Quick Solution! – Turn on device encryption
Here is a quick solution for our active and speedy learners. Follow these steps to enable and configure BitLocker on Windows 11/10:
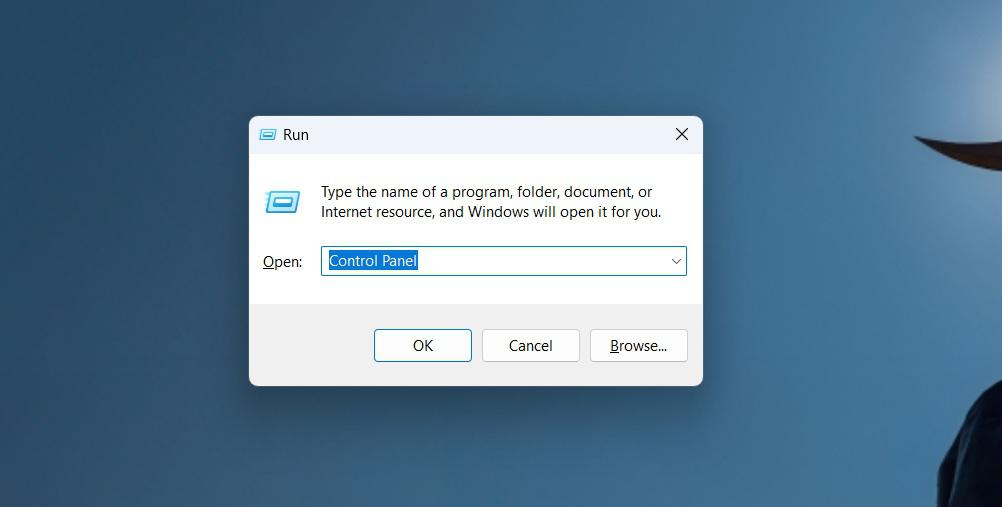
- Press Windows key + R, type “Control Panel,” then press Enter.
- Navigate to “System and Security” > “BitLocker Drive Encryption” in the Control Panel.
- In the section called “Operating system drive,” right-click “Turn on BitLocker.”
- Choose a recovery key backup option like “Save to your Microsoft account.”
- Click “Next.”
- Select “Encrypt used disk space only.”
- Click “Next.”
- Choose the “New encryption mode” option.
- Click “Next.”
- (Optional) Select “Run BitLocker system check.”
- Click “Restart now.”
The BitLocker is preinstalled on hard drives to secure data from unauthorized access by encryption. It provides two approaches hardware-based encryption that employs a Trusted Platform Module (TPM) chip and software-based encryption that requires a password or USB flash drive as an authentication token.
BitLocker safeguards installation drives, secondary storage media, and removable media with “BitLocker To Go”. Encryption features on Windows devices have existed since the Windows 2000 operating system and have progressed to include entire drives as well as portable drives.
Enable BitLocker encryption on Windows
In this article, we will show you how to enable and configure BitLocker on Windows.
How to Check If Device Has TPM Support to Use BitLocker?
If you’re wondering whether your computer can use BitLocker encryption on Windows 11 or 10, you first need to check if it has TPM support. TPM, or Trusted Platform Module, is a hardware component that provides extra security features.
Here’s how to check:
Step 1: To launch the Run dialog box, press Windows Key + R.
Step 2: Type tpm.msc and press Enter. The TPM Management console will open.
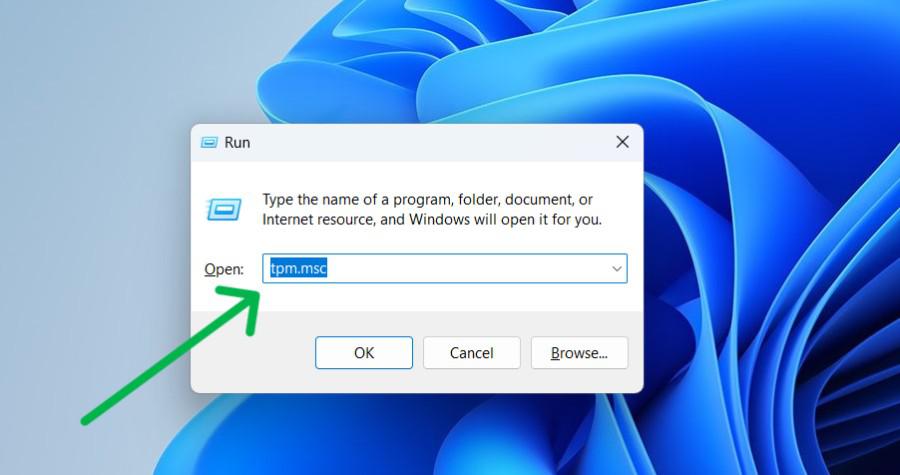
Step 3: Your device will display details about the TPM version and its status if it supports TPM. If it doesn’t, a message stating “Compatible TPM cannot be found” will appear.
If you find TPM listed in Device Manager and it’s version 1.2 or higher, congratulations! Your device supports BitLocker encryption. If not, you might need to enable TPM in BIOS or consider alternative encryption methods.
How To Enable (Hardware) BitLocker On System Drive?
Enabling BitLocker on your system drive, which contains your operating system and important files, is a smart way to protect your data. Follow these simple steps to activate BitLocker on your Windows 11 or 10 system:
Step 1: Press Win + R then on run dialog type “Control Panel” hit Enter button
Step 2: Go to “System and Security” > “BitLocker Drive Encryption“.
Step 3: Under the “Operating system drive” section, click the on “Turn on BitLocker” option.
-BitLocker-On-System-Drive.jpg)
Step 4: Select the option to backup the recovery key, such as “Save to your Microsoft account.”
Step 5: Click the Next button.
Step 6: Select the “Encrypt used disk space only” checkbox.
-BitLocker-On-System-Drive-1.jpg)
Step 7: Click the Next button.
Step 8: Choose the “New encryption mode” option.
Step 9: Click the Next button.
(Optional) Select the “Run BitLocker system check” option.
Step 10: Click the Restart now button.
That’s it! Your system drive is now protected by BitLocker encryption, helping to keep your data safe from unauthorized access.
How To Enable (Software) BitLocker on the Operating System Drive?
Step 1: Press Win + R on run dialog type “gpedit.msc” hit enter button
Step 2: In Group policy editor, Navigate to this path
Computer Configuration > Administrative Templates > Windows Components > BitLocker Drive Encryption > Operating System Drives
Step 3: Double-click the “Require additional authentication at startup” policy.
Step 4: Choose the Enabled option.
Step 5: Ensure that you enable the “Allow BitLocker without a compatible TPM (requires a password or a startup key on a USB flash drive)” option.
-BitLocker-On-The-Operating-System-Drive.jpg)
How to Enable BitLocker on Fixed Data Drive on Windows 11?
If you’re using Windows 11 and want to secure your data on a fixed drive (like your internal hard drive), BitLocker can help.
Here’s how to set it up:
Step 1: Press Win + R then on run dialog type “Control Panel” hit Enter button
Step 2: Navigate to “System and Security” > “BitLocker Drive Encryption” in the Control Panel.
Step 3: Under the “Operating system drive” section, click the on “Turn on BitLocker” option.
Step 4: Choose the “Use a password to unlock the drive” checkbox.
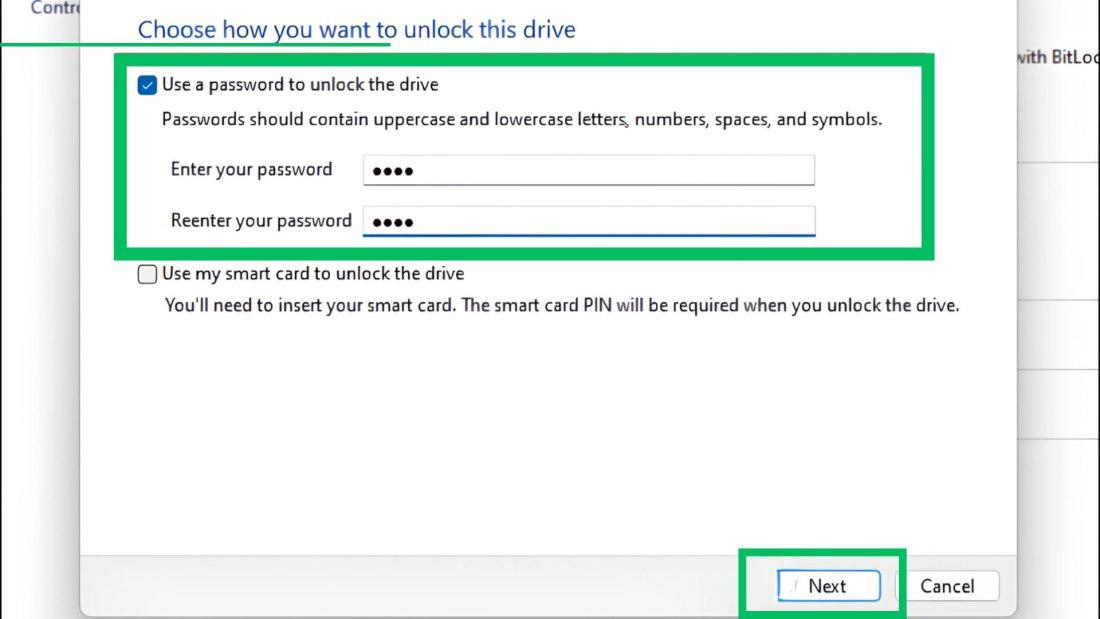
Step 5: Create and confirm the password to unlock the BitLocker drive then Click on the next button.
Step 6: Choose the option to save the recovery key.
- Save to your Microsoft Account.
- Save to a USB flash drive.
- Save as a file.
- Print the recovery.
Select the option to backup the recovery key, such as “Save to your Microsoft account.”
Step 7: Click the next button.
Step 8: Select the “Encrypt used disk space only” checkbox.
Step 9: Click the Next button then choose the “New encryption mode” option.
Step 10: Click the Next button then click on the Start encrypting button.
Step 11: Click the Close button.
That’s it! Your fixed data drive is now encrypted with BitLocker, helping to keep your data safe from unauthorized access.
How To Enable BitLocker To Go On Removable Drives?
If you want to keep your USB drives or external hard disks safe, you can use BitLocker to encrypt them. Here’s how to do it:
Step 1: Press Win + R then on run dialog type “Control Panel” hit Enter button
Step 2: In the Control Panel, go to “System and Security” > BitLocker Drive Encryption.
Step 3: Under the “BitLocker To Go” section, click the on “Turn on BitLocker” option.
Step 4: Choose the “Use a password to unlock the drive” checkbox.
Step 5: Create and confirm the password to unlock the BitLocker drive then Click on the next button.
Step 6: Choose the option to save the recovery key.
- Save to your Microsoft Account.
- Save to a USB flash drive.
- Save as a file.
- Print the recovery.
Select the option to backup the recovery key, such as “Save to your Microsoft account.”
Step 7: Click the next button.
Step 8: Select the “Encrypt used disk space only” checkbox.
Step 9: Click the Next button then choose the “Compatibility mode” option.
Step 10: Click the Next button then click on the Start encrypting button.
Step 11: Click the Close button.
That’s it! Your removable drive is now encrypted with BitLocker, keeping your files safe from prying eyes.
How To Disable BitLocker On Windows?
If you’ve encrypted your Windows computer using BitLocker and now need to turn it off, follow these simple steps:
Step 1: Press Win + R then on run dialog type “Control Panel” hit Enter button
Step 2: In the Control Panel, go to “System and Security” > BitLocker Drive Encryption.
Step 3: Choose the drive to disable BitLocker encryption.
Step 4: Click on the “Turn off BitLocker” option.
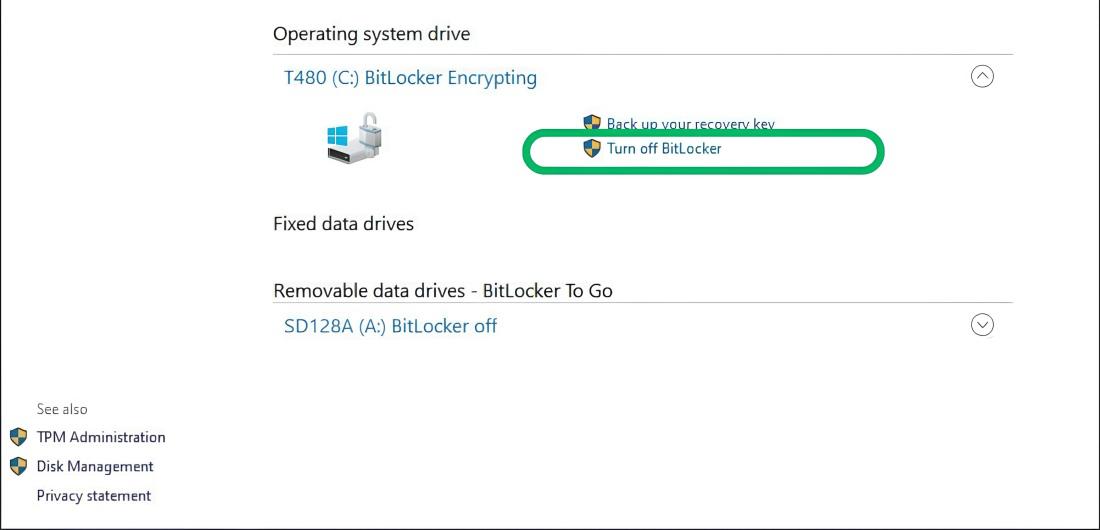
That’s it! BitLocker should now be disabled on your Windows computer, and you can access your drive without encryption.
Conclusion
In conclusion, BitLocker is a powerful tool that adds an extra layer of security to your Windows computer by encrypting your drives. By following the steps outlined in this guide, you can easily enable and configure BitLocker on Windows 11/10. Enabling BitLocker ensures that your sensitive data remains protected from unauthorized access, whether it’s stored on your hard drive or a removable storage device. With BitLocker, you can have peace of mind knowing that even if your device falls into the wrong hands, your data will remain safe and secure.
Moreover, configuring BitLocker allows you to customize settings such as encryption strength and recovery options, giving you control over how your data is protected. In today’s digital age, data security is more important than ever. With BitLocker, you can encrypt your drives with ease, ensuring that your information stays private and confidential. So why wait? Take control of your data security today with BitLocker on Windows 11/10.
How to Enable BitLocker on Windows 11?
To enable BitLocker on the operating system drive, follow these steps:
Press Win + R, type “Control Panel,” and hit Enter. Then, navigate to “System and Security” > “BitLocker Drive Encryption.” Click on “Turn on BitLocker,” choose a recovery key backup option, select your encryption preferences, and follow the prompts.
Why can’t I find BitLocker on my computer Windows 11?
BitLocker available on Windows Pro, Enterprise, Education; not on Windows 11 Home. Device encryption on specific devices like Surface Pro 9, Laptop 5. Requires TPM chip; check BIOS/UEFI. Windows 11 Home has limited device encryption.
How to get the BitLocker recovery key through Command Prompt in Windows 11/10?
Follow these steps to get recovery key through Command Prompt
- Type ‘powershell’ in the search bar and select it.
- Enter ‘Get-BitLockerVolume’ and press Enter.
- Note the Volume ID of the encrypted drive needing the recovery key.
- Enter ‘manage-bde -protectors -get [VolumeId]’ in PowerShell, replacing ‘[VolumeId]’ with the actual Volume ID.
- The BitLocker recovery key will be displayed.
How do I configure BitLocker on Windows 11?
Enable BitLocker on Windows 11:
- Pro & Enterprise: Search for “BitLocker Drive Encryption” and follow the on-screen instructions. Choose a strong password and back up your recovery key!
- Windows 11 Home (limited): Search for “Device encryption” in Settings and turn it on if available. This offers some protection, but not as robust as BitLocker.
Is BitLocker enabled by default on Windows 11?
No, BitLocker is not enabled by default on Windows 11, even in Pro and Enterprise editions where it’s available. You’ll need to manually configure it to activate the full drive encryption features.
How do I know if BitLocker is enabled Windows 11?
Two quick checks to see if BitLocker is on in Windows 11:
- File Explorer: Open it and look for a “BitLocker Drive Encryption” column. “On” means BitLocker is active.
- Run Command: Press Windows key + R, type
manage-bde and press Enter. See the “Encryption Status” column. “On” means BitLocker is on.
Share your thoughts in the comments
Please Login to comment...