Generate a PDF in Django
Last Updated :
25 Sep, 2023
With the correct frameworks and an organized approach, it is simple to generate PDF files in a Django web application using Python. Following the techniques indicated in this article, you may enable users to download data in these popular formats, improving the usability and functionality of your Django application.
Generating a PDF file in Python and Django
Step 1: Create a Virtual Environment.
Step 2: Create a new Django project and app, and move to the folder.
django-admin startproject test_project
cd test_project
python manage.py startapp test
Step 3: Register your app
Step 4: Create views.py
Here is the code explanation of the views:
- Import necessary modules.
- home function: It is a simple input form which take Title, Author and, Publish Year as an Input, that is saved in the database.
- generate_pdf function: This view function is called when a user requests a PDF. It uses generate_pdf_file to create a PDF and returns it as a downloadable attachment with the filename “book_catalog.pdf.”
- generate_pdf_file function: Imports BytesIO from io to create an in-memory buffer for the PDF. Initializes a PDF canvas (p) on the buffer. Retrieves all books from the Book model. Adds “Book Catalog” as the PDF title at coordinates (100, 750). Iterates through the books: Adds book details (title, author, year) to the PDF at decreasing Y-coordinates. Each book’s details are printed with a vertical offset of -20 units. Calls showPage() to end the current page and save() to finish creating the PDF. The buffer is reset and returned. It now contains the PDF content.
Python3
from django.http import FileResponse
from reportlab.pdfgen import canvas
from .models import Book
from django.shortcuts import redirect, render
from .forms import BookForm
def home(request):
if request.method == 'POST':
form = BookForm(request.POST)
if form.is_valid():
form.save()
return redirect('home')
else:
form = BookForm()
return render(request, 'myapp/create_user_profile.html',
{'form': form})
def generate_pdf(request):
response = FileResponse(generate_pdf_file(),
as_attachment=True,
filename='book_catalog.pdf')
return response
def generate_pdf_file():
from io import BytesIO
buffer = BytesIO()
p = canvas.Canvas(buffer)
books = Book.objects.all()
p.drawString(100, 750, "Book Catalog")
y = 700
for book in books:
p.drawString(100, y, f"Title: {book.title}")
p.drawString(100, y - 20, f"Author: {book.author}")
p.drawString(100, y - 40, f"Year: {book.publication_year}")
y -= 60
p.showPage()
p.save()
buffer.seek(0)
return buffer
|
Step 5: Create model.py
This code represents a simple Django model for storing information about books, including their title, author, and publication year.
Python3
from django.db import models
class Book(models.Model):
title = models.CharField(max_length=100)
author = models.CharField(max_length=100)
publication_year = models.PositiveIntegerField()
def __str__(self):
return self.title
|
Step 6: Create a form.py
This code sets up a Django form, BookForm, that is connected to the Book model and includes specific fields for creating or editing book instances with title, author, and publication year attributes.
Python3
from django import forms
from .models import Book
class BookForm(forms.ModelForm):
class Meta:
model = Book
fields = ['title', 'author', 'publication_year']
|
Step 7: Create test/urls.py
This is to set in the URLs of the app.
Python3
from django.urls import path
from . import views
urlpatterns = [
path('', views.home, name='home'),
path('generate-pdf/', views.generate_pdf, name='generate_pdf'),
]
|
Step 8: Update urls.py
This is to set in the Urls of the project folder.
Python3
from django.contrib import admin
from django.urls import path, include
urlpatterns = [
path('admin/', admin.site.urls),
path('', include('test.urls')),
]
|
Step 9: Create a templates/create_user_profile.html
HTML
<!DOCTYPE html>
<html lang="en">
<head>
<meta charset="UTF-8">
<title>Generate PDF</title>
</head>
<body>
<h1>Generate and Download PDF</h1>
<h2>Add a New Book</h2>
<form method="post">
{% csrf_token %}
{{ form.as_p }}
<button type="submit">Add Book</button>
</form>
<p><a href="{% url 'generate_pdf' %}" download>Download Book Catalog (PDF)</a></p>
<br>
</body>
</html>
|
Step 10: Apply Migration
By the following commands you can migrate the data into the database.
python manage.py makemigrations
python manage.py migrate
Deploy project
python manage.py runserver
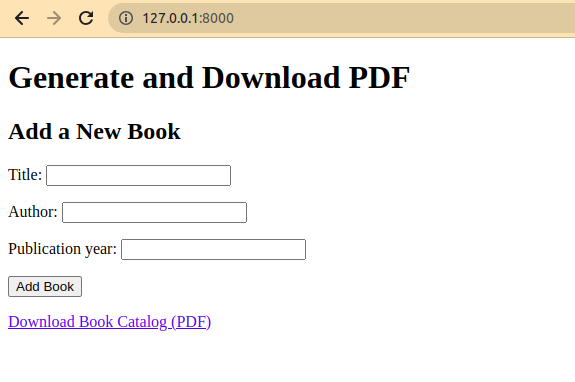
Output: Input form
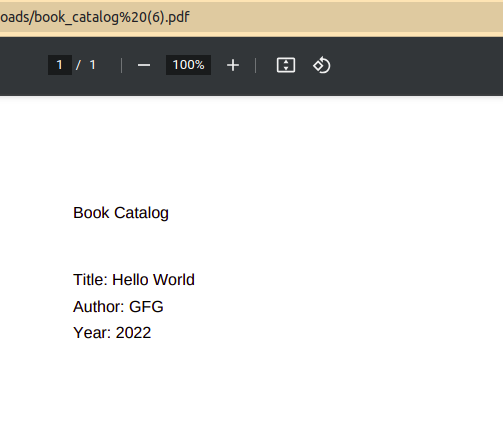
The downloaded PDF
Share your thoughts in the comments
Please Login to comment...