Angular CLI | Angular Project Setup
Last Updated :
22 Mar, 2024
Angular is the most popular front-end framework for building dynamic web applications. It uses typescript by default for creating logics and methods for a class but the browser doesn’t know typescript.
Setting up an Angular project from scratch can be a task, especially for beginners. here, the Angular Command Line Interface (CLI) comes into picture, serving as a powerful tool to streamline the project setup process and enhance developer productivity. Webpack is used to compile these typescript files to JavaScript. In addition, there are so many configuration files you will need to run an angular project on your computer.
Angular CLI is a tool that does all these things for you in some simple commands. Angular CLI uses webpack behind to do all this process.
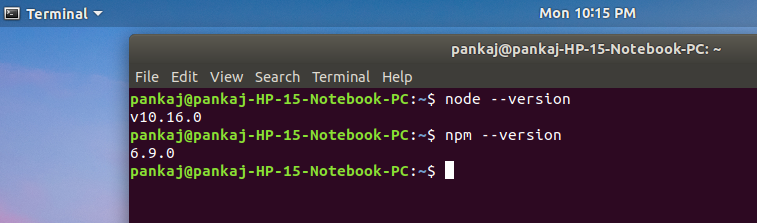
Note: Please make sure you have installed node and npm in your system. You can check your node version and npm version by using the following command:
node --version
npm --version
Steps to Create your first application using angular CLI
Step-1: Install angular cli
npm install - g @angular/cli

Step-2: Create new project by this command Choose yes for routing option and, CSS or SCSS.
ng new myNewApp


Step-3: Go to your project directory
cd myNewApp

Step-4: Run server and see your application in action
ng serve -o --poll=2000

Output: Below Image shows the default angular app output.

Folder structure:
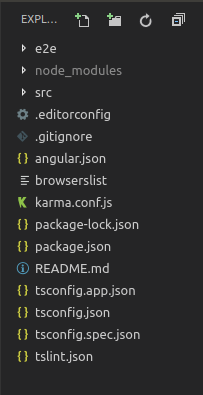
- e2e It contains the code related to automated testing purpose. For example, if on a certain page you are calling a REST API then what should be the return status code, whether it is acceptable or not etc.
- node_modules It saves all the dev dependencies (used only at development time) and dependencies (used for development as well as needed in production time), any new dependency when added to project it is automatically saved to this folder.
- src This directory contains all of our work related to project i.e. creating components, creating services, adding CSS to the respective page, etc.
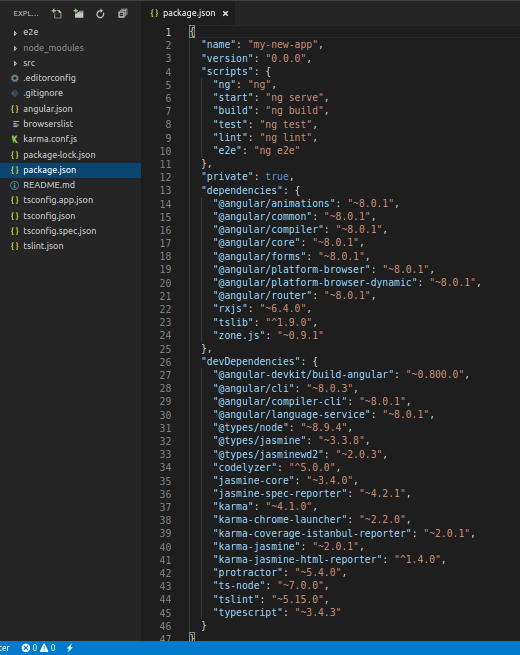
- package.json This file stores the information about the libraries added and used in the project with their specified version installed. Whenever a new library is added to the project it’s name and version is added to the dependencies in package.json.
Other files:
As a beginner you don’t need these files at this time, don’t bother about that. These all are used for editor configurations and information needed at compile time. The builtin webpack in angular CLI manages all for you.
Inside src folder:
- index.html This is the entry point for the application, app-root tag is the entry point of the application on this single page application, on this page angular will add or remove the content from the DOM or will add new content to the DOM. Base href=”/” is important for routing purposes.
html
<!DOCTYPE HTML>
<html lang="en">
    <head>
        <meta charset="utf-8">
        <title>MyNewApp</title>
        <base href="/">

        <meta name="viewport" content="width=device-width, initial-scale=1">
        <link rel="icon" type="image/x-icon" href="favison.ico">
    </head>
    <body>
        <app-root></app-root>
    </body>
</html>
- style.scss This file is the global stylesheet you can add that CSS classes or selectors which are common to many components, for example, you can import custom fonts, import bootstrap.css, etc.
- assets It contains the js images, fonts, icons and many other files for your project.
Inside app folder:
- app.module.ts An angular project is composite of so many other modules in order to create an application you have to create a root module for your application in the hierarchy. This app.module.ts file is that. If you want to add more modules at the root level, you can add.
- declarations It is the reference of the array to store its components. The app component is the default component that is generated when a project is created. You have to add all your component’s reference to this array to make them available in the project.
- imports If you want to add any module whether angular or you have to add it to imports array to make them available in the whole project.
- providers If you will create any service for your application then you will inject it into your project through this provider array. Service injected to a module is available to it and it’s child module in the project hierarchy.
- bootstrap This has reference to the default component created, i.e., AppComponent
- app.component.html Edit this file to make changes to the page. You can edit this file as an HTML file. Work directly with div or any other tag used inside body tags, these are components and do not add html head body tags.
html
<h1>
    Hello world
</h1>

<div>
    <p>
        This is my First Angular app.
    </p>
</div>
- app.component.spec.ts These are automatically generated files which contain unit tests for source component.
- app.component.ts You can do the processing of the HTML structure in the .ts file. The processing will include activities such as connecting to the database, interacting with other components, routing, services, etc.
- app.component.scss Here you can add CSS for your component. You can write scss which further compiled to CSS by a transpiler.
More commands that you will need while working on the project:
ng generate component component_name
ng generate service service_name
ng generate directive directive_name
Share your thoughts in the comments
Please Login to comment...