Spring – SimpleJDBCTemplate with Example
Last Updated :
06 Feb, 2023
The SimpleJDBCTemplate includes all the features and functionalities of JdbcTemplate class and it also supports the Java5 features such as var-args(variable arguments) and autoboxing. Along with JdbcTemplate class, it also provides the update() method which takes two arguments the SQL query and arbitrary arguments which depend upon the SQL query. In order to access the methods of the old JdbcTemplate class, we use the getJdbcOperations() method and we call all those methods over SimpleJdbcTemplate.
Note: We need to pass the parameters inside the update() method in the same order we defined them in parameterized query.
Syntax for update() method of SimpleJDBCTemplate class:
int update(String sqlQuery, Object parameters)
Example
In this example, we will update a student’s details using the update() method of SimpleJDBCTemplate class. For this tutorial, we will be using the following schema for the Student table.
Student(id INT, name VARCHAR(45), department VARCHAR(45))
Step By Step Implementation
Step 1: Create Table
In this step, we will create a Student table to store students’ information. For this tutorial, we will assume you have created the following table in your database.
CREATE TABLE STUDENT(
id INT,
name VARCHAR(45),
department VARCHAR(45));
After creating the table we will insert the following data in our table.
INSERT INTO STUDENT VALUES(1, "geek", "computer science");
Step 2: Adding dependencies
In this step, we will add the maven dependencies to our application. Add the following dependencies to your pom.xml
Note: Spring 3 JDBC supports SimpleJDBCTemplate class and Java5 features
XML
<modelVersion>4.0.0</modelVersion>
<groupId>com.geeksforgeeks</groupId>
<artifactId>SimpleJDBCTemplate</artifactId>
<version>0.0.1-SNAPSHOT</version>
<dependencies>
<dependency>
<groupId>org.springframework</groupId>
<artifactId>spring-jdbc</artifactId>
<version>3.0.0.RELEASE</version>
</dependency>
<dependency>
<groupId>org.springframework</groupId>
<artifactId>spring-context</artifactId>
<version>5.0.8.RELEASE</version>
</dependency>
<dependency>
<groupId>mysql</groupId>
<artifactId>mysql-connector-java</artifactId>
<version>5.1.44</version>
</dependency>
</dependencies>
</project>
|
Step 3: Create a model class
Now, we will create a model class for our students. This class will have three-member variables id, name, and department. We will also define its constructors, getters and setters methods, and toString() method.
Java
public class Student {
private int id;
private String name;
private String department;
public Student(){}
public Student(int id, String name, String department) {
super();
this.id = id;
this.name = name;
this.department = department;
}
public int getId() {
return id;
}
public void setId(int id) {
this.id = id;
}
public String getName() {
return name;
}
public void setName(String name) {
this.name = name;
}
public String getDepartment() {
return department;
}
public void setDepartment(String department) {
this.department = department;
}
@Override
public String toString() {
return "Student [id=" + id + ", name=" + name + ", department=" + department + "]";
}
}
|
Step 4: Create a DAO class
In this step, we will create a StudentDao.java class. In this class, we will define SimpleJdbcTemplate and update() method and provide its definition to update our data.
Java
import org.springframework.jdbc.core.simple.SimpleJdbcTemplate;
import com.geeksforgeeks.model.Student;
public class StudentDao{
private SimpleJdbcTemplate simpleJdbcTemplate;
public StudentDao(SimpleJdbcTemplate simpleJdbcTemplate) {
super();
this.simpleJdbcTemplate = simpleJdbcTemplate;
}
public int update(Student student) {
String sqlQuery = "UPDATE student SET name=? WHERE id=?";
return simpleJdbcTemplate.update(sqlQuery, student.getName(), student.getId());
}
}
|
Step 5: Bean Configuration
In this step, we will create the spring configuration file and name it application-context.xml. In order to make a connection to the database, we need the following information username, password, database connection, URL, and the driver class name. All this information is contained in the DriverManagerDataSource class, it has the getConnection() method which returns a connection of java type. We are using the instance of SimpleJdbcTemplate in our StudentDao class and passing it using the constructor injection method.
XML
<?xml version="1.0" encoding="UTF-8"?>
<beans
<bean id="dataSource" class="org.springframework.jdbc.datasource.DriverManagerDataSource">
<property name="driverClassName" value="com.mysql.jdbc.Driver" />
<property name="username" value="root" />
<property name="password" value="root" />
</bean>
<bean id="simpleJdbcTemplate" class="org.springframework.jdbc.core.simple.SimpleJdbcTemplate">
<constructor-arg ref = "dataSource"></constructor-arg>
</bean>
<bean id="studentDao" class="com.geeksforgeeks.dao.StudentDao">
<constructor-arg><ref bean = "simpleJdbcTemplate"/></constructor-arg>
</bean>
</beans>
|
Note: In application-context, you need to define the whole path of your dao class
Step 6: Creating Utilities Class
Now, we will create a Utility class for testing our application. For this create a new class and name it TestSimpleJDBCTemplate.java and add the following code to it.
Java
import org.springframework.core.io.Resource;
import org.springframework.beans.factory.BeanFactory;
import org.springframework.beans.factory.xml.XmlBeanFactory;
import org.springframework.core.io.ClassPathResource;
import com.geeksforgeeks.dao.StudentDao;
import com.geeksforgeeks.model.Student;
public class TestSimpleJDBCTemplate {
public static void main(String[] args) {
Resource resource=new ClassPathResource("application-context.xml");
BeanFactory factory=new XmlBeanFactory(resource);
StudentDao studentDao = (StudentDao)factory.getBean("studentDao");
int res = studentDao.update(new Student(1, "Rohan", "computer science"));
System.out.println(res);
}
}
|
Output:
Now, we will run our application. If the update() method will return 1 it means the query is executed successfully otherwise not.
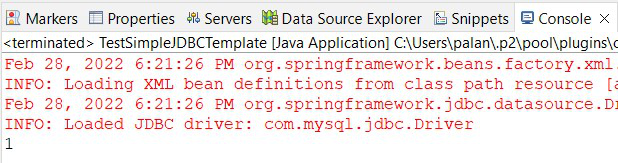
Fig 1 – Console Output
We will also cross-check it by executing the query at the database. We have created a student table and inserted the following data 1, “geek”, “computer science” respectively.
SELECT * FROM student;
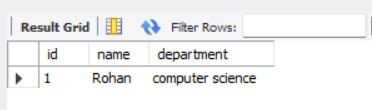
Fig 2 – Database Output
Share your thoughts in the comments
Please Login to comment...