Spring – FactoryBean
Last Updated :
14 Feb, 2023
Spring is one of the most popular Java EE frameworks. It is an open-source lightweight framework that allows Java EE 7 developers to build simple, reliable, and scalable enterprise applications. This framework mainly focuses on providing various ways to help you manage your business objects. It made the development of Web applications much easier than compared to classic Java frameworks and application programming interfaces (APIs), such as Java database connectivity (JDBC), JavaServer Pages(JSP), and Java Servlet. This framework uses various new techniques such as Aspect-Oriented Programming (AOP), Plain Old Java Object (POJO), and dependency injection (DI), to develop enterprise applications.
Spring container has two types of beans:
- Ordinary bean – By default used by the Spring.
- Factory bean – Used to produce beans(objects) that are managed by the Spring framework.
Factory Bean is a bean that acts as a factory for creating other beans and instantiating them with the Spring IOC container. Factory beans are mostly used to implements the framework facilities and hence they are framework-specific and can not be used outside the scope of spring IOC containers. For eg:
- JndiObjectFactoryBean – Used to lookup data sources from JNDI
- ProxyFactoryBean – Used to create a proxy for a bean using AOP
How to create a factory bean?
- We can create a factory bean we need to implement the FactoryBean interface by our(user-defined) bean which will create the other beans that are meant to return by the factory bean.
- A simple method is to extend the AbstractFactoryBean class. We are required to override the createInstance() method using factory bean to create the instances to the target beans. After that, we need to return the type of target beans using getObjectType() method.
- getObjectType() – This method will return the type of object produced by the factory bean.
Example
In this example, we will be creating a factory bean that will produce different types of student beans depending on their departments with their id, first_name, and last_name as per-populated data.
Step 1: Create a Maven Project
In this step, we will create a new maven project and make sure you will Create a simple project(skip archetype selection).
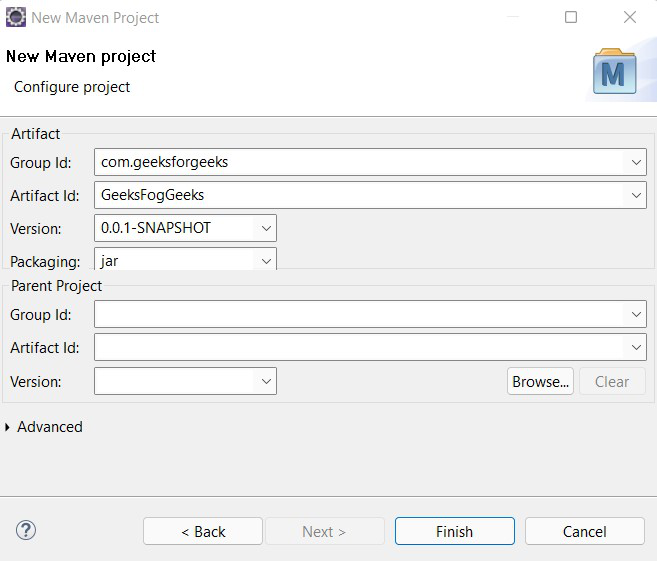
Fig 1 – Maven Project Details
Step 2: Adding Dependencies
Now we will add the maven dependencies to our application. Add the following dependencies to your pom.xml
XML
<modelVersion>4.0.0</modelVersion>
<groupId>com.geeksforgeeks</groupId>
<artifactId>GeeksForGeeks</artifactId>
<version>0.0.1-SNAPSHOT</version>
<dependencies>
<dependency>
<groupId>org.springframework</groupId>
<artifactId>spring-beans</artifactId>
<version>5.0.8.RELEASE</version>
</dependency>
<dependency>
<groupId>org.springframework</groupId>
<artifactId>spring-context</artifactId>
<version>5.0.8.RELEASE</version>
</dependency>
</dependencies>
</project>
|
Step 3: Create A Model(Bean) Class
In this step, we will create a model class Student.java for our application. This class will have id, first_name, last_name, and department as the member variables. We will create its getter and setters method and will provide a toString() method definition.
Java
public class Student {
private int id;
private String first_name;
private String last_name;
private String department;
public int getId() { return id; }
public void setId(int id) { this.id = id; }
public String getFirst_name() { return first_name; }
public void setFirst_name(String first_name)
{
this.first_name = first_name;
}
public String getLast_name() { return last_name; }
public void setLast_name(String last_name)
{
this.last_name = last_name;
}
public String getDepartment() { return department; }
public void setDepartment(String department)
{
this.department = department;
}
@Override public String toString()
{
return "Student [id=" + id + ", first_name="
+ first_name + ", last_name=" + last_name
+ ", department=" + department + "]";
}
}
|
Step 4: Create StudentFactoryBean class
In this step, we will create a FactoryBean class that will extend AbstractFactoryBean class and we need to also implement its methods createInstance() and getObjectType().
Java
import org.springframework.beans.factory.config.AbstractFactoryBean;
import com.gfg.model.Student;
public class StudentFactoryBean extends AbstractFactoryBean<Object>{
private String department;
public String getDepartment() {
return department;
}
public void setDepartment(String department) {
this.department = department;
}
@Override
public Class<Student> getObjectType() {
return Student.class;
}
@Override
protected Object createInstance() throws Exception {
Student student = new Student();
student.setId(1);
student.setFirst_name("geeks");
student.setLast_name("geeks");
student.setDepartment(department);
return student;
}
@Override
public String toString() {
return "StudentFactoryBean [department=" + department + "]";
}
}
|
Step 5: Bean Configuration
In this step, we will create a spring configuration file and name it application-context.xml. We will configure our beans and use the property tag of the bean element to set the value of the student’s department. (Note: In application-context, you need to define the whole path of your factory bean class)
XML
<?xml version="1.0" encoding="UTF-8"?>
xsi:schemaLocation="
<bean id="CSE" class="com.gfg.factory.StudentFactoryBean">
<property name="department" value="Computer Science Department"></property>
</bean>
</beans>
|
Step 6: Creating Utilities Class
Now, we will create a Utility class for testing our factory bean method. For this create a new class and name it as TestSpringFactoryBean.java and add the following code to it.
Java
import org.springframework.context.support.AbstractApplicationContext;
import org.springframework.context.support.ClassPathXmlApplicationContext;
import com.gfg.model.Student;
public class TestSpringFactoryBean {
@SuppressWarnings("resource")
public static void main(String []args) throws Exception {
AbstractApplicationContext context = new ClassPathXmlApplicationContext("application-context.xml");
Student computer_student = (Student)context.getBean("CSE");
System.out.println(computer_student.toString());
}
}
|
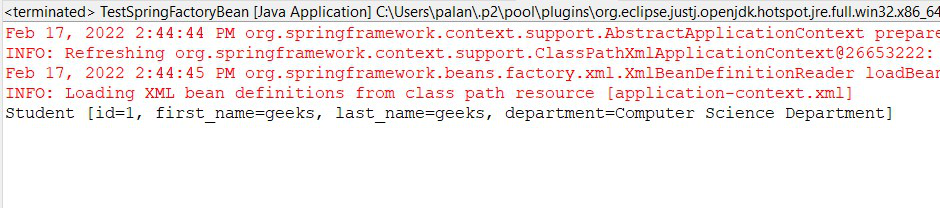
Output:
Now, we will run our application.
Share your thoughts in the comments
Please Login to comment...