In Spring Boot, Spring Cloud Bus is the lightweight event bus framework that can be provided by the Spring Cloud, and it can enable the communication and coordination between the microservices or the disturbed system by providing the mechanism for transmitting messages across the system. Spring Cloud Bus is built on top of the Spring Cloud Stream, and it is typically used in conjunction with Spring Boot applications.
Key Terminologies:
- Spring Cloud Bus: This is a lightweight event bus tool that the Spring Cloud project can provide for communication and communication between microservices or distributed systems.
- Message broker: This is the part of the middleware that is responsible for receiving, storing, and transmitting messages between the sender and receiver of applications Spring Cloud Bus uses a messaging protocol such as RabbitMQ or Kafka to distribute messages throughout the system.
- Spring Cloud Stream: This framework is used to create event-driven microservices with generic abstractions in the message center and Spring Cloud Bus on top of Spring Cloud Stream.
- Configuration Refresh: The process of updating application configurations dynamically without requiring a restart. It can enable configuration refresh by broadcasting configuration changes to all instances of the microservice.
- State Propagation: The dissemination of the state changes across the distributed system. Spring Cloud Bus facilitates state propagation by allowing microservices to subscribe to and react to the state change events.
Example Project:
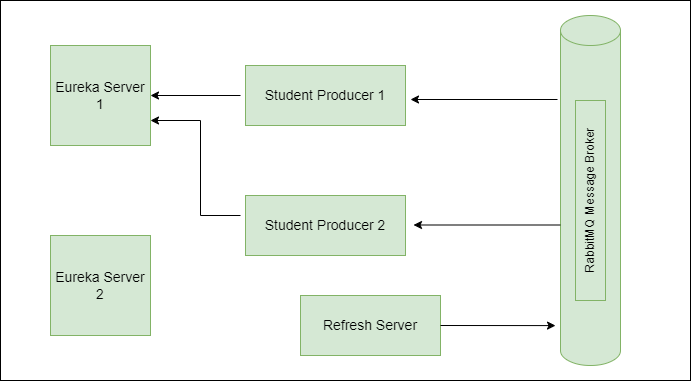
We can develop the simple microservice application of the services named as the student-producer-1 and student-producer-2 and these are connected with eureka-server-1 and refresh-service connected with the RabbitMQ message broker after that refresh the properties through the message then two service will connect to eureka-server-2 then it will be achieved through the spring cloud bus. Refer the below image for better understanding.
If we observe the first image, then the two students’ services are connected to the eureka server 1 and rabbitmq message is connect with the student service and refresh service.
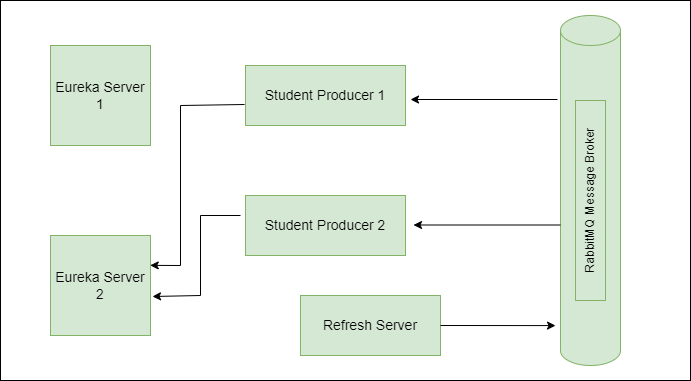
If we observe the image 2, then the two students’ services are connected to the eureka server 2 without restart the application. It will implement through the refresh service and can refresh the properties of the students through the rabbitmq message broker.
Implementation of Spring Cloud Bus
First of all, we need to install the rabbitmq server then it runs the server using the below command then the rabbitmq server will start.
RabbitMQ Server:
rabbitmq-server.bat
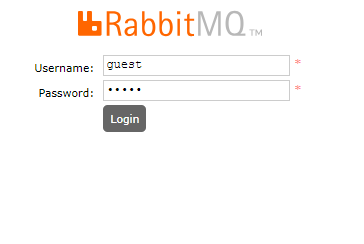
If we want to login the rabbitmq server then username and password will be guest enter and login into the dashboard. Once the rabbitmq server configuration is complete successfully.
Eureka-Server-1:
Step 1: We will create a spring boot project named Eureka-server-1. On creating the project, include the below dependencies into the project.
Dependencies:
- Eureka Server
- Spring Web
- Spring Dev Tools
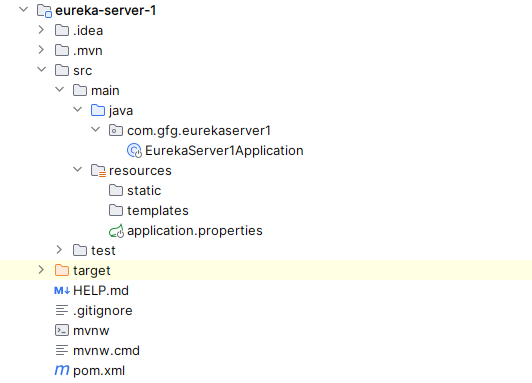
Once created the project then the image structure looks like the below image.
Step 2: Open the application.properties file and put the below code for the eureka server configuration.
# application.properties for Eureka Server 1
server.port=8095
eureka.instance.hostname=localhost
Step 3: Open the main class add the @EnableEurekaServer annotation for the enabling the eureka server for the spring project.
Java
package com.gfg.eurekaserver1;

import org.springframework.boot.SpringApplication;
import org.springframework.boot.autoconfigure.SpringBootApplication;
import org.springframework.cloud.netflix.eureka.server.EnableEurekaServer;

/**
 * Entry point for the Eureka Server 1 application.
 */
@SpringBootApplication
@EnableEurekaServer
public class EurekaServer1Application {

    /**
     * Main method to start the Eureka Server 1 application.
     *
     * @param args the command-line arguments
     */
    public static void main(String[] args) {
        SpringApplication.run(EurekaServer1Application.class, args);
    }

}
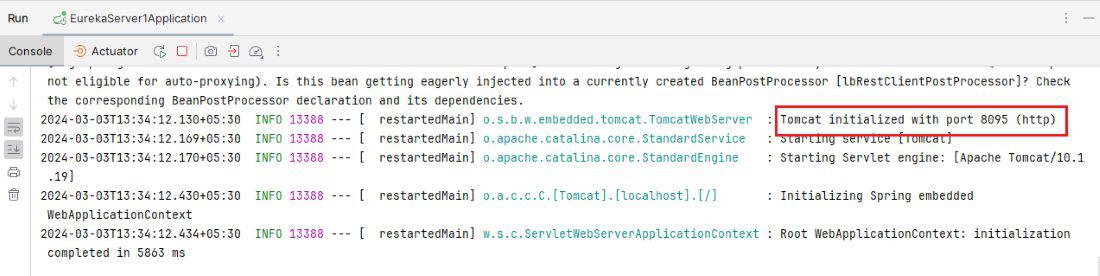
Step 4: Once complete the project, then run the project as spring project, once runs successfully, then server can start at port 8095. Refer the below output image for the better understanding.
Eureka-server-2:
Step 1: We will create a spring boot project named Eureka-server-2. On creating the project, include the below dependencies into the project.
Dependencies:
- Eureka Server
- Spring Web
- Spring Dev Tools
Once created the project then the image structure looks like the below image.

Step 2: Open the application.properties file and put the below code for the eureka server configuration.
# application.properties for Eureka Server 1
server.port=8095
eureka.instance.hostname=localhost
Step 3: Open the main class add the @EnableEurekaServer annotation for the enabling the eureka server for the spring project.
Java
package com.gfg.eurekaserver2;

import org.springframework.boot.SpringApplication;
import org.springframework.boot.autoconfigure.SpringBootApplication;
import org.springframework.cloud.netflix.eureka.server.EnableEurekaServer;

/**
 * Entry point for the Eureka Server 2 application.
 */
@SpringBootApplication
@EnableEurekaServer
public class EurekaServer2Application {

    /**
     * Main method to start the Eureka Server 2 application.
     *
     * @param args the command-line arguments
     */
    public static void main(String[] args) {
        SpringApplication.run(EurekaServer2Application.class, args);
    }

}
Step 4: Once complete the project, then run the project as spring project, once it runs successfully, then server can start at port 8096. Refer the below output image for the better understanding.
.jpg)
Student-producer-1:
Step 1: Create the spring project and it named as the student-producer-1 on creating the project add the below dependencies into the project.
Dependencies:
- Eureka Server Client
- Spring Web
- RabbitMQ Server
- Spring Cloud Bus
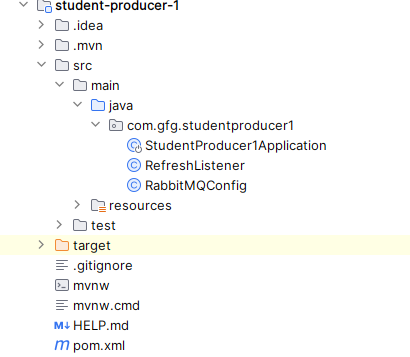
Once create the project then the file structure looks like the below image.
Step 2: Open the application.properties file and put the below code for the eureka client and rabbitmq message configuration of the spring project.
# Server port and application name
server.port=8081
spring.application.name=student-producer
# Eureka Client configuration
eureka.client.service-url.defaultZone=http://localhost:8096/eureka
# RabbitMQ connection properties
spring.rabbitmq.host=localhost
spring.rabbitmq.port=5672
spring.rabbitmq.username=guest
spring.rabbitmq.password=guest
# Queue name
spring.rabbitmq.queue-name=refresh-queue
Step 2: Create the new Java class and it named as the RabbitMQConfig and it configure the rabbitmq message broker of the student producer 1 service.
Go to src > studentproducer1 > RabbitMQConfig and put the below code.
Java
package com.gfg.studentproducer1;

import org.springframework.context.annotation.Bean;
import org.springframework.context.annotation.Configuration;
import org.springframework.amqp.core.DirectExchange;

@Configuration
public class RabbitMQConfig {

    /**
     * Defines a DirectExchange bean named "refreshExchange".
     *
     * @return DirectExchange bean instance
     */
    @Bean
    public DirectExchange refreshExchange() {
        return new DirectExchange("refresh-exchange");
    }
}
Step 3: Create the new Java class and it named as the RefreshListener and it can refresh the properties through the rabbitmq and spring cloud bus.
Go to src > studentproducer1 > RefreshListener and put the below code.
Java
package com.gfg.studentproducer1;

import org.springframework.amqp.rabbit.annotation.RabbitListener;
import org.springframework.stereotype.Component;

/**
 * Component class responsible for listening to refresh events.
 */
@Component
public class RefreshListener {

    /**
     * Method to process incoming refresh messages.
     *
     * @param message the message received
     */
    @RabbitListener(queues = "${spring.rabbitmq.queue-name}")
    public void processMessage(String message) {
        if ("Refresh configuration".equals(message)) {
            // Perform configuration refresh here
            System.out.println("Received refresh event. Refreshing configuration...");
        }
    }
}
Step 4: Open the main class and add the @EnableDiscoveryClient and it enables the eureka server client configuration of the spring project.
Java
package com.gfg.studentproducer1;

import org.springframework.boot.SpringApplication;
import org.springframework.boot.autoconfigure.SpringBootApplication;
import org.springframework.cloud.client.discovery.EnableDiscoveryClient;

/**
 * Spring Boot application class for Student Producer 1.
 * Enables service discovery.
 */
@SpringBootApplication
@EnableDiscoveryClient
public class StudentProducer1Application {

    /**
     * Main method to start the application.
     *
     * @param args command-line arguments
     */
    public static void main(String[] args) {
        SpringApplication.run(StudentProducer1Application.class, args);
    }

}
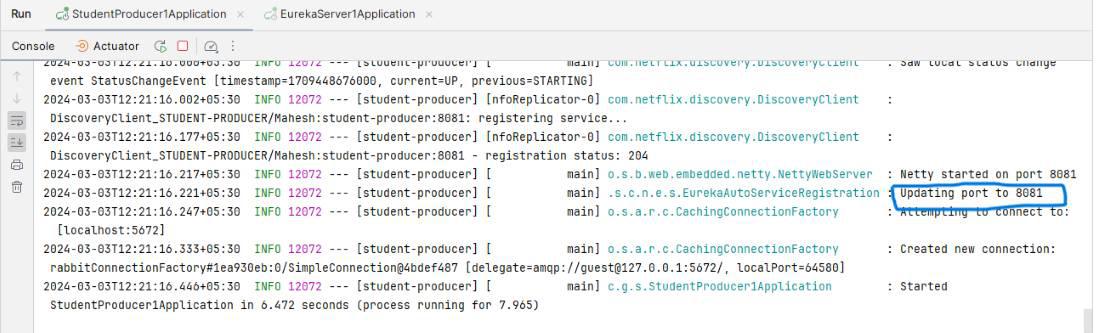
Step 5: Once complete the spring project, then it can run as spring project. It will run successfully, then it starts the application at port 8081. Refer the below output image for better understanding.
Student-producer-2:
Step 1: Create the spring project and it named as the student-producer-1 on creating the project add the below dependencies into the project.
Dependencies:
- Eureka Server Client
- Spring Web
- RabbitMQ Server
- Spring Cloud Bus
Once create the project then the file structure looks like the below image.

Step 2: Open the application.properties file and put the below code for the eureka client and rabbitmq message configuration of the spring project.
# application.properties for Student Producer 2
server.port=8082
spring.application.name=student-producer
eureka.client.service-url.defaultZone=http://localhost:8096/eureka
# RabbitMQ connection properties
spring.rabbitmq.host=localhost
spring.rabbitmq.port=5672
spring.rabbitmq.username=guest
spring.rabbitmq.password=guest
# Queue name
spring.rabbitmq.queue-name=refresh-queue
spring.main.allow-bean-definition-overriding=true
Step 3: Create the new Java class and it named as the RabbitMQConfig and it configure the rabbitmq message broker of the student producer 1 service.
Go to src > studentproducer2 > RabbitMQConfig and put the below code.
Java
package com.gfg.studentproducer2;

import org.springframework.amqp.core.DirectExchange;
import org.springframework.context.annotation.Bean;
import org.springframework.context.annotation.Configuration;

/**
 * Configures the RabbitMQ exchange for refresh events.
 */
@Configuration
public class RabbitMQConfig {

    /**
     * Defines a direct exchange for refresh events.
     *
     * @return the DirectExchange instance for refresh events
     */
    @Bean
    public DirectExchange refreshExchange() {
        return new DirectExchange("refresh-exchange");
    }
}
Step 4: Create the new Java class and it named as the RefreshListener and it can refresh the properties through the rabbitmq and spring cloud bus.
Go to src > studentproducer2 > RefreshListener and put the below code.
Java
package com.gfg.studentproducer2;

import org.springframework.amqp.rabbit.annotation.RabbitListener;
import org.springframework.stereotype.Component;

/**
 * Listens for refresh events from RabbitMQ.
 */
@Component
public class RefreshListener {

    /**
     * Processes the received refresh message.
     * If the message indicates a refresh configuration event, performs configuration refresh.
     *
     * @param message the message received from RabbitMQ
     */
    @RabbitListener(queues = "${spring.rabbitmq.queue-name}")
    public void processMessage(String message) {
        if ("Refresh configuration".equals(message)) {
            // Perform configuration refresh here
            System.out.println("Received refresh event. Refreshing configuration...");
        }
    }
}
Step 5: Open the main class and add the @EnableDiscoveryClient and it enables the eureka server client configuration of the spring project.
Java
package com.gfg.studentproducer2;

import org.springframework.boot.SpringApplication;
import org.springframework.boot.autoconfigure.SpringBootApplication;
import org.springframework.cloud.client.discovery.EnableDiscoveryClient;

/**
 * The main class to start the StudentProducer2 application.
 */
@SpringBootApplication
@EnableDiscoveryClient
public class StudentProducer2Application {

    /**
     * Main method to launch the Spring Boot application.
     */
    public static void main(String[] args) {
        SpringApplication.run(StudentProducer2Application.class, args);
    }

}
Step 6: Once complete the spring project, then it can run as spring project. It will run successfully then it starts the application at port 8082. Refer the below output image for better understanding.
.jpg)
Refresh-service:
Step 1: We can the spring boot project and it named as the refresh-service on creating the project include the below dependencies into the project.
Dependencies:
- Eureka Server Client
- Spring Cloud Bus
- RabbitMQ Server
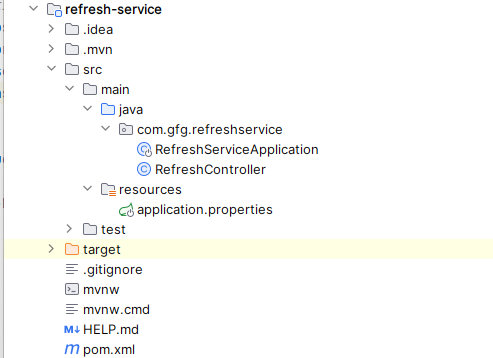
Once created the project then the folder structure looks like the below image.
Step 2: Open the application.properties file and put the below code for the eureka server configuration.
# application.properties for Refresh Service
server.port=8083
eureka.client.service-url.default-zone=http://localhost:8096/eureka
management.endpoints.web.exposure.include=*
# RabbitMQ connection properties
spring.rabbitmq.host=localhost
spring.rabbitmq.port=5672
spring.rabbitmq.username=guest
spring.rabbitmq.password=guest
Step 3: Create the newJjava class and it named as the RefreshController and it can be implementing the refresh API for the project.
Go to src > refreshservice> RefreshController and put the below code.
Java
package com.gfg.refreshservice;

import org.springframework.beans.factory.annotation.Autowired;
import org.springframework.amqp.rabbit.core.RabbitTemplate;
import org.springframework.web.bind.annotation.PostMapping;
import org.springframework.web.bind.annotation.RestController;

@RestController
public class RefreshController {

    private static final String EXCHANGE_NAME = "refresh-exchange";
    private static final String ROUTING_KEY = "refresh-event";

    @Autowired
    private RabbitTemplate rabbitTemplate;

    /**
     * Endpoint to test refresh event
     */
    @PostMapping("/refresh")
    public void refresh() {
        rabbitTemplate.convertAndSend(EXCHANGE_NAME, ROUTING_KEY, "Refresh configuration");
    }
}
Step 4: Open the main class and put the below code.
Java
package com.gfg.refreshservice;

import org.springframework.boot.SpringApplication;
import org.springframework.boot.autoconfigure.SpringBootApplication;
import org.springframework.cloud.bus.jackson.RemoteApplicationEventScan;

@SpringBootApplication
@RemoteApplicationEventScan
public class RefreshServiceApplication {

    /**
     * Main method to start the Refresh Service application.
     *
     * @param args Command-line arguments
     */
    public static void main(String[] args) {
        SpringApplication.run(RefreshServiceApplication.class, args);
    }

}
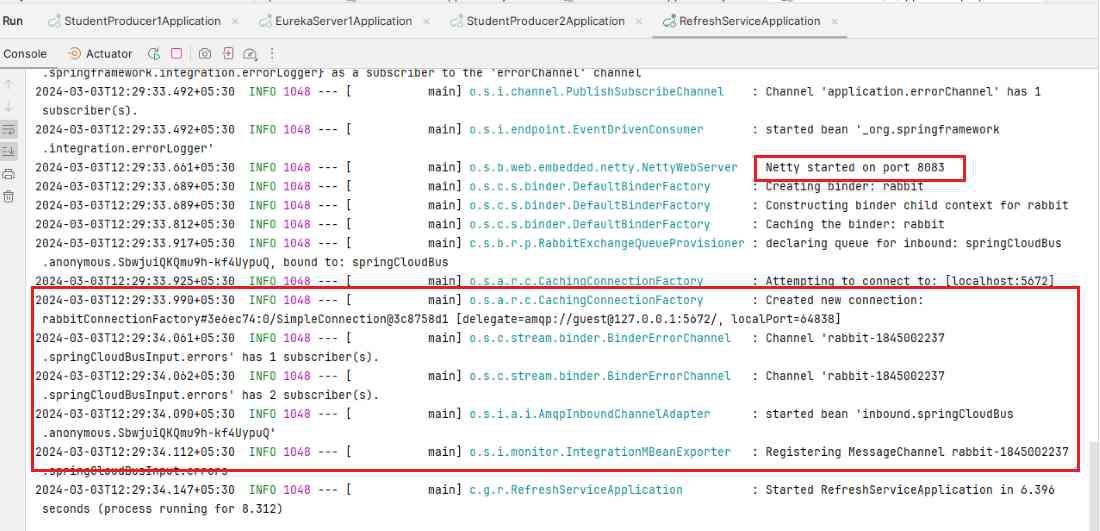
Step 5: Once complete the spring project, then it can run as a spring project. It will run successfully then it starts the application at port 8083. Refer the below output image for better understanding.
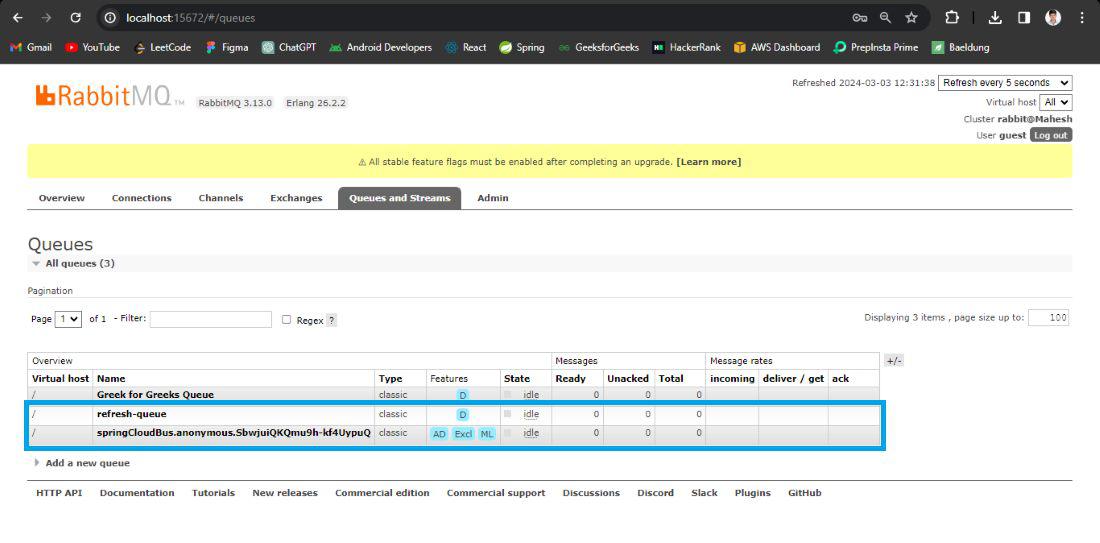
RabbitMQ Queues and Messages:
Open the rabbitmq server dashboard, then go the queues and message and it will find the refresh-queue once call the refresh API. It notifies the services of the application.
Eureka server 1 Dashboard:
After opening the eureka server 1, we will find the student producer connected to the eureka server once run the refresh API, then the service will connect to the eureka server 2.
.jpg)
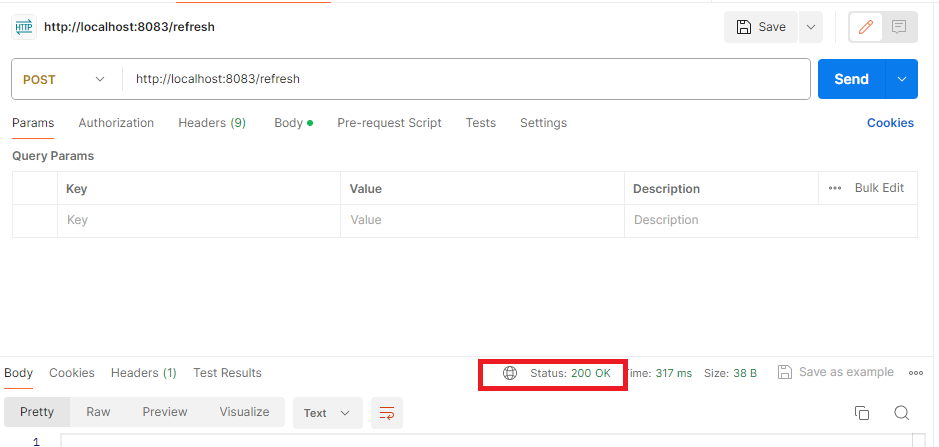
Open the post man then run the refresh API and it will refresh the properties of the student producer then it will connect to the eureka server 2. Refer the below output image for better understanding.
Eureka Server 2 Dashboard:
Once run the refresh API then the student producers connect to the eureka server 2 of the services. Kindly refer the below output image for better understanding of the concept.

If we follow the above steps, then we can implement the Spring Cloud Bus example project of the Spring Boot Application.
Share your thoughts in the comments
Please Login to comment...