Spring Cloud Gateway
Last Updated :
07 Jun, 2023
If you are aware of a microservices architecture, then there we have several spring boot applications (microservices) running on different ports or routes. An API gateway acts as a single point of entry for a collection of microservices. In simple words, all microservices can be accessed through a single port or route. It is a non-blocking and reactive gateway that provides several features like routing, filtering, load balancing, circuit breaking, and more. In this article first, we’ll look at the spring cloud gateway architecture and then implement it.
Spring Cloud Gateway Architecture
The main components of the spring cloud gateway are:
- Route: It is an important component in the spring cloud gateway. I consist of ID, destination URI, predicates, and filters.
- Predicates: It is the same as Java 8 function predicate. A Predicate simply evaluates the input against a condition defined by the Predicate and returns true if the condition is satisfied. Here the Predicate is used to match the HTTP requests. A route is matched if the Predicate returns true.
- Filter Chain: It is a series of filters applied to incoming requests and responses. It can be used for various purposes like authentication, requests or response transformation, and many more.
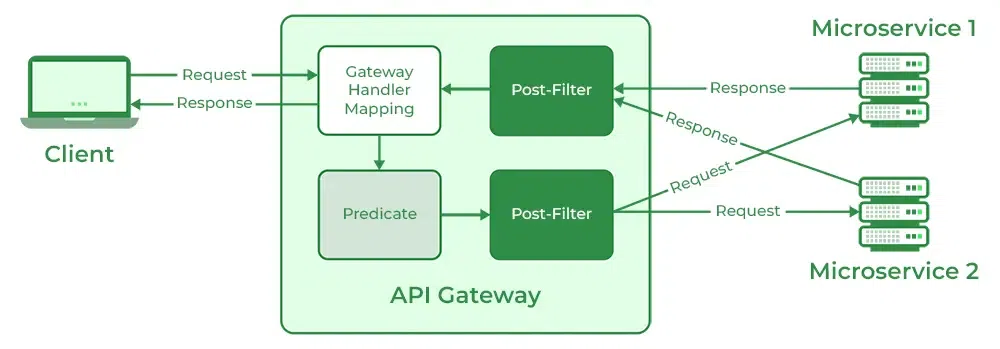
Spring Cloud Gateway Architecture
The process begins with the client sending a request to the API gateway. The request first goes to the Gateway mapping handler. It uses Predicate to check whether a request matches a route. The request is then transferred to Gateway Web Handler. It passes the request through the Filter Chain specific to the request. Here the filters can be considered in two categories. When requests arrive all the pre-filter logic is executed. After the request is made all the post-filter logic is executed.
Project Configuration
Each spring boot application that we’ll create will be the Maven project with the following configurations
- Language: Java
- Spring Boot Version: 3.0.6
- Java Version: 17
- Packaging: Jar
First Microservice Implementation
Below is what the project structure looks like
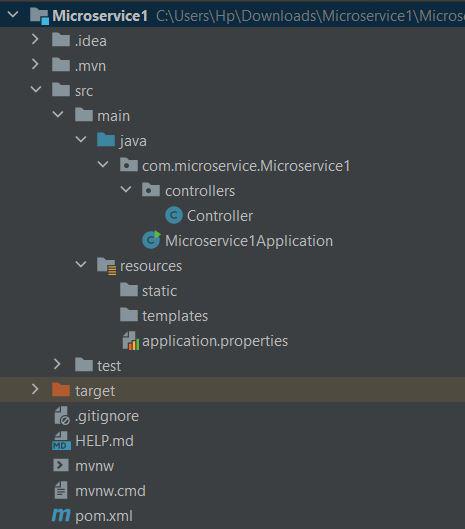
Project structure of Microservice 1
Include the below dependencies in the pom.xml.
XML
<?xml version="1.0" encoding="UTF-8"?>
<modelVersion>4.0.0</modelVersion>
<parent>
<groupId>org.springframework.boot</groupId>
<artifactId>spring-boot-starter-parent</artifactId>
<version>3.0.6</version>
<relativePath/>
</parent>
<groupId>com.microservice</groupId>
<artifactId>Microservice1</artifactId>
<version>0.0.1-SNAPSHOT</version>
<name>Microservice1</name>
<description>Demo project for Spring Boot</description>
<properties>
<java.version>17</java.version>
</properties>
<dependencies>
<dependency>
<groupId>org.springframework.boot</groupId>
<artifactId>spring-boot-starter-web</artifactId>
</dependency>
<dependency>
<groupId>org.springframework.boot</groupId>
<artifactId>spring-boot-starter-test</artifactId>
<scope>test</scope>
</dependency>
</dependencies>
<build>
<plugins>
<plugin>
<groupId>org.springframework.boot</groupId>
<artifactId>spring-boot-maven-plugin</artifactId>
</plugin>
</plugins>
</build>
</project>
|
Now, provide a name for the spring application and configure the port number. To do so, make the following changes to the application.properties file
spring.application.name=MicroService1
server.port=8081
The above configuration ensures that our first microservice runs on port 8081. Now let’s create the Controller class.
Controller Class
Java
import org.springframework.http.ResponseEntity;
import org.springframework.web.bind.annotation.GetMapping;
import org.springframework.web.bind.annotation.RestController;
@RestController
@RequestMapping("/serviceA")
public class Controller {
@GetMapping("/displayMessage")
public ResponseEntity<String> showMessage(){
return ResponseEntity.ok("Microservice 1 controller executed");
}
}
|
The above controller class only contains one API “displayMessage” which is accessible via GET request. We’ll fetch this API through Spring Cloud Gateway soon.
Second Microservice Implementation
The second microservice has the same project structure and dependencies as that of the first microservice. Here also provide a name to the application and set the port number in the application.properties file.
spring.application.name=MicroService2
server.port=8082
Controller Class
Here also, We create a GET API inside the controller and then access it through Spring Cloud Gateway.
Java
import org.springframework.http.ResponseEntity;
import org.springframework.web.bind.annotation.GetMapping;
import org.springframework.web.bind.annotation.RestController;
@RestController
@RequestMapping("/serviceB")
public class Controller {
@GetMapping("/displayMessage")
public ResponseEntity<String> showMessage(){
return ResponseEntity.ok("Microservice 2 controller executed");
}
}
|
Now, we have both of our microservices reading and running on port numbers 8081 and 8082 respectively. Now let’s create a Spring Cloud Gateway running at port 8083 and then we’ll see whether both microservices can be accessed from port 8083 or not.
Spring Cloud Gateway Implementation
There are two ways to create an API gateway.
- Programmatic configuration: Here we create Spring Cloud Gateway as Java bean. The routes, predicates, and all are created as a traditional Java program.
- Property configuration: Here, we create components of Spring Cloud Gateway as properties in the application.properties or application.yml file.
Spring Cloud Gateway Implementation using Properties
Create a Separate Spring boot application to create a gateway. Include the following dependencies in the pom.xml file.
XML
<?xml version="1.0" encoding="UTF-8"?>
<modelVersion>4.0.0</modelVersion>
<parent>
<groupId>org.springframework.boot</groupId>
<artifactId>spring-boot-starter-parent</artifactId>
<version>3.0.6</version>
<relativePath/>
</parent>
<groupId>com.gateway</groupId>
<artifactId>Gateway</artifactId>
<version>0.0.1-SNAPSHOT</version>
<name>Gateway</name>
<description>Demo project for Spring Boot</description>
<properties>
<java.version>17</java.version>
<spring-cloud.version>2022.0.2</spring-cloud.version>
</properties>
<dependencies>
<dependency>
<groupId>org.springframework.boot</groupId>
<artifactId>spring-boot-starter-webflux</artifactId>
</dependency>
<dependency>
<groupId>org.springframework.cloud</groupId>
<artifactId>spring-cloud-starter-gateway</artifactId>
</dependency>
<dependency>
<groupId>org.springframework.boot</groupId>
<artifactId>spring-boot-starter-test</artifactId>
<scope>test</scope>
</dependency>
<dependency>
<groupId>io.projectreactor</groupId>
<artifactId>reactor-test</artifactId>
<scope>test</scope>
</dependency>
</dependencies>
<dependencyManagement>
<dependencies>
<dependency>
<groupId>org.springframework.cloud</groupId>
<artifactId>spring-cloud-dependencies</artifactId>
<version>${spring-cloud.version}</version>
<type>pom</type>
<scope>import</scope>
</dependency>
</dependencies>
</dependencyManagement>
<build>
<plugins>
<plugin>
<groupId>org.springframework.boot</groupId>
<artifactId>spring-boot-maven-plugin</artifactId>
</plugin>
</plugins>
</build>
</project>
|
The project structure looks like
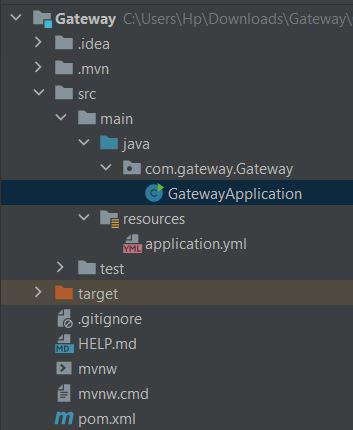
Project Structure
Now create a file with the name application.yml inside the resources folder and populate it with the following:
server:
  port: 8083
spring:
  cloud:
    gateway:
      routes:
        - id: Microservice1
          uri: http://localhost:8081/
          Predicates:
            - Path=/serviceA/**
        - id: Microservice2
          uri: http://localhost:8082/
          Predicates:
            - Path=/serviceB/**
Spring Cloud Gateway Programmatic Implementation
here also, the project structure and dependencies remain the same. Also apart from port configuration, remove everything from the YML file. Now create a bean inside GatewayApplication.java class as follows:
Java
import org.springframework.boot.SpringApplication;
import org.springframework.boot.autoconfigure.SpringBootApplication;
import org.springframework.cloud.gateway.route.RouteLocator;
import org.springframework.cloud.gateway.route.builder.RouteLocatorBuilder;
import org.springframework.context.annotation.Bean;
@SpringBootApplication
public class GatewayApplication {
public static void main(String[] args) {
SpringApplication.run(GatewayApplication.class, args);
}
@Bean
public RouteLocator routerBuilder(RouteLocatorBuilder routeLocatorBuilder){
return routeLocatorBuilder.routes()
.route("Microservice1",r->r.path("/serviceA/**")
.route("Microservice2",r->r.path("/serviceB/**")
}
}
|
Now, on running the gateway application using any of the above methods, we can see that both microservices can be accessed with a single port as below
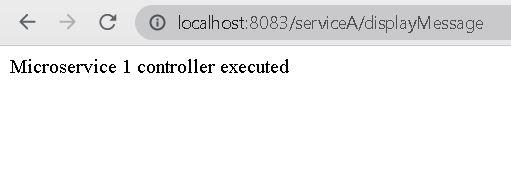
Accessing the first microservice
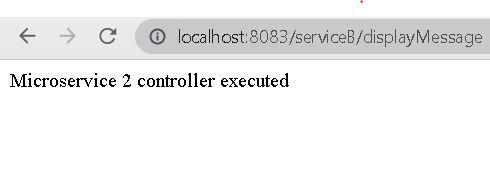
Accessing the second microservice
Share your thoughts in the comments
Please Login to comment...