Spring Cloud AWS – S3
Last Updated :
25 Mar, 2024
In Spring Boot, Spring Cloud AWS can provide integration with the Amazon Web Service (AWS), and it can include the Amazon Storage Service(S3). When it’s working with the S3 in the Spring Cloud AWS application. This integration can allow the developers to easily interact with the S3 buckets and the objects using the familiar Spring programming models and abstractions.
Prerequisites:
- Good Knowledge of the Spring Boot and Spring Framework.
- Must be an AWS account with access to S3 service.
- AWS credentials like Access Key ID and Secret Access Key and required permissions interact with S3.
Spring Cloud AWS can simplify the interaction with the Amazon S3 by providing convenient abstractions and utilities. The main components that can involve the integrating Spring application with the AWS S3.
Key Terminologies:
- Bucket: It is a container for the objects stored in the Amazon S3 every object is contained within the bucket and it can act as the highest level of storage in the S3 Bucket names must be globally unique across all of the S3.
- AmazonS3: This can mainly interface for the interacting with the Amazon S3, and it can be providing the methods for performing the various operations like the uploading files, downloading files and listing the objects.
- ResourceLoader: It can be loading the resources from the various sources including the class path resources, file system resources and the URL resources.
Implementation of Amazon S3 with Spring Cloud
We can develop the simple spring project that can be used AWS S3 for the storage management of the project.
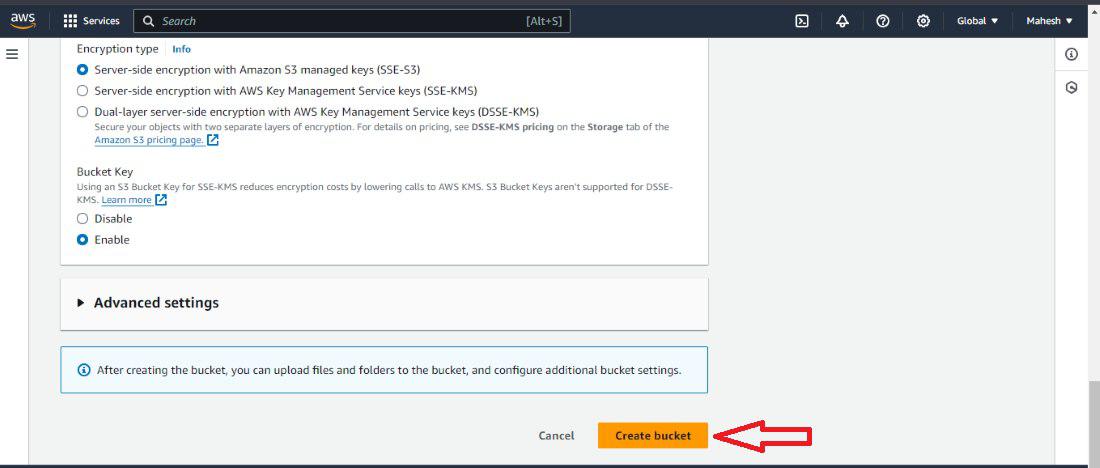
Step 1: We can create the AWS S3 bucket with the name of the springdemo123 and give all permissions of the bucket. Refer the below image for the understanding of S3 bucket creation.

Fill the required details of the bucket like bucket name and select the region and disable public access and click on the create bucket button then create the bucket successfully.
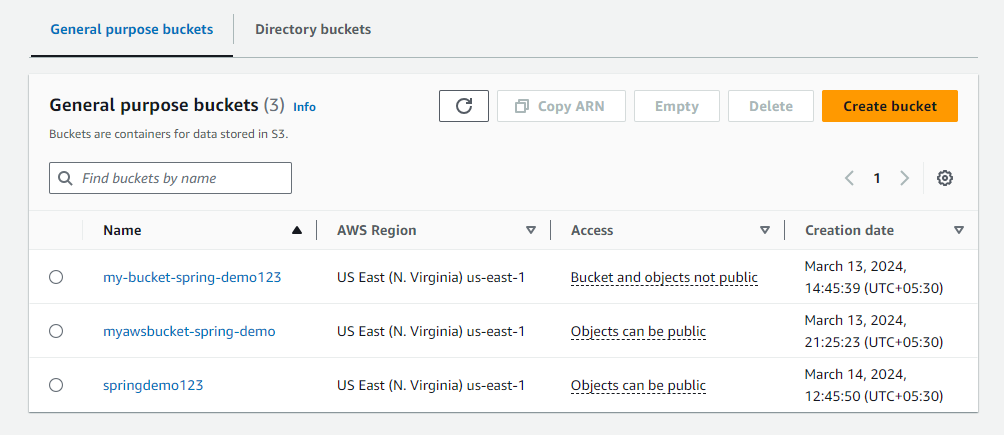
Once create the S3 bucket then dashboard look like the below image.
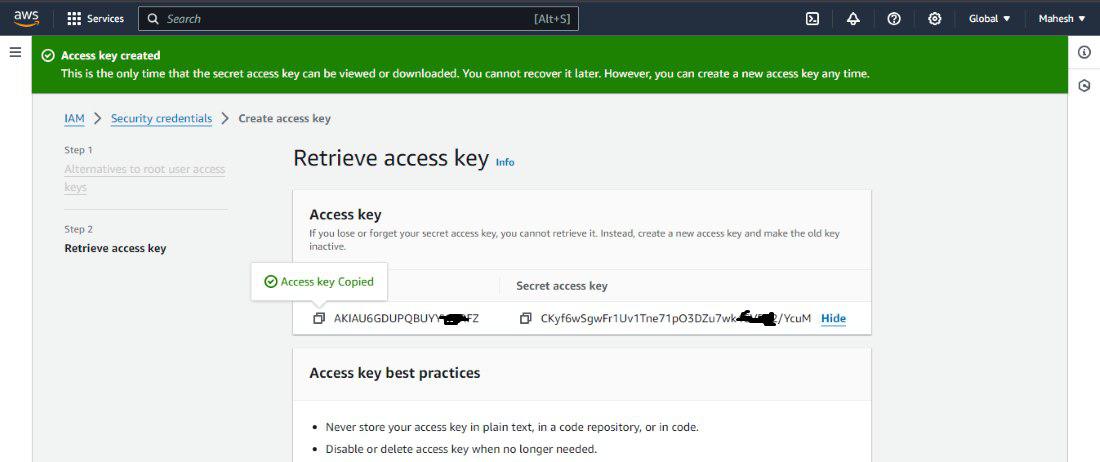
Step 2: Now, Open the security credentials into the AWS Console then retrieves the access key and secret key. These are required to AWS S3 integrates with the Spring boot application.
Once complete the configuration of the AWS S3 in the AWS Account then it’s time develop the spring project then connect with the AWS.
Step 3: Create the Spring Project using spring initializr and it named as spring-aws-demo on creating the project includes the below dependencies into the project.
Depependencies:
- Spring Web
- Lombok
- Spring Dev Tools
In Latest version of the spring project then we can find the AWS core dependencies so, we can provide the dependencies to add into the project.
<dependency>
  <groupId>com.amazonaws</groupId>
  <artifactId>aws-java-sdk</artifactId>
  <version>${aws-java-sdk.version}</version>
</dependency>
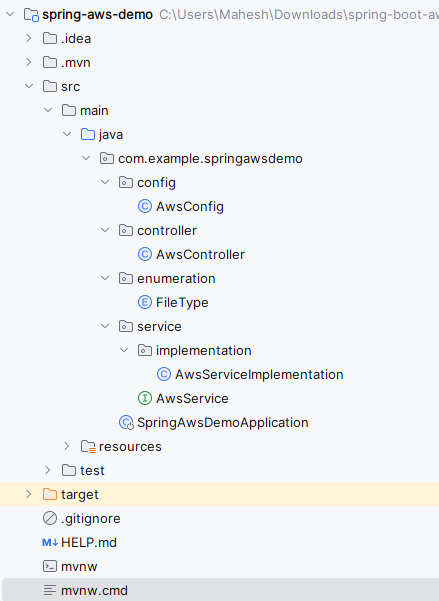
Once completed the creation of the spring project, then the file structure looks like the below image.
Step 4: Open the application.properties file and put the below code for the AWS S3 configuration of the project.
Note: Replace the access key, secret key, region and bucket of your AWS account.
spring.application.name=spring-aws-demo
cloud.aws.credentials.accessKey=AKIAU6GDUPB53VD7
cloud.aws.credentials.secretKey=lzQzuC0hlnM1yKCG8gko/yLojhNyCN7leki6xE
cloud.aws.region.static=us-east-1
cloud.aws.s3.bucket=springdemo123
spring.servlet.multipart.enabled=true

spring.servlet.multipart.max-request-size=10MB
spring.servlet.multipart.max-file-size=10MB

ServicePointManager.DefaultConnectionLimit = 25
Step 5: Create the new package named as config in that package create the new Java class named as AwsConfig. This class can be used to configuration of the AWS S3 into the project.
Go to src > main > java > com.example.springawsdemo > config > AwsConfig and put the below code.
Java
package com.example.springawsdemo.config;

import com.amazonaws.auth.AWSCredentials;
import com.amazonaws.auth.AWSStaticCredentialsProvider;
import com.amazonaws.auth.BasicAWSCredentials;
import com.amazonaws.regions.Regions;
import com.amazonaws.services.s3.AmazonS3;
import com.amazonaws.services.s3.AmazonS3ClientBuilder;
import org.springframework.beans.factory.annotation.Value;
import org.springframework.context.annotation.Bean;
import org.springframework.context.annotation.Configuration;

@Configuration
public class AwsConfig {

    // Injecting access key from application.properties
    @Value("${cloud.aws.credentials.accessKey}")
    private String accessKey;

    // Injecting secret key from application.properties
    @Value("${cloud.aws.credentials.secretKey}")
    private String accessSecret;

    // Injecting region from application.properties
    @Value("${cloud.aws.region.static}")
    private String region;

    // Creating a bean for Amazon S3 client
    @Bean
    public AmazonS3 s3Client() {
        // Creating AWS credentials using access key and secret key
        AWSCredentials credentials = new BasicAWSCredentials(accessKey, accessSecret);

        // Building Amazon S3 client with specified credentials and region
        return AmazonS3ClientBuilder.standard()
                .withCredentials(new AWSStaticCredentialsProvider(credentials))
                .withRegion(region)
                .build();
    }
}
Step 6: Create the new package named as enumeration in that package create the new enum class named as FileType.
Go to src > main > java > com.example.springawsdemo > enumeration > FileType and put the below code.
Java
package com.example.springawsdemo.enumeration;

import lombok.AllArgsConstructor;
import lombok.Getter;
import lombok.val;
import org.springframework.http.MediaType;

import java.util.Arrays;

@Getter
@AllArgsConstructor(access = lombok.AccessLevel.PACKAGE)
public enum FileType {
    // Enum constants representing file types with their extensions and corresponding media types
    JPG("jpg", MediaType.IMAGE_JPEG),
    JPEG("jpeg", MediaType.IMAGE_JPEG),
    TXT("txt", MediaType.TEXT_PLAIN),
    PNG("png", MediaType.IMAGE_PNG),
    PDF("pdf", MediaType.APPLICATION_PDF);

    // File extension
    private final String extension;

    // Media type associated with the file extension
    private final MediaType mediaType;

    // Method to get MediaType based on the filename's extension
    public static MediaType fromFilename(String fileName) {
        // Finding the last index of '.' to get the extension
        val dotIndex = fileName.lastIndexOf('.');
        // Extracting file extension from filename
        val fileExtension = (dotIndex == -1) ? "" : fileName.substring(dotIndex + 1);
        // Finding matching enum constant for the file extension
        return Arrays.stream(values())
                .filter(e -> e.getExtension().equals(fileExtension))
                .findFirst()
                .map(FileType::getMediaType)
                .orElse(MediaType.APPLICATION_OCTET_STREAM); // Default to octet-stream if no matching media type found
    }
}
Step 7: Create the new package named as service in that package create the new java interface named as AwsService.
Go to src > main > java > com.example.springawsdemo > service > AwsService and put the below code.
Java
package com.example.springawsdemo.service;

import com.amazonaws.AmazonClientException;

import java.io.ByteArrayOutputStream;
import java.io.IOException;
import java.io.InputStream;
import java.util.List;

// Interface for AWS service operations
public interface AwsService {

    // Method to upload a file to an S3 bucket
    void uploadFile(
        final String bucketName,
        final String keyName,
        final Long contentLength,
        final String contentType,
        final InputStream value
    ) throws AmazonClientException;

    // Method to download a file from an S3 bucket
    ByteArrayOutputStream downloadFile(
        final String bucketName,
        final String keyName
    ) throws IOException, AmazonClientException;

    // Method to list files in an S3 bucket
    List<String> listFiles(final String bucketName) throws AmazonClientException;

    // Method to delete a file from an S3 bucket
    void deleteFile(
        final String bucketName,
        final String keyName
    ) throws AmazonClientException;
}
Step 8: Create the new package named as implementation in that package create the new Java class named as AwsServiceImplementation.
Go to src > main > java > com.example.springawsdemo > service > implementation > AwsServiceImplementation and put the below code.:
Java
package com.example.springawsdemo.service.implementation;

import com.amazonaws.AmazonClientException;
import com.amazonaws.services.s3.AmazonS3;
import com.amazonaws.services.s3.model.ObjectListing;
import com.amazonaws.services.s3.model.ObjectMetadata;
import com.amazonaws.services.s3.model.S3Object;
import com.amazonaws.services.s3.model.S3ObjectSummary;
import com.example.springawsdemo.service.AwsService;
import lombok.extern.slf4j.Slf4j;
import org.springframework.beans.factory.annotation.Autowired;
import org.springframework.stereotype.Service;

import java.io.ByteArrayOutputStream;
import java.io.IOException;
import java.io.InputStream;
import java.util.ArrayList;
import java.util.List;

@Slf4j
@Service
public class AwsServiceImplementation implements AwsService {

    @Autowired
    private AmazonS3 s3Client;

    // Method to upload a file to an S3 bucket
    @Override
    public void uploadFile(
            final String bucketName,
            final String keyName,
            final Long contentLength,
            final String contentType,
            final InputStream value
    ) throws AmazonClientException {
        ObjectMetadata metadata = new ObjectMetadata();
        metadata.setContentLength(contentLength);
        metadata.setContentType(contentType);

        s3Client.putObject(bucketName, keyName, value, metadata);
        log.info("File uploaded to bucket({}): {}", bucketName, keyName);
    }

    // Method to download a file from an S3 bucket
    @Override
    public ByteArrayOutputStream downloadFile(
            final String bucketName,
            final String keyName
    ) throws IOException, AmazonClientException {
        S3Object s3Object = s3Client.getObject(bucketName, keyName);
        InputStream inputStream = s3Object.getObjectContent();
        ByteArrayOutputStream outputStream = new ByteArrayOutputStream();

        int len;
        byte[] buffer = new byte[4096];
        while ((len = inputStream.read(buffer, 0, buffer.length)) != -1) {
            outputStream.write(buffer, 0, len);
        }

        log.info("File downloaded from bucket({}): {}", bucketName, keyName);
        return outputStream;
    }

    // Method to list files in an S3 bucket
    @Override
    public List<String> listFiles(final String bucketName) throws AmazonClientException {
        List<String> keys = new ArrayList<>();
        ObjectListing objectListing = s3Client.listObjects(bucketName);

        while (true) {
            List<S3ObjectSummary> objectSummaries = objectListing.getObjectSummaries();
            if (objectSummaries.isEmpty()) {
                break;
            }

            objectSummaries.stream()
                    .filter(item -> !item.getKey().endsWith("/"))
                    .map(S3ObjectSummary::getKey)
                    .forEach(keys::add);

            objectListing = s3Client.listNextBatchOfObjects(objectListing);
        }

        log.info("Files found in bucket({}): {}", bucketName, keys);
        return keys;
    }

    // Method to delete a file from an S3 bucket
    @Override
    public void deleteFile(
            final String bucketName,
            final String keyName
    ) throws AmazonClientException {
        s3Client.deleteObject(bucketName, keyName);
        log.info("File deleted from bucket({}): {}", bucketName, keyName);
    }
}
Step 9: Create the new package named as controller in that package create the new Java class named as AwsController.
Go to src > main > java > com.example.springawsdemo > controller > AwsController and put the below code.:
Java
package com.example.springawsdemo.controller;

import com.example.springawsdemo.enumeration.FileType;
import com.example.springawsdemo.service.AwsService;
import lombok.SneakyThrows;
import lombok.val;
import org.springframework.beans.factory.annotation.Autowired;
import org.springframework.http.HttpHeaders;
import org.springframework.http.ResponseEntity;
import org.springframework.util.StringUtils;
import org.springframework.web.bind.annotation.*;
import org.springframework.web.multipart.MultipartFile;

import java.io.IOException;
import java.io.InputStream;

@RestController
@RequestMapping("/s3bucketstorage")
public class AwsController {

    @Autowired
    private AwsService service;

    // Endpoint to list files in a bucket
    @GetMapping("/{bucketName}")
    public ResponseEntity<?> listFiles(
            @PathVariable("bucketName") String bucketName
    ) {
        val body = service.listFiles(bucketName);
        return ResponseEntity.ok(body);
    }

    // Endpoint to upload a file to a bucket
    @PostMapping("/{bucketName}/upload")
    @SneakyThrows(IOException.class)
    public ResponseEntity<?> uploadFile(
            @PathVariable("bucketName") String bucketName,
            @RequestParam("file") MultipartFile file
    ) {
        if (file.isEmpty()) {
            return ResponseEntity.badRequest().body("File is empty");
        }

        String fileName = StringUtils.cleanPath(file.getOriginalFilename());
        String contentType = file.getContentType();
        long fileSize = file.getSize();
        InputStream inputStream = file.getInputStream();

        service.uploadFile(bucketName, fileName, fileSize, contentType, inputStream);

        return ResponseEntity.ok().body("File uploaded successfully");
    }

    // Endpoint to download a file from a bucket
    @SneakyThrows
    @GetMapping("/{bucketName}/download/{fileName}")
    public ResponseEntity<?> downloadFile(
            @PathVariable("bucketName") String bucketName,
            @PathVariable("fileName") String fileName
    ) {
        val body = service.downloadFile(bucketName, fileName);

        return ResponseEntity.ok()
                .header(HttpHeaders.CONTENT_DISPOSITION, "attachment; filename=\"" + fileName + "\"")
                .contentType(FileType.fromFilename(fileName))
                .body(body.toByteArray());
    }

    // Endpoint to delete a file from a bucket
    @DeleteMapping("/{bucketName}/{fileName}")
    public ResponseEntity<?> deleteFile(
            @PathVariable("bucketName") String bucketName,
            @PathVariable("fileName") String fileName
    ) {
        service.deleteFile(bucketName, fileName);
        return ResponseEntity.ok().build();
    }
}
Step 10: Now, open the main class file and put the below code.
Java
package com.example.springawsdemo;

import org.springframework.boot.SpringApplication;
import org.springframework.boot.autoconfigure.SpringBootApplication;

@SpringBootApplication
public class SpringAwsDemoApplication {

    public static void main(String[] args) {
        SpringApplication.run(SpringAwsDemoApplication.class, args);
    }

}
pom.xml:
XML
<?xml version="1.0" encoding="UTF-8"?>
<project xmlns="http://maven.apache.org/POM/4.0.0" xmlns:xsi="http://www.w3.org/2001/XMLSchema-instance"
    xsi:schemaLocation="http://maven.apache.org/POM/4.0.0 https://maven.apache.org/xsd/maven-4.0.0.xsd">
    <modelVersion>4.0.0</modelVersion>
    <parent>
        <groupId>org.springframework.boot</groupId>
        <artifactId>spring-boot-starter-parent</artifactId>
        <version>3.2.3</version>
        <relativePath/> <!-- lookup parent from repository -->
    </parent>
    <groupId>com.example</groupId>
    <artifactId>spring-aws-demo</artifactId>
    <version>0.0.1-SNAPSHOT</version>
    <name>spring-aws-demo</name>
    <description>spring-aws-demo</description>
    <properties>
        <java.version>17</java.version>
        <aws-java-sdk.version>1.12.70</aws-java-sdk.version>

    </properties>
    <dependencies>
        <dependency>
            <groupId>org.springframework.boot</groupId>
            <artifactId>spring-boot-starter-web</artifactId>
        </dependency>

        <dependency>
            <groupId>com.amazonaws</groupId>
            <artifactId>aws-java-sdk</artifactId>
            <version>${aws-java-sdk.version}</version>
        </dependency>

        <dependency>
            <groupId>org.projectlombok</groupId>
            <artifactId>lombok</artifactId>
            <optional>true</optional>
        </dependency>

    <dependency>
        <groupId>org.springframework.boot</groupId>
        <artifactId>spring-boot-devtools</artifactId>
        <scope>runtime</scope>
        <optional>true</optional>
    </dependency>
    <dependency>
        <groupId>org.projectlombok</groupId>
        <artifactId>lombok</artifactId>
        <version>${lombok.version}</version>
        <scope>provided</scope>
    </dependency>

        <dependency>
            <groupId>org.springframework.boot</groupId>
            <artifactId>spring-boot-starter-test</artifactId>
            <scope>test</scope>
        </dependency>
    </dependencies>


    <build>
        <plugins>
            <plugin>
                <groupId>org.springframework.boot</groupId>
                <artifactId>spring-boot-maven-plugin</artifactId>
                <configuration>
                    <excludes>
                        <exclude>
                            <groupId>org.projectlombok</groupId>
                            <artifactId>lombok</artifactId>
                        </exclude>
                    </excludes>
                </configuration>
            </plugin>
        </plugins>
    </build>

</project>
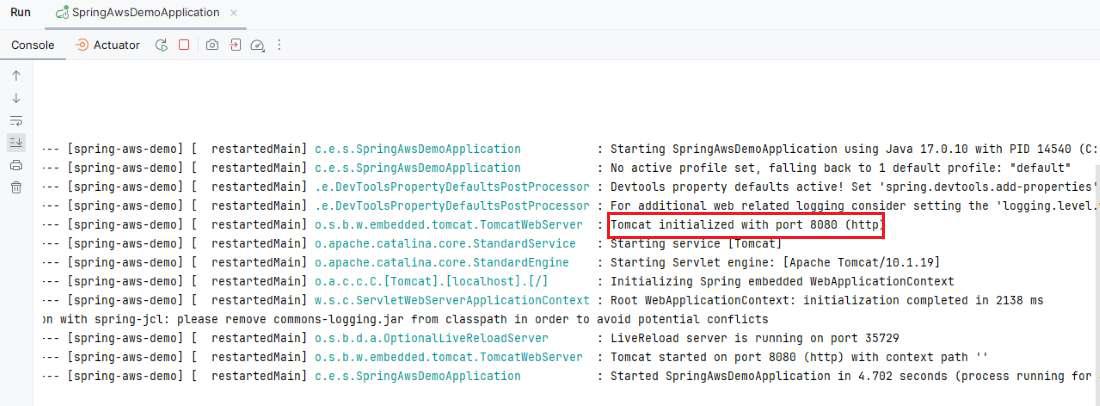
Step 11: Once the project completed, then run it as Spring Application and it will run at port 8080. Refer the below image for the better understanding the execution of the project.
Output Endpoints:
Open the postman tool and test the endpoints of the project.
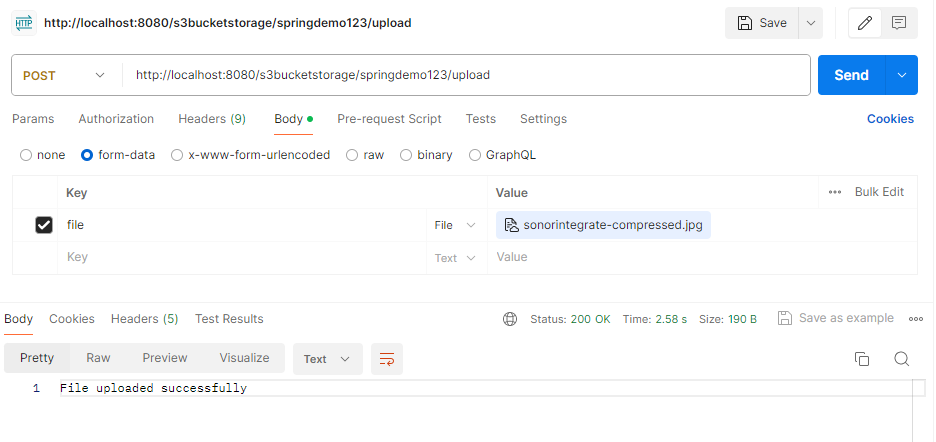
File Upload Endpoint:
POST http://localhost:8080/s3bucketstorage/{bucketName}/uploadOutput Image:
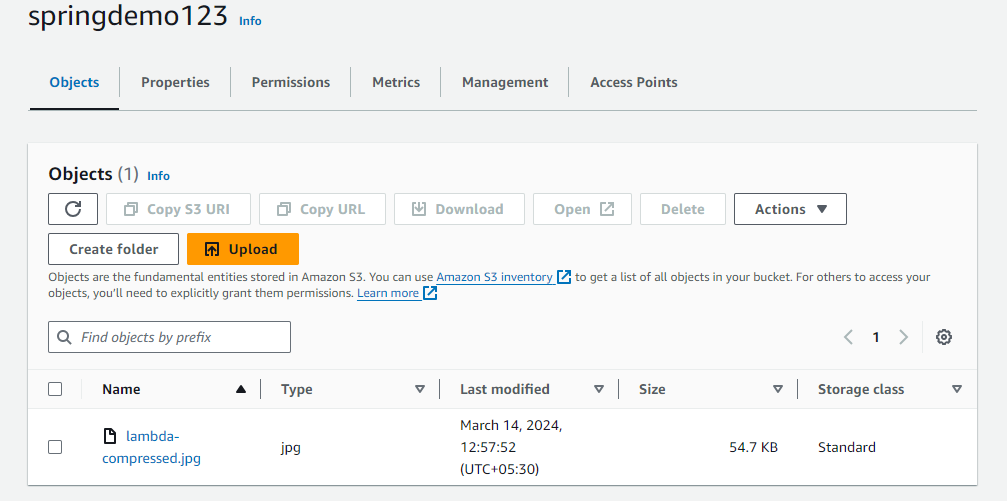
AWS Dashboard: In S3 bucket we can find the uploaded file of the project.
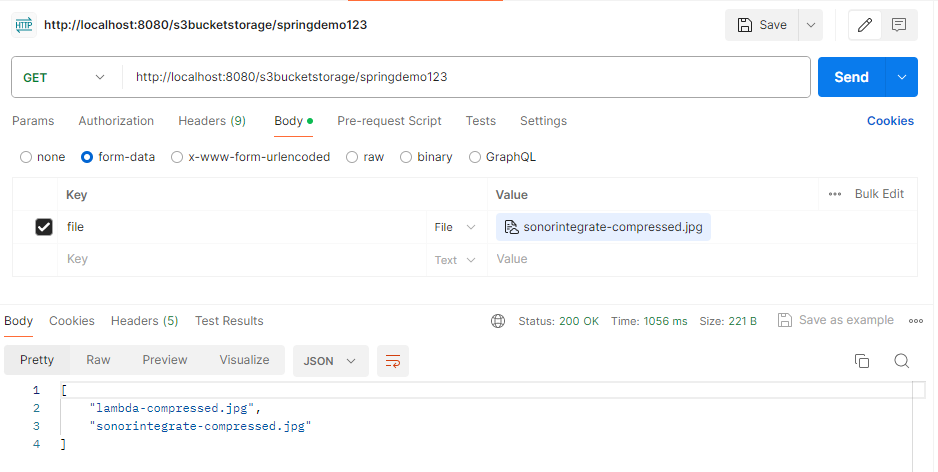
Get the File Endpoint:
GET http://localhost:8080/s3bucketstorage/{bucketName}Output Image:
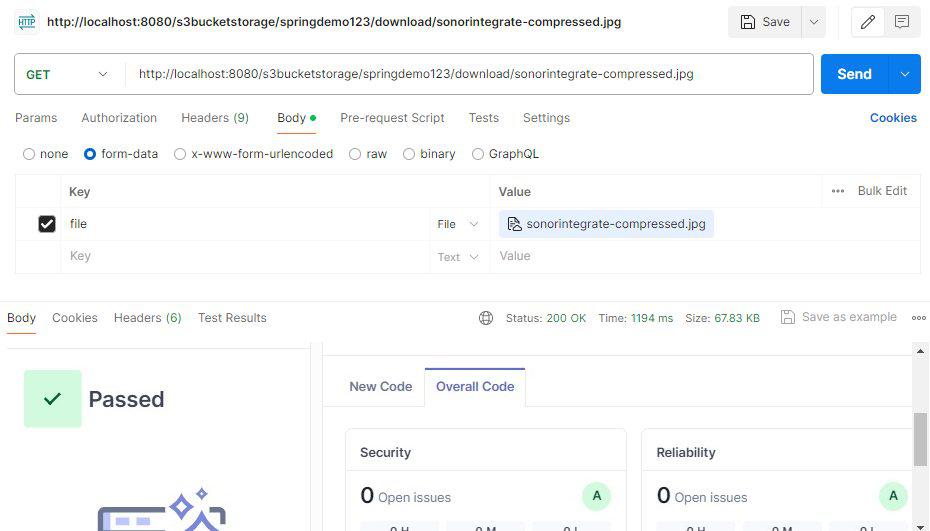
File Download Endpoint:
GET http://localhost:8080/s3bucketstorage/{bucketName}/{filename}Output Image:
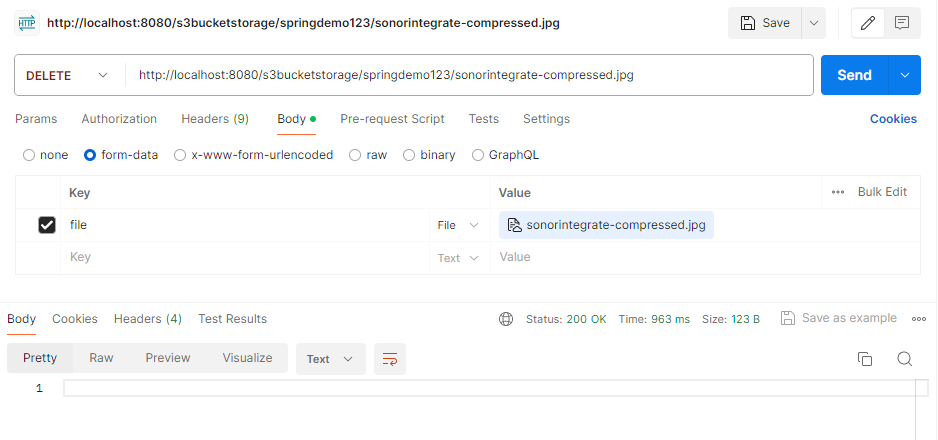
Delete File Endpoint:
DELETE http://localhost:8080/s3bucketstorage/{bucketName}/{filename}Output Image:
Application Log:
.jpg)
If we follow the above steps then we can successfully build the Spring Application that can integrate the AWS S3 for the database of the project.
Share your thoughts in the comments
Please Login to comment...