Spring Security is the most powerful and highly customizable authentication, and it is access control framework for Java enterprise applications and React is a popular JavaScript library for building for the user interfaces. Integrating Spring Security with the React frontend allows you to create the secure login pages and protect your application’s resources.
Spring Security Login Page with React
The main concept involves to creating the React frontend that can be communicated with a Spring Boot backend secured with Spring Security. The react frontend will have a login page where users can input their credentials, and upon submission, these credentials will be sent to the backend for authentication. If the credentials are valid, the backend will generate a token (JWT) and send it back to the frontend. This token will be stored on the frontend side for subsequent requests to protected resources.
Prerequisites
- Basic understanding of React.js
- Familiarity with Spring Security and Java
- Node.js and npm installed on your system
- Basic knowledge of RESTful APIs
React – Frontend
Create the React project using the below command:
npx install create-react-app simple-login-project
In this project, we can require below components, so we can install using npm install command:
npm install component_name
Required components of this project
- Axios
- mdb-react-ui-kit
- react-dom
- react-router-dom
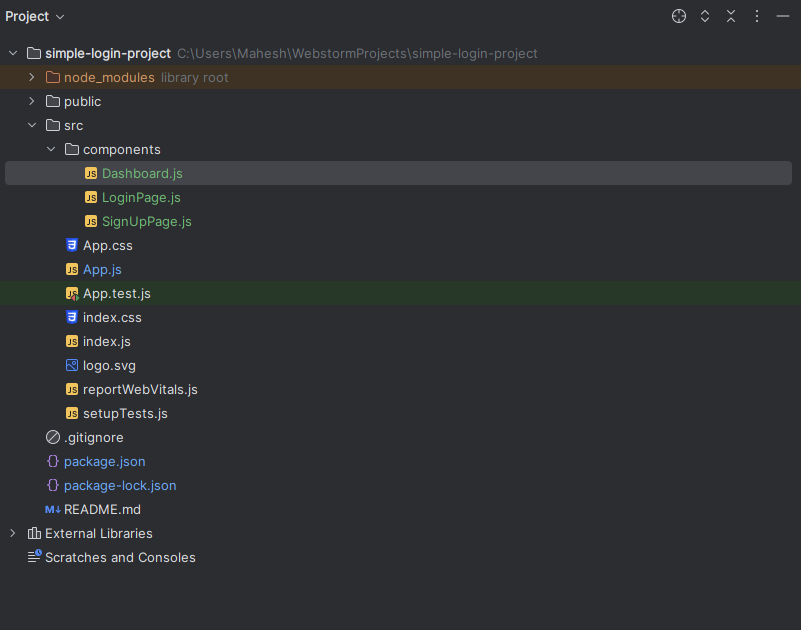
Once created the project with all required components and create the required directories and file, then the file structure looks like the below image.
File Structure
Step 1: Create the directory into src folder named as components in that folder we can create one react file and it named as SignUpPage for the building the signup frontend into the file.
Go to the src > components > SignUpPage and put the below code:
Javascript
import React, { useState } from 'react';
import axios from 'axios';
import { useNavigate } from 'react-router-dom';
import {
MDBContainer,
MDBInput,
MDBBtn,
} from 'mdb-react-ui-kit';
function SignupPage() {
const [fullName, setFullName] = useState('');
const [email, setEmail] = useState('');
const [password, setPassword] = useState('');
const [confirmPassword, setConfirmPassword] = useState('');
const [role, setRole] = useState('ROLE_CUSTOMER');
const [mobile, setMobileNumber] = useState('');
const [error, setError] = useState('');
const history = useNavigate();
const handleSignup = async () => {
try {
if (!fullName || !email || !password || !confirmPassword || !mobile) {
setError('Please fill in all fields.');
return;
}
if (password !== confirmPassword) {
throw new Error("Passwords do not match");
}
fullName,
email,
password,
role,
mobile
});
console.log(response.data);
history('/dashboard');
} catch (error) {
console.error('Signup failed:', error.response ? error.response.data : error.message);
setError(error.response ? error.response.data : error.message);
}
};
return (
<div className="d-flex justify-content-center align-items-center vh-100">
<div className="border rounded-lg p-4" style={{width: '600px', height: 'auto'}}>
<MDBContainer className="p-3">
<h2 className="mb-4 text-center">Sign Up Page</h2>
{}
{error && <p className="text-danger">{error}</p>}
<MDBInput wrapperClass='mb-3' id='fullName' placeholder={"Full Name"} value={fullName} type='text'
onChange={(e) => setFullName(e.target.value)}/>
<MDBInput wrapperClass='mb-3' placeholder='Email Address' id='email' value={email} type='email'
onChange={(e) => setEmail(e.target.value)}/>
<MDBInput wrapperClass='mb-3' placeholder='Password' id='password' type='password' value={password}
onChange={(e) => setPassword(e.target.value)}/>
<MDBInput wrapperClass='mb-3' placeholder='Confirm Password' id='confirmPassword' type='password'
value={confirmPassword}
onChange={(e) => setConfirmPassword(e.target.value)}/>
<MDBInput wrapperClass='mb-2' placeholder='Mobile Number' id='mobileNumber' value={mobile}
type='text'
onChange={(e) => setMobileNumber(e.target.value)}/>
<label className="form-label mb-1">Role:</label>
<select className="form-select mb-4" value={role} onChange={(e) => setRole(e.target.value)}>
<option value="ROLE_CUSTOMER">User</option>
<option value="ROLE_ADMIN">Admin</option>
</select>
<button className="mb-4 d-block mx-auto fixed-action-btn btn-primary"
style={{height: '40px', width: '100%'}}
onClick={handleSignup}>Sign Up
</button>
<div className="text-center">
<p>Already Register? <a href="/">Login</a></p>
</div>
</MDBContainer>
</div>
</div>
);
}
export default SignupPage;
|
Step 2: In component folder, Create the another react file and it named as the LoginPage to building the login frontend into the page.
Go to the src > components > LoginPage and put the below code:
Javascript
import React, { useState } from 'react';
import axios from 'axios';
import { useNavigate } from 'react-router-dom';
import {
MDBContainer,
MDBInput,
MDBBtn,
} from 'mdb-react-ui-kit';
function LoginPage() {
const [username, setUsername] = useState('');
const [password, setPassword] = useState('');
const [error, setError] = useState('');
const history = useNavigate();
const handleLogin = async () => {
try {
if (!username || !password) {
setError('Please enter both username and password.');
return;
}
console.log('Login successful:', response.data);
history('/dashboard');
} catch (error) {
console.error('Login failed:', error.response ? error.response.data : error.message);
setError('Invalid username or password.');
}
};
return (
<div className="d-flex justify-content-center align-items-center vh-100">
<div className="border rounded-lg p-4" style={{ width: '500px', height: 'auto' }}>
<MDBContainer className="p-3">
<h2 className="mb-4 text-center">Login Page</h2>
<MDBInput wrapperClass='mb-4' placeholder='Email address' id='email' value={username} type='email' onChange={(e) => setUsername(e.target.value)} />
<MDBInput wrapperClass='mb-4' placeholder='Password' id='password' type='password' value={password} onChange={(e) => setPassword(e.target.value)} />
{error && <p className="text-danger">{error}</p>} {}
<button className="mb-4 d-block btn-primary" style={{ height:'50px',width: '100%' }} onClick={handleLogin}>Sign in</button>
<div className="text-center">
<p>Not a member? <a href="/signup" >Register</a></p>
</div>
</MDBContainer>
</div>
</div>
);
}
export default LoginPage;
|
Step 3: In component folder, create the another react file and it named as the Dashboard to building the simple dashboard frontend into the page.
Go to the src > components > Dashboard and put the below code:
Javascript
import React from 'react';
import { useNavigate} from 'react-router-dom';
function WelcomeDashboard({ username }) {
const history = useNavigate();
const handleLogout = () => {
history('/');
};
return (
<div className="d-flex justify-content-center align-items-center vh-100">
<div className="border rounded-lg p-4" style={{width: '500px', height: '400px'}}>
<h2 className="mb-4 text-center">Welcome to Dashboard</h2>
<p className="mb-4 text-center">Hello, {username}!</p>
<p className="text-center">You are logged in successfully.</p>
<div className="text-center">
<button type="button" className="btn btn-primary mt-3" onClick={handleLogout}>Logout</button>
</div>
</div>
</div>
);
}
export default WelcomeDashboard;
|
Step 4: Open the app.js file and modified the code into the routing of the page into the login and signup pages of the project.
Note: No need to modify the remaining file of the project as per requirements of the project we are develop the frontend add into the app.js file.
Go to src > components > app and put the below code:
Javascript
import React from 'react';
import { BrowserRouter as Router, Route, Routes } from 'react-router-dom';
import LoginPage from './components/LoginPage';
import SignupPage from './components/SignUpPage';
import Dashboard from "./components/Dashboard";
function App() {
return (
<div className="App">
<Router>
<Routes>
<Route path="/" element={<LoginPage/>} />
<Route path="/signup" element={ <SignupPage/>} />
<Route path = "/dashboard" element={<Dashboard/>}/>
</Routes>
</Router>
</div>
);
}
export default App;
|
Step 5: Once the develop the frontend of the website we can run the application using below command once it runs successful it will run the port 3000.
npm start

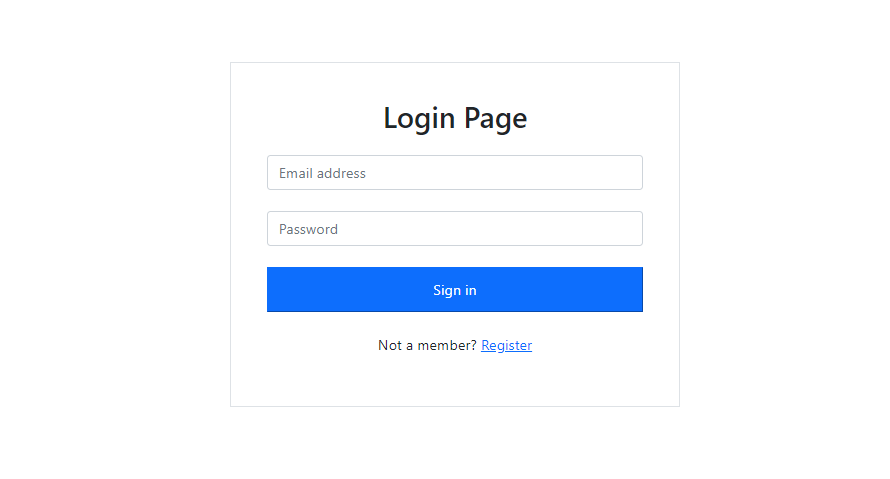
Login Page:
Below is the login page.
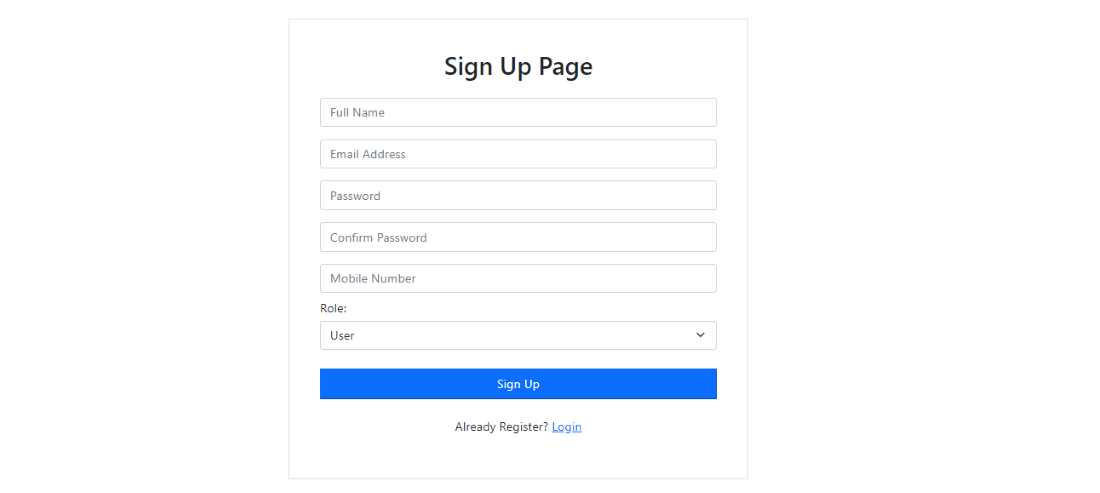
Sign Up page:
Below is the sign-up page. We can now sign up by filling the necessary fields.
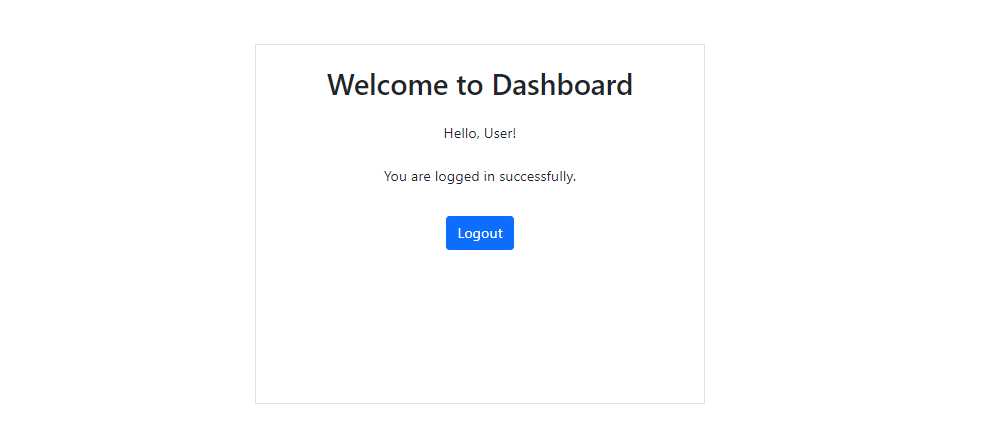
Simple Dashboard:
After logging in, we can see a simple Dashboard like below image.
Now we can develop the backend using the Spring Security. Once we can develop the spring security environment then endpoints of the spring boot project integrate with frontend using axios.
Spring Security – Backend
Below are the steps to implement the backend system of this application.
Step 1: We can create the spring project using Spring STS IDE on creating the project add the below dependencies into our spring project.
Dependencies
- Spring Web
- Spring Web Security
- Spring data for mongodb
- Spring Dev Tools
- Lombok
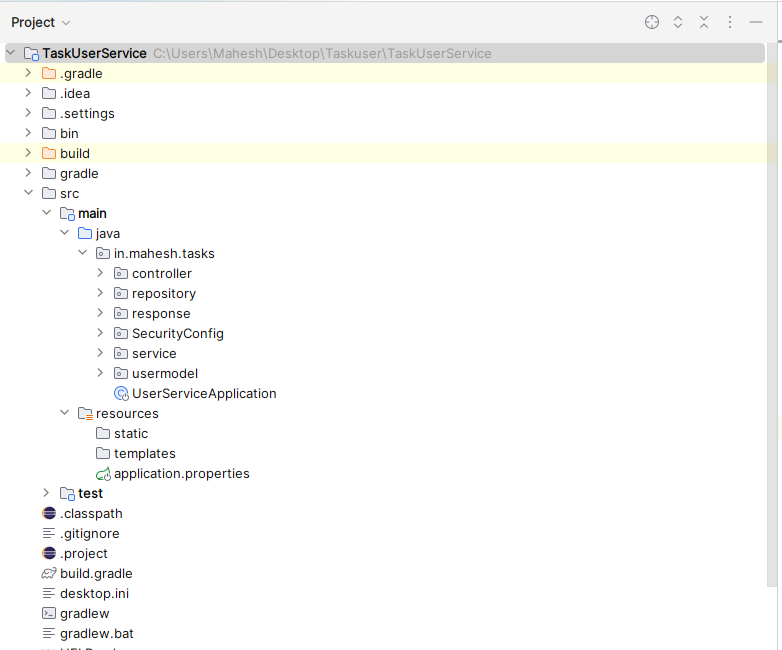
Once completed the creation of the spring project and create the required package also then the file structure looks like below image:
File structure
Step 2: Open the application.properities file and put the below code into that file. This code can be configuration of the database and spring security permissions to allow the react app request into this project.
application.properties:
server.port=8081
spring.data.mongodb.uri=mongodb://localhost:27017/userData
spring.application.name=LOGIN-SERVICE
# Session Management Configuration
spring.security.filter.chain.content-negotiation.parameter-strategy=ignore
spring.security.filter.chain.any-request.authorized=permitAll
spring.security.filter.chain.request-matcher.path.pattern=/api/**
spring.security.filter.chain.request-matcher.path.authenticated=true
# CSRF Configuration
spring.security.csrf.disabled=true
# CORS Configuration
spring.security.cors.configurationSource.allowedOrigins=http://localhost:3000
spring.security.cors.configurationSource.allowedMethods=*
spring.security.cors.configurationSource.allowedHeaders=*
spring.security.cors.configurationSource.allowCredentials=true
spring.security.cors.configurationSource.exposedHeaders=Authorization
spring.security.cors.configurationSource.maxAge=3600
Step 3: Create the usermodel package and in that package create the Java class and it named as the User for the user data handling into the project.
Go to the src > in.mahesh.tasks > usermodel > User and put the below code:
Java
package in.mahesh.tasks.usermodel;
import java.util.List;
import org.springframework.data.annotation.Id;
import org.springframework.data.mongodb.core.mapping.Document;
import com.fasterxml.jackson.annotation.JsonProperty;
import lombok.AllArgsConstructor;
import lombok.Data;
import lombok.NoArgsConstructor;
@Document(collection = "user")
@AllArgsConstructor
@NoArgsConstructor
@Data
public class User {
@Id
private String id;
private String fullName;
private String email;
@JsonProperty(access = JsonProperty.Access.WRITE_ONLY)
private String password;
private String role = "ROLE_CUSTOMER";
private String mobile;
public String getId() {
return id;
}
public void setId(String id) {
this.id = id;
}
public String get_id() {
return id;
}
public void set_id(String id) {
this.id = id;
}
public String getFullName() {
return fullName;
}
public void setFullName(String fullName) {
this.fullName = fullName;
}
public String getEmail() {
return email;
}
public void setEmail(String email) {
this.email = email;
}
public String getPassword() {
return password;
}
public void setPassword(String password) {
this.password = password;
}
public String getRole() {
return role;
}
public void setRole(String role) {
this.role = role;
}
public String getMobile() {
return mobile;
}
public void setMobile(String mobile) {
this.mobile = mobile;
}
}
|
Step 4: Create the repository package and in that package create the Java interface and it named as the UserRepository for the user data can save into the database.
Go to the src > in.mahesh.tasks > repository> UserRepository and put the below code:
Java
package in.mahesh.tasks.repository;
import org.springframework.data.mongodb.repository.MongoRepository;
import org.springframework.data.mongodb.repository.Query;
import org.springframework.stereotype.Repository;
import in.mahesh.tasks.usermodel.User;
@Repository
public interface UserRepository extends MongoRepository<User,String> {
@Query("{email :?0}")
User findByEmail(String email);
}
|
Step 5: Create the service package and in that package create the Java class and it named as the UserService for handling the services of the project.
Go to the src > in.mahesh.tasks > service > UserService and put the below code:
Java
package in.mahesh.tasks.service;
import in.mahesh.tasks.usermodel.User;
import java.util.List;
public interface UserService {
public List<User> getAllUser() ;
public User findUserProfileByJwt(String jwt);
public User findUserByEmail(String email) ;
public User findUserById(String userId) ;
public List<User> findAllUsers();
}
|
Step 6: Create the service package and in that package create the java class and it named as the UserServiceImplementation for handling the services of the project.
Go to the src > in.mahesh.tasks > service > UserServiceImplementation and put the below code:
Java
package in.mahesh.tasks.service;
import in.mahesh.tasks.repository.UserRepository;
import in.mahesh.tasks.usermodel.User;
import org.springframework.beans.factory.annotation.Autowired;
import org.springframework.security.core.GrantedAuthority;
import org.springframework.security.core.userdetails.UserDetails;
import org.springframework.security.core.userdetails.UserDetailsService;
import org.springframework.security.core.userdetails.UsernameNotFoundException;
import org.springframework.stereotype.Service;
import java.util.ArrayList;
import java.util.List;
@Service
public class UserServiceImplementation implements UserDetailsService {
@Autowired
private UserRepository userRepository;
public UserServiceImplementation(UserRepository userRepository) {
this.userRepository=userRepository;
}
@Override
public UserDetails loadUserByUsername(String username) throws UsernameNotFoundException {
User user = userRepository.findByEmail(username);
System.out.println(user);
if(user==null) {
throw new UsernameNotFoundException("User not found with this email"+username);
}
System.out.println("Loaded user: " + user.getEmail() + ", Role: " + user.getRole());
List<GrantedAuthority> authorities = new ArrayList<>();
return new org.springframework.security.core.userdetails.User(
user.getEmail(),
user.getPassword(),
authorities);
}
}
|
Step 7: Create the SecurityConfig package and in that package create the java class and it named as the ApplicationConfig for handling the security of the project.
Go to the src > in.mahesh.tasks > SecurityConfig > ApplicationConfig and put the below code:
Java
package in.mahesh.tasks.SecurityConfig;
import jakarta.servlet.http.HttpServletRequest;
import org.springframework.context.annotation.Bean;
import org.springframework.context.annotation.Configuration;
import org.springframework.security.config.annotation.web.builders.HttpSecurity;
import org.springframework.security.config.http.SessionCreationPolicy;
import org.springframework.security.crypto.bcrypt.BCryptPasswordEncoder;
import org.springframework.security.crypto.password.PasswordEncoder;
import org.springframework.security.web.SecurityFilterChain;
import org.springframework.security.web.authentication.www.BasicAuthenticationFilter;
import org.springframework.web.cors.CorsConfiguration;
import org.springframework.web.cors.CorsConfigurationSource;
import java.util.Arrays;
import java.util.Collections;
@Configuration
public class ApplicatonConfig {
@SuppressWarnings("deprecation")
@Bean
SecurityFilterChain filterChain(HttpSecurity http) throws Exception {
http.sessionManagement(management -> management.sessionCreationPolicy(SessionCreationPolicy.STATELESS))
.authorizeRequests(
authorize -> authorize.requestMatchers("/api/**")
.authenticated().anyRequest().permitAll())
.addFilterBefore(new JwtTokenValidator(), BasicAuthenticationFilter.class)
.csrf(csrf -> csrf.disable())
.cors(cors -> cors.configurationSource(corsConfigurationSource()));
return http.build();
}
private CorsConfigurationSource corsConfigurationSource() {
return new CorsConfigurationSource() {
@Override
public CorsConfiguration getCorsConfiguration(HttpServletRequest request) {
CorsConfiguration ccfg = new CorsConfiguration();
ccfg.setAllowedMethods(Collections.singletonList("*"));
ccfg.setAllowCredentials(true);
ccfg.setAllowedHeaders(Collections.singletonList("*"));
ccfg.setExposedHeaders(Arrays.asList("Authorization"));
ccfg.setMaxAge(3600L);
return ccfg;
}
};
}
@Bean
PasswordEncoder passwordEncoder() {
return new BCryptPasswordEncoder();
}
}
|
Step 8: In same package create the java class and it named as the JwtProvider for handling the provides the token of the project.
Go to the src > in.mahesh.tasks > SecurityConfig > JwtProvider and put the below code:
Java
package in.mahesh.tasks.SecurityConfig;
import io.jsonwebtoken.Claims;
import io.jsonwebtoken.Jwts;
import io.jsonwebtoken.security.Keys;
import org.springframework.security.core.Authentication;
import org.springframework.security.core.GrantedAuthority;
import javax.crypto.SecretKey;
import java.util.Collection;
import java.util.Date;
import java.util.HashSet;
import java.util.Set;
public class JwtProvider {
static SecretKey key = Keys.hmacShaKeyFor(JwtConstant.SECRET_KEY.getBytes());
public static String generateToken(Authentication auth) {
Collection<? extends GrantedAuthority> authorities = auth.getAuthorities();
String roles = populateAuthorities(authorities);
@SuppressWarnings("deprecation")
String jwt = Jwts.builder()
.setIssuedAt(new Date())
.setExpiration(new Date(new Date().getTime()+86400000))
.claim("email", auth.getName())
.claim( "authorities",roles)
.signWith(key)
.compact();
System.out.println("Token for parsing in JwtProvider: " + jwt);
return jwt;
}
private static String populateAuthorities(Collection<? extends GrantedAuthority> authorities) {
Set<String> auths = new HashSet<>();
for(GrantedAuthority authority: authorities) {
auths.add(authority.getAuthority());
}
return String.join(",",auths);
}
@SuppressWarnings("deprecation")
public static String getEmailFromJwtToken(String jwt) {
jwt = jwt.substring(7);
try {
Claims claims = Jwts.parser().setSigningKey(key).build().parseClaimsJws(jwt).getBody();
String email = String.valueOf(claims.get("email"));
System.out.println("Email extracted from JWT: " + claims);
return email;
} catch (Exception e) {
System.err.println("Error extracting email from JWT: " + e.getMessage());
e.printStackTrace();
return null;
}
}
}
|
Step 9: In same package create the java class and it named as the JwtTokenValidator for handling the provides the validation of the token.
Go to the src > in.mahesh.tasks > SecurityConfig > JwtTokenValidator and put the below code:
Java
package in.mahesh.tasks.SecurityConfig;
import io.jsonwebtoken.Claims;
import io.jsonwebtoken.Jwts;
import io.jsonwebtoken.security.Keys;
import jakarta.servlet.FilterChain;
import jakarta.servlet.ServletException;
import jakarta.servlet.http.HttpServletRequest;
import jakarta.servlet.http.HttpServletResponse;
import org.springframework.security.authentication.BadCredentialsException;
import org.springframework.security.authentication.UsernamePasswordAuthenticationToken;
import org.springframework.security.core.Authentication;
import org.springframework.security.core.GrantedAuthority;
import org.springframework.security.core.authority.AuthorityUtils;
import org.springframework.security.core.context.SecurityContextHolder;
import org.springframework.web.filter.OncePerRequestFilter;
import javax.crypto.SecretKey;
import java.io.IOException;
import java.util.List;
public class JwtTokenValidator extends OncePerRequestFilter {
@Override
protected void doFilterInternal(HttpServletRequest request, HttpServletResponse response, FilterChain filterChain) throws ServletException, IOException {
String jwt = request.getHeader(JwtConstant.JWT_HEADER);
System.out.println("JWT Token in JwtTokenValidator: " + jwt);
if (jwt != null && jwt.startsWith("Bearer ")) {
jwt = jwt.substring(7);
System.out.println("JWT Token in JwtTokenValidator: " + jwt);
try {
SecretKey key = Keys.hmacShaKeyFor(JwtConstant.SECRET_KEY.getBytes());
@SuppressWarnings("deprecation")
Claims claims = Jwts.parser().setSigningKey(key).build().parseClaimsJws(jwt).getBody();
System.out.print(claims);
String email = String.valueOf(claims.get("email"));
System.out.print(email);
String authorities = String.valueOf(claims.get("authorities"));
List<GrantedAuthority> auth = AuthorityUtils.commaSeparatedStringToAuthorityList(authorities);
Authentication authentication = new UsernamePasswordAuthenticationToken(email, null, auth);
SecurityContextHolder.getContext().setAuthentication(authentication);
} catch (Exception e) {
throw new BadCredentialsException("Invalid token", e);
}
}
filterChain.doFilter(request, response);
}
}
|
Step 10: In same package create the java class and it named as the JwtConstant for handling the provides the jwt header and secret key of the token.
Go to the src > in.mahesh.tasks > SecurityConfig > JwtConstant and put the below code:
Java
package in.mahesh.tasks.SecurityConfig;
public class JwtConstant {
public static final String SECRET_KEY = "wpembytrwcvnryxksdbqwjebruyGHyudqgwveytrtrCSnwifoesarjbwe";
public static final String JWT_HEADER = "Authorization";
}
|
Step 11: Create the controller package and in that package create the java class and it named as the UserController for handling the request of the project.
Go to the src > in.mahesh.tasks > controller > UserController and put the below code:
Java
package in.mahesh.tasks.controller;
import in.mahesh.tasks.repository.UserRepository;
import in.mahesh.tasks.response.AuthResponse;
import in.mahesh.tasks.service.UserServiceImplementation;
import in.mahesh.tasks.service.UserService;
import in.mahesh.tasks.SecurityConfig.JwtProvider;
import in.mahesh.tasks.usermodel.User;
import org.springframework.beans.factory.annotation.Autowired;
import org.springframework.http.HttpStatus;
import org.springframework.http.ResponseEntity;
import org.springframework.security.authentication.BadCredentialsException;
import org.springframework.security.authentication.UsernamePasswordAuthenticationToken;
import org.springframework.security.core.Authentication;
import org.springframework.security.core.context.SecurityContextHolder;
import org.springframework.security.core.userdetails.UserDetails;
import org.springframework.security.crypto.password.PasswordEncoder;
import org.springframework.web.bind.annotation.PostMapping;
import org.springframework.web.bind.annotation.RequestBody;
import org.springframework.web.bind.annotation.RequestMapping;
import org.springframework.web.bind.annotation.RestController;
@RestController
@RequestMapping("/auth")
public class UserController {
@Autowired
private UserRepository userRepository;
@Autowired
private PasswordEncoder passwordEncoder;
@Autowired
private UserServiceImplementation customUserDetails;
@Autowired
private UserService userService;
@PostMapping("/signup")
public ResponseEntity<AuthResponse> createUserHandler(@RequestBody User user) {
String email = user.getEmail();
String password = user.getPassword();
String fullName = user.getFullName();
String mobile = user.getMobile();
String role = user.getRole();
User isEmailExist = userRepository.findByEmail(email);
if (isEmailExist != null) {
}
User createdUser = new User();
createdUser.setEmail(email);
createdUser.setFullName(fullName);
createdUser.setMobile(mobile);
createdUser.setRole(role);
createdUser.setPassword(passwordEncoder.encode(password));
User savedUser = userRepository.save(createdUser);
userRepository.save(savedUser);
Authentication authentication = new UsernamePasswordAuthenticationToken(email,password);
SecurityContextHolder.getContext().setAuthentication(authentication);
String token = JwtProvider.generateToken(authentication);
AuthResponse authResponse = new AuthResponse();
authResponse.setJwt(token);
authResponse.setMessage("Register Success");
authResponse.setStatus(true);
return new ResponseEntity<AuthResponse>(authResponse, HttpStatus.OK);
}
@PostMapping("/signin")
public ResponseEntity<AuthResponse> signin(@RequestBody User loginRequest) {
String username = loginRequest.getEmail();
String password = loginRequest.getPassword();
System.out.println(username+"-------"+password);
Authentication authentication = authenticate(username,password);
SecurityContextHolder.getContext().setAuthentication(authentication);
String token = JwtProvider.generateToken(authentication);
AuthResponse authResponse = new AuthResponse();
authResponse.setMessage("Login success");
authResponse.setJwt(token);
authResponse.setStatus(true);
return new ResponseEntity<>(authResponse,HttpStatus.OK);
}
private Authentication authenticate(String username, String password) {
System.out.println(username+"---++----"+password);
UserDetails userDetails = customUserDetails.loadUserByUsername(username);
System.out.println("Sig in in user details"+ userDetails);
if(userDetails == null) {
System.out.println("Sign in details - null" + userDetails);
throw new BadCredentialsException("Invalid username and password");
}
if(!passwordEncoder.matches(password,userDetails.getPassword())) {
System.out.println("Sign in userDetails - password mismatch"+userDetails);
throw new BadCredentialsException("Invalid password");
}
return new UsernamePasswordAuthenticationToken(userDetails,null,userDetails.getAuthorities());
}
}
|
Step 12: Create the response package and in that package create the java class and it named as the ApiResponse for handling the api response of the project.
Go to the src > in.mahesh.tasks > response > ApiResponse and put the below code:
Java
package in.mahesh.tasks.response;
import lombok.AllArgsConstructor;
import lombok.Data;
import lombok.NoArgsConstructor;
@Data
public class ApiResponse {
private String message;
private boolean status;
public ApiResponse(String string, boolean b) {
}
public String getMessage() {
return message;
}
public void setMessage(String message) {
this.message = message;
}
public boolean isStatus() {
return status;
}
public void setStatus(boolean status) {
this.status = status;
}
}
|
Step 13: Create the response package and in that package create the Java class and it named as the AuthResponse for handling the auth response of the project.
Go to the src > in.mahesh.tasks > response > AuthResponse and put the below code:
Java
package in.mahesh.tasks.response;
import lombok.AllArgsConstructor;
import lombok.NoArgsConstructor;
@AllArgsConstructor
@NoArgsConstructor
public class AuthResponse {
private String jwt;
private String message;
private Boolean status;
public String getJwt() {
return jwt;
}
public void setJwt(String jwt) {
this.jwt = jwt;
}
public String getMessage() {
return message;
}
public void setMessage(String message) {
this.message = message;
}
public Boolean getStatus() {
return status;
}
public void setStatus(Boolean status) {
this.status = status;
}
}
|
Step 14: Open the main class and put the below code:
Java
package in.mahesh.tasks;
import org.springframework.boot.SpringApplication;
import org.springframework.boot.autoconfigure.SpringBootApplication;
@SpringBootApplication
public class UserServiceApplication {
public static void main(String[] args) {
SpringApplication.run(UserServiceApplication.class, args);
}
}
|
Step 15: Once completed the project and run the application as spring project and once runs the application successful then it will run on the port 8081. Refer the below image for the better understanding.
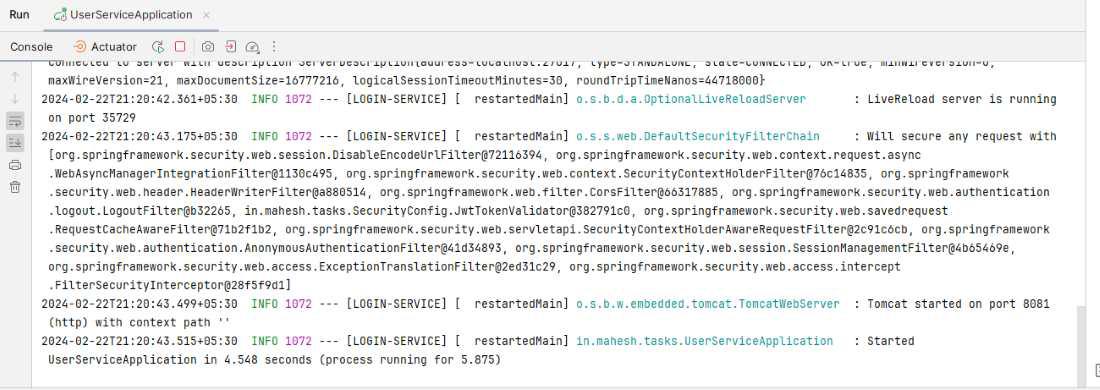
Endpoints of this project
|
Method
|
Endpoints
|
|
POST
|
http://localhost:8081/auth/signup
|
|
POST
|
http://localhost:8081/auth/signin
|
Once completed both frontend with React and backend with Spring Security then run both applications of the project.
Final Output
Below we can refer the video to see the output of the application.
We can follow the above steps you can successful develop the react login application with the backend of the spring security of the project.
Share your thoughts in the comments
Please Login to comment...