How to Enable Automatic Replies in Gmail – Quick Steps
Navigate to Settings > See all settings and go to the Advanced tab.
Within the Templates section, Select Enable
Are you aware of the secret hidden tricks of Gmail that can be a game changer for email work? Then auto replies using filters must be your top pick to ease down your workload. Auto replies can help you manage your inbox effectively.
The auto-reply feature of Gmail allows you to create a template with a pre-written message that is automatically delivered when certain emails that are received match specific filters. It is similar to like an AI or virtual assistant who manages your email inbox.
Think about the time you can save and utilize it fruitfully by setting up auto-replies with pre-written messages. Ensure that all your important messages are answered quickly, even when you’re not there or busy. Setting up auto-replies keeps your work organized.
What is Auto-Reply in Gmail
Auto auto-reply feature allows users to create a pre-written message and send it to incoming emails. Gmail’s auto-reply feature responds to messages quickly and with less effort.
Take, for example, if you’re not at your workplace, you can set up auto-replies to answer emails sent to you. Next, assume you are on vacation or in a meeting or just can’t answer emails due to some reasons. These auto-replies will do it for you.
Perhaps you’re looking for a way to streamline mundane, repetitive email responses. In order to automate routine email responses, you can use variables like content and sender information to trigger pre-programmed responses. This method confirms email receipts, answers frequently asked questions (FAQs), and gives information (such as business hours) efficiently. It saves time, supports quick and regular communication, and works especially well for teams that get a lot of emails with the same questions.
How do Auto Replies Help
In a business context, auto-responses are a huge help when it comes to improving communication and efficiency. A few examples of when auto-replies are useful are:
Timely acknowledgment: With auto-replies, email senders are assured that their message has been received, even if a full answer is not required right away. This shows that they have gotten their message and is a good way to show professional courtesy.
Managing high email volumes: Auto replies help people handle the large number of emails they get at work. Users can focus on more important jobs because it saves them time by responding quickly to emails without having to type them in by hand.
Consistent and standardized responses: Auto-replies make sure that the same, standard answers are sent to all similar types of questions. This makes the conversation more professional by lowering the chances of mistakes, inconsistencies, or omissions.
Remote work and flexible schedules: These days, people can work from home and set their hours, so auto-replies help keep communication going when employees can’t be reached during normal office hours. It makes sure that senders get a reply and know when the receiver is free.
Emergency or urgent situations: You can set up auto-replies to handle emergencies. Let’s say, for example, that there is a big system failure or something strange happens. Auto-replies can let people who sent the message know what’s going on and give them other ways to get help right away.
Professionalism and brand image: When someone or an organization consistently uses auto-replies in a professional and timely way, it looks good. It shows a dedication to quick responses and professionalism, which can improve the brand’s image as a whole.
Conditional Responses: The auto-reply feature can send responses to companies based on the sender or the message. An instant auto-reply makes sure that essential communications are dealt with quickly. It can be set up for emails from VIP clients or those that contain certain phrases.
People and businesses can get these benefits from Gmail’s auto-reply tool, which leads to more professional communication, higher customer satisfaction, and more efficient work.
How to set up Auto Replies in Gmail
You can configure this function to automatically reply to a specific email address whenever a predefined condition is satisfied, such as when you get an email from a certain individual.
Enable Templates for Automatic Replies in Gmail
You need to enable templates in Gmail before it can automatically respond to emails with a pre-written response based on certain parameters. In this way:
Step 1: Log in to Gmail
Open Gmail on your desktop or mobile application and log in to your Gmail account. You will find the Settings icon in the top corner; click on it.
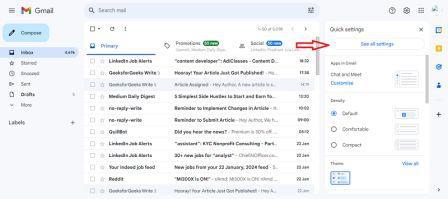
Step 2: Click on “See all Settings.”
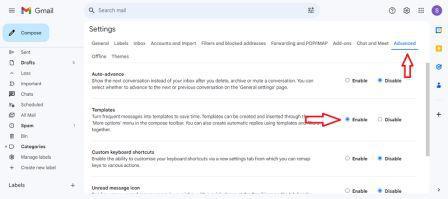
Browse through the “See all Settings” option to open the “Advanced Tab” on the top.
Step 3: Select “Template”
Search for the “Template” on the menu and tap on “Enable”. Now scroll down at the bottom of the window to “Save” the changes made.
Create a Template for Automatic Email Replies in Gmail
With templates enabled, the next step is to create a template that will serve as your default response.
Step 1: Compose your Email
On the main browser window of Gmail, click on “Compose” and type the auto-reply message.
Step 2: Create a template
On the menu bar at the button, tap at the three dots icon and select “Template” from the dropdown menu.
Step 3: Save the draft
Click on the “Save Draft” option and save it as a “New template”. Name your new template. Now “Save” the changes.
.jpg)
How to Set Up an Automatic Reply Filter in Gmail
You can set up a filter in Gmail to automatically email your newly made template based on certain parameters.
Step 1: Open the Search bar
Open the main window of the Gmail page and tap on the Search bar that appears at the top. Now click the “Show search options” icon.
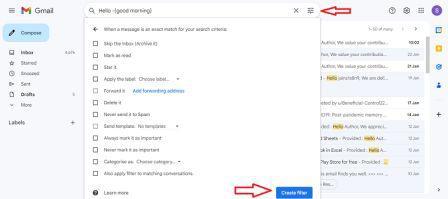
Step 2: Set the filters
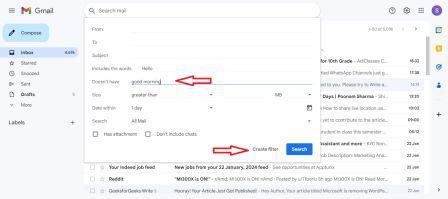
Set the rules for the instant reply filter. It could be a name, a theme, or any of the other form fields. After that, click Make filter.
Step 3: Check the results
On the search bar, check whether the results are appropriate or not.
Step 4: Create a filter
In the search bar, tap on the “Show Search” option and click on “Create filter”.
Step 5: Send the template
Pick out the action. Send the template, pick the one you made before, and click Create filter.
Conclusion
In conclusion, Gmail’s auto-reply tool has many advantages and options for managing emails effectively. Routine questions, out-of-office messages, and general messages can be answered automatically by users, saving them time and making contact easier.
Auto-replies make sure that you quickly respond to and answer new emails, which keeps your professionalism and good image. But it’s important to check and change your auto-reply settings often to make sure they stay relevant and correct.
The auto-reply feature in Gmail helps people handle their email more efficiently in today’s busy world, which boosts productivity and makes connections stronger. Use Gmail’s auto-replies to get the most out of managing your emails efficiently.
FAQ’s on How to Set Up Auto Reply in Gmail
Can I set an auto-reply for Gmail?
Yes, you can set an auto reply for Gmail. Select Compose from the main Gmail page. Put your automated response into the new message window. After that, click the three dots next to the button, and then choose Templates. Then, select Save as new template after clicking Save draft as template.
How do you send an automatic reply to every incoming email?
Click FILE > Automatic Replies > Send Automatic Replies. Craft and format your message. If desired, select Only send during this time range and choose start and end dates.
How to set up automatic replies in Gmail on your iPhone?
Access Settings ➔ Mail ➔ Accounts: Pick the email account ➔ Navigate to Automatic Replies (found at the bottom). IMPORTANT – The Automatic Replies option will be visible, as depicted above, only if the email account you are using permits it in the Apple Mail app.
Share your thoughts in the comments
Please Login to comment...