Quick Preview to Record Screen on Windows or Mac:
- On Windows, Press Windows + G Keys to open XBox Game Bar & select Capture to record screen.
- On Mac, press Shift + Command + 5 keys to open Recorder Bar. And start recording the screen.
In different conditions that require someone to create a video, one often needs to Incorporate Screen Recording into the process. For example, a marketer trying to create a promotional video of their new product might need to show how the process works on screen. For such cases Screen Recording on Windows Mac devices is necessary.
The need for Screen Recording on PCs for different occupations is infinite. Keep in mind that, Windows and Mac devices modify themselves to come up with Dedicated Screen Recorded Tool. Using such a tool, Capturing Screen Activities on a Windows PC or Mac will become a cakewalk.
In this article, we will discuss the steps required to Record a Screen on Windows or Mac in a way detailed format to clear the concept.

How to Record Screen on Windows?
For Windows 11 and 10 users, the Game Bar is a suitable solution for recording the on-screen elements without quality loss. This preset utility in Windows devices is helpful for gaming controls but is also inlaid with the on-screen video-capturing function powered by Xbox.
Steps to Access the Windows Game Bar
Step 1: You can click on the Start menu and type Settings. Then, choose and launch. Or, press the Win + I keys to go to the Settings section on your Windows device.
Step 2: Tap on the Gaming option.

Step 3: Windows 11 users can directly activate the Xbox Game Bar through the controller if they are using it. On the other hand, Windows 10 users have to open the Xbox Game Bar option under Gaming.
Step 4: Activate the “Enable Xbox Game Bar for things” if it is not already enabled.
Steps to Start the Game Bar App
Step 1: On your Windows device, open the app or window you want to screen record and tap on the Win + G buttons.
Step 2: The Game Bar utility will open with many widgets related to different controls that appear on the screen, like recording video/audio, screenshot capture, or live broadcasting of the screen activity.
Step 3: Tap on the Start Recording key. Or tap on the Win + Alt + R letter combination on the keyboard.
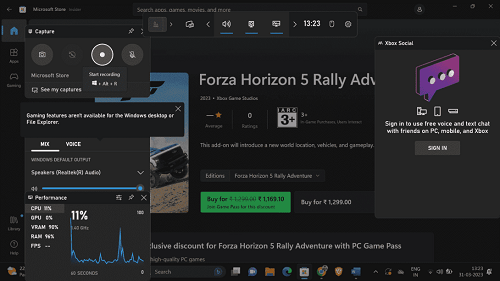
Step 4: Continue with the activity you need to handle on the screen. For example, if you want to capture how different features on an app work, do them while the Game Bar keeps recording the screen in the background.
Step 5: Tap on the screen for the floating widgets to disappear. Instead, you will see a small floating bar on the screen’s top-right side. You can manage recording controls through this section.

Step 6: After you are done, press the Recording button to end the screen capturing.
Step 7: A pop-up alert will appear immediately afterward, showing the information about the video downloading successfully. Click on it to enter the Game Bar and view the video directly. Here, tapping on the Play icon will start the video.
Step 8: Or go to File Explorer and follow this path: C:\Users\[username]\Videos\Captures.
Click on it to see the MP4 file of the recording for further editing and sharing.
Steps to Customize Game Bar Settings
Step 1: Open the Settings menu and click on Gaming.
Step 2: Choose Captures and make changes, like default saving location for files, background recording, video and audio recording, and frame rate adjustment to 60 FPS from 30 FPS. Notably, users can make such changes directly through the Game Bar app controls.

How to Record Screen on Mac?
Mac devices include native screen capturing tools as well that users can try out for simple and quick screen recording. Users can find the tools and access them with simple steps as well, like shortcut keys.
Method 1: Record the Screen on Mac Using the Screenshot Tool
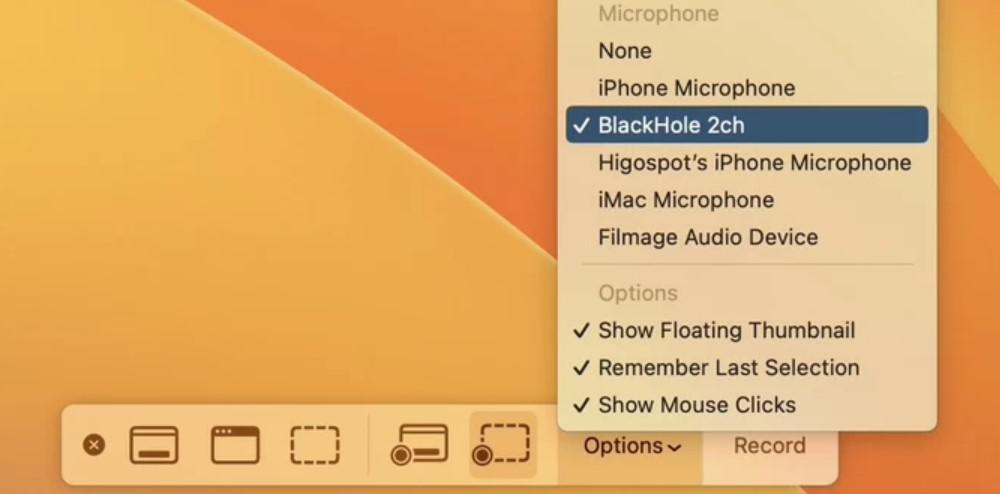
Step 1: On your Mac device, tap on the Shift + Command + 5 keys.
Step 2: When the Screenshot Toolbar launches, a floating bar appears with the multiple screen recording template options. Choose the one that fits your requirements.
Step 3: Tap on the Record Entire Screen option. However, you can click on the Record Selected Portion choice to record a partial screen.

Step 4: Audio recording does not activate automatically on this app. You have to go to the Options section to activate the microphone to add an audio clip to the video recording.
Step 5: Then tap on the Record key.
Step 6: After recording what you need to do, click on the Stop button from the top taskbar. Alternatively, you can click the Command + Ctrl + Esc keys.
Step 7: You can find the captured video under the Videos folder on the device.
Method 2: Record the Screen on Mac Using the QuickTime Player App
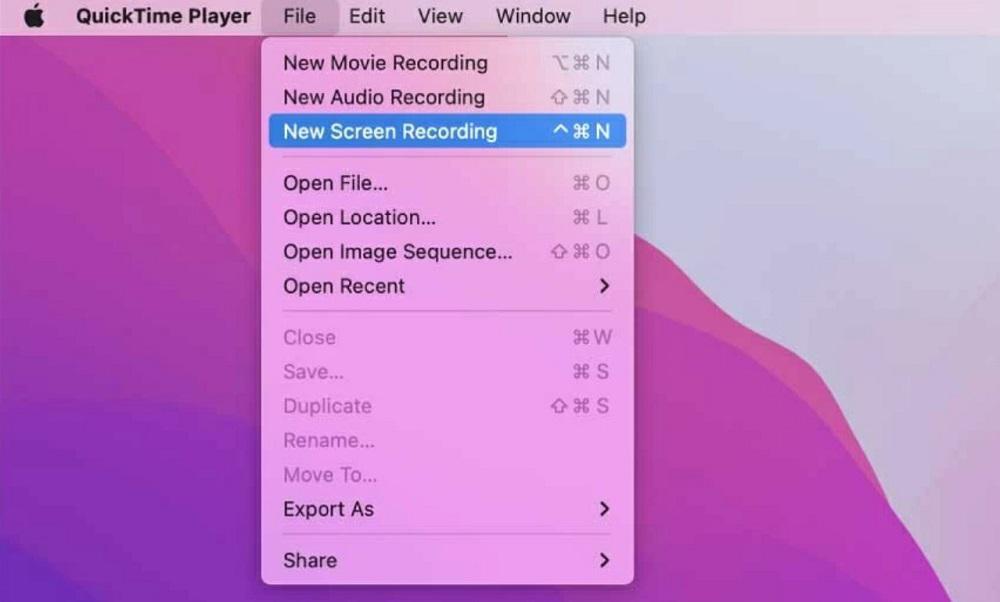
Step 1: Launch the QuickTime Player app on Mac.
Step 2: Click on the File option and choose “New Screen Recording.”
Step 3: Choose a section of the screen, like a separate window or a portion of the whole screen. Or, you can select to record the full screen.
Step 4: Tap on the Record key and proceed with the on-screen work you want to record.
Step 5: Afterward, hit the Stop button from the menu bar to complete this action.
How to Record Screen with Third-Party Apps?
Alternatively, you can opt for different third-party tools for the on-screen recording function if the prebuilt utilities are not working. Some suitable examples of this process are:
- OBS Studio- This powerful video editing software includes features available for high-quality live streaming. Users can smoothly record different screen activities as well.
- Wondershare Filmora- This video editor has a Screen Recorder feature that allows users to easily record long-time videos on windows, tabs, or entire screen elements.
Conclusion
Multiple methods are available for securely Recording the Screen on Windows and Mac Computers. The prebuilt features are the most secure and convenient options, so it is best to prioritize them. Follow the steps as mentioned properly. Otherwise, third-party apps are available for this function, where you can directly edit the videos later.
Frequently Asked Questions to Record Screen on Windows & Mac
How to record Screens on Windows?
To record the screen on Windows, the following guidelines should be executed.
- Press Windows + G Key simultaneously.
- Press the capture button to start recording.
- Do all the activities there.
- Click on the Stop Recording button.
How to Record Screen on Mac?
The steps required to record screen on Mac, are enlisted in the following guidelines.
- Press Shift + Command + 5 key to open Screenshot Tool.
- Execute your task on the screen.
- Press Command + CTRL + Esc to end the recording.
Can I use a third-party tool to record the screen on the Desktop?
Yes! You can use any kind of screen recording application to record the screen on a desktop. Also, there are many online platforms present to capture screen recordings as well. However, this application might sometimes access personal information that could create issues in the future.
Like Article
Suggest improvement
Share your thoughts in the comments
Please Login to comment...