Create and expand your Google community with the help of Google Groups.
Have you ever thought that before the flourishing era of social media and communication channels online, how would people convey their messages, ideas, and important notes to each other? Google Groups preceded the widespread use of threaded conversations on Twitter, stories on Instagram, and Facebook groups.
Google Groups is a service that lets people make and join online communities for communicating via email and conversation.
What are Google Groups?
Google has an amazing tool for their users named Google Groups. Through Groups, people of the same interests likes, and communities came together and shared their ideas. Individuals can establish groups, join preexisting ones, or engage in topical discussions.
Two versions of Google Groups are available: one that anybody may use for free and another that suits businesses. To access the features you want, you must repeatedly switch accounts if you are utilizing both versions of Google Groups.
How to Make a Google Group
Now, the question arises: how can you create Google groups? Follow these simple steps to create a Google group-
Step 1: Sign in with your Google Account and Open Google Groups
Open the Homepage of Google and browse Groups from the App menu at the top right corner.
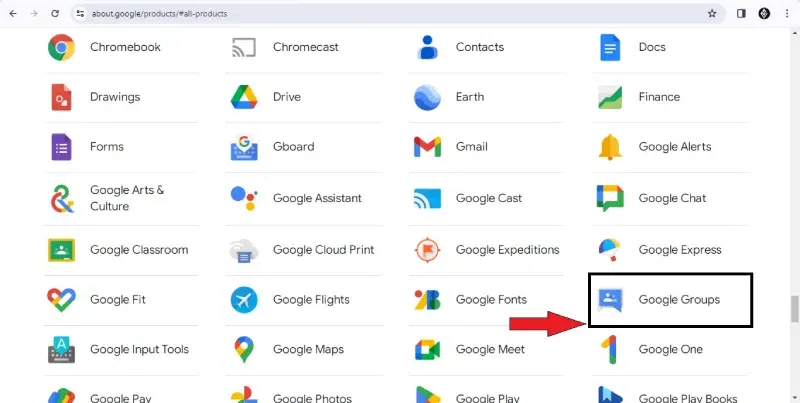
Browse Groups from the App menu
Step 2: Click on the Create Group Option
With your Gmail account credentials, sign in to Groups. On the left side, below the Groups icon, you’ll find the “Create” option.
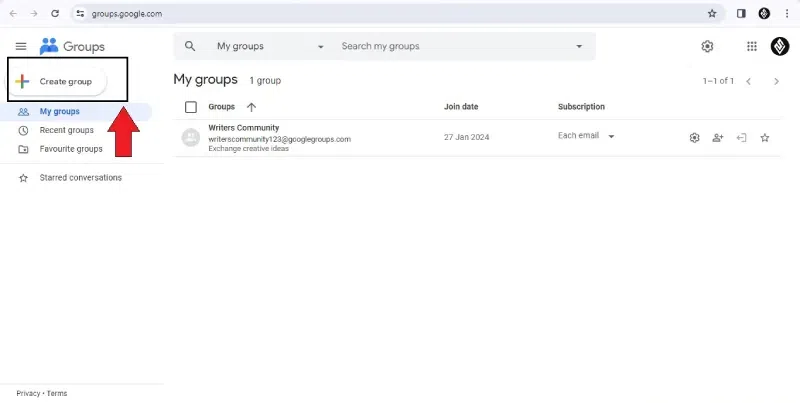
Click at the“Create” option
Step 3: Fill the Group Info and Click on Create Group
Tap the “Create” button and fill in all the required details. Customise your group from the “Settings” option.
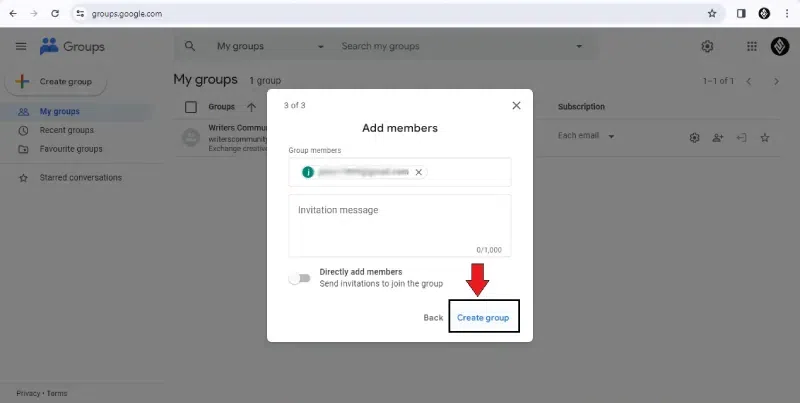
Add members in the Group
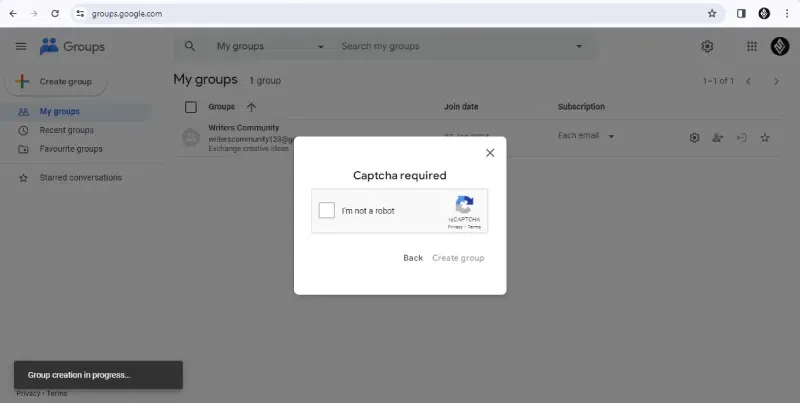
Step 4: Finish the captcha verification process
Wait for a while until the group is Activated to send messages.
Create Group
Note:
You can also update advanced settings for your group.
How to Make your Google Group a Collaborative Inbox
Note:
- Remember that if you want to make your Group a collaborative box, you must be an owner or manager.
- To make your Group a Collaborative inbox, your Google account should be “Google Groups for Business.”
- To enable the feature, turn the conversation history on.
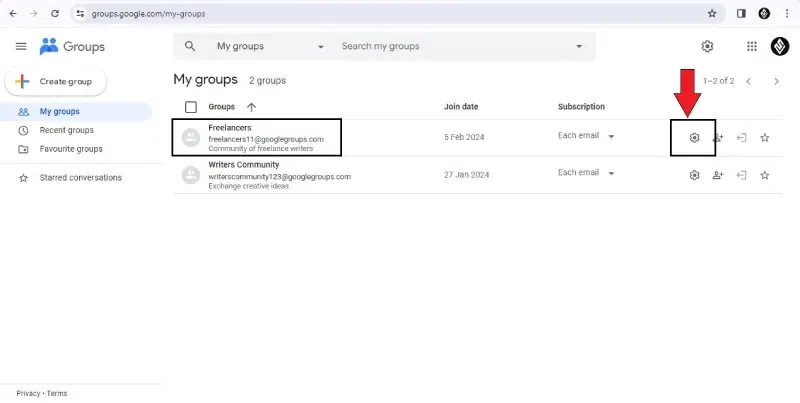
Step 1: Open Google groups
To access Groups, open the Google Homepage and click on the App menu in the upper right corner. Use your Gmail login information to get into Groups.
Open Google groups
Step 2: Open the “Settings”
Tap on the group name that you want to make a “collaborative inbox” and open “Settings” from the left corner.
Open the “Settings”
Step 3: Select “Collaborative box”
To activate more Google Groups capabilities, go to the Settings menu and choose Collaborative Inbox.
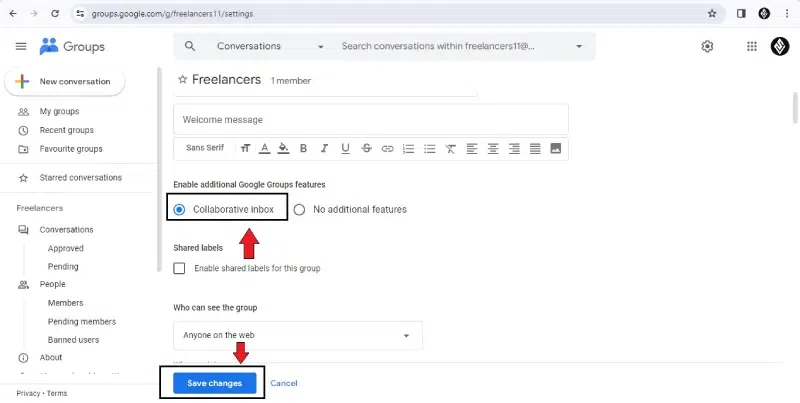
Select “Collaborative box”
How to Change your Google Group’s Settings
Note: To change the name of the Group or description and even email settings, you need to be the Owner or Manager.
Step 1: Open the Google Group
Browse Groups on Google’s homepage by tapping the App menu in the upper right corner.
Open the Google Group
Step 2: Sign in to Group
To access Groups, log in using your Gmail credentials.
Step 3: Tap on the Group’s name
Select the group and tap on it to make changes.
Tap on the Group’s name
Step 4: Open Settings
Now click on “Group Settings” and select “General section” to make the changes. Tap on the “Save” to save the changes you made.
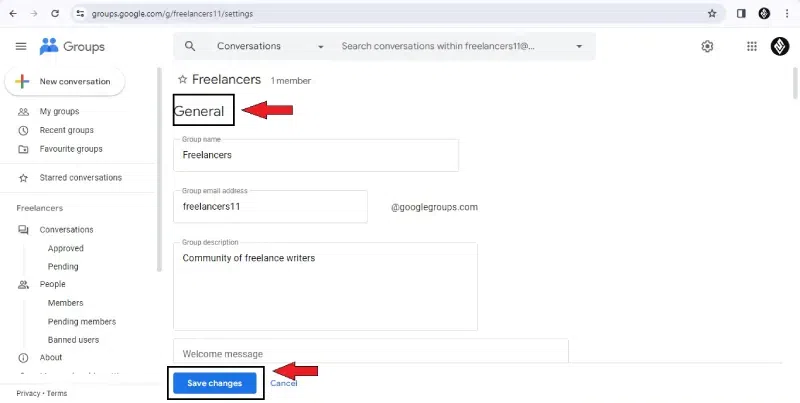
Select “General section”
How to Set Email options for your Group
Note:
To set email options for your group, you need to be the Owner or Manager.
Step 1: Open Google Groups and sign in
Click the App menu at the left corner of Google’s home page. Now open the Groups from the App menu and log in with your Gmail ID and password.
Open Google Groups and sign in
Step 2: Select “Group”
To edit a specific Group, just click on its name.
Select “Group”
Step 3: Open “Settings”
On the left side of the window, click “Settings” and choose the “Email” option from the drop-down menu. “Save” your changes.
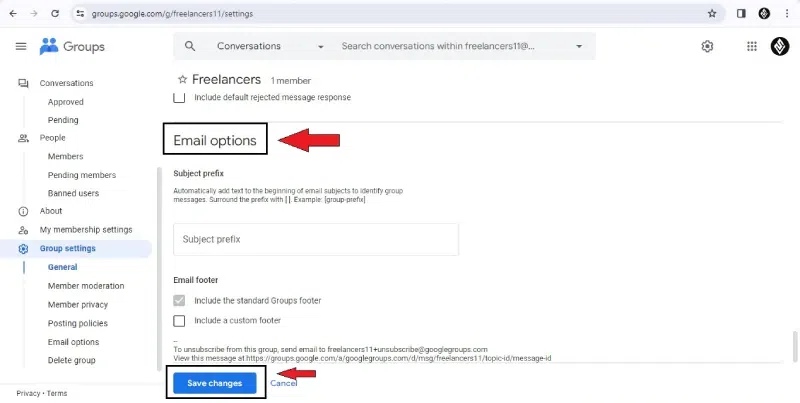
choose the “Email” option
Point to remember:
You can update the email preference to Subject prefix, Email footer, Conversation mode, and Post replies to features per your requirements. Choose these options to automatically fill the To field whenever you reply to a message. Message receivers can be changed manually.
Set How Members can Display their Identity
Note:
- To set email options for your group, you need to be the Owner or Manager.
- It’s up to you if you want users to be able to post with a display name or your Google profile linked.
Step 1: Start with Google Groups
Click the App menu at the left corner of Google’s home page. Now open the Groups from the App menu and log in with your Gmail ID and password.
Start with Google Groups
Step 2: Select “Group”
To edit a specific Group, just click on its name.
Select “Group”
Step 3: Go to “Settings”
On the left side of the window, click “Settings”, choose the “Member privacy” option from the drop-down menu, and select any of the identification formats. “Save” your changes.
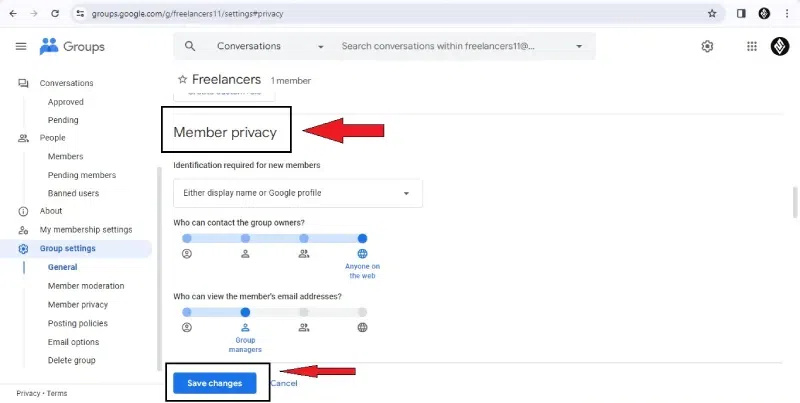
Choose the “Member privacy” option
How to Set who can post, view conversations, and join the group
Note:
To set email options for your group, you need to be the Owner or Manager.
Step 1: Open Google Groups and sign in
Click the App menu at the left corner of Google’s home page. Now open the Groups from the App menu and log in with your Gmail ID and password.
Open Google Groups and sign in
Step 2: Select “Group”
To edit a specific Group, just click on its name.
Select “Group”
Step 3: Open “Settings”
Click on the “Settings” on the window’s left side. Choose the “Posting policies” option from the drop-down menu. From the “Posting policies, you can update the permissions for your group.“Save” your changes.
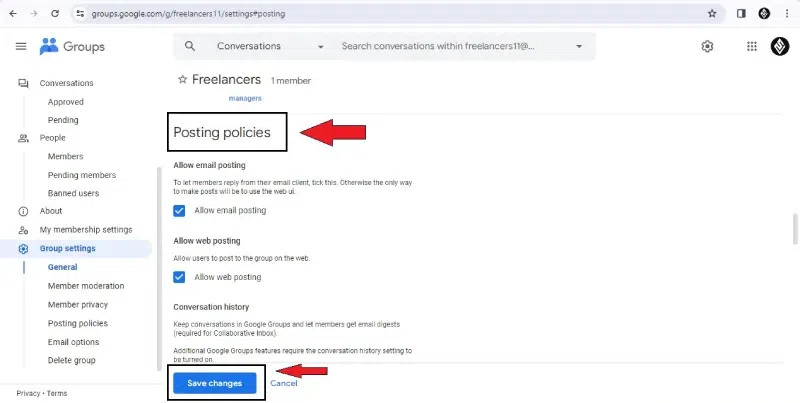
Choose the “Posting policies” option
How to set who can manage members and roles
Note:
To set email options for your group, you need to be the Owner or Manager.
Step 1: Open Google Groups and sign in
Click the App menu at the left corner of Google’s home page. Now open the Groups from the App menu and log in with your Gmail ID and password.
Open Google Groups and sign in
Step 2: Select “Group”
To edit a specific Group, just click on its name.
Select “Group”
Step 3: Open “Settings”
On the left side of the window, click “Settings” and choose the “Member moderation” option from the drop-down menu. You can select the permissions that you want to update in the group. “Save” your changes.
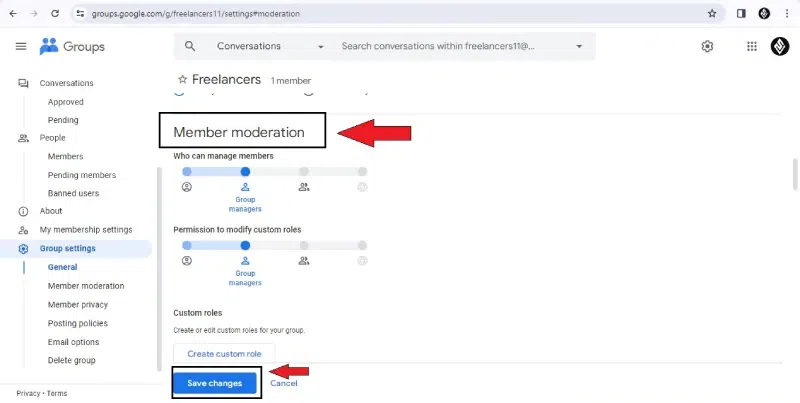
Choose the “Member moderation” option
How to Change your Subscription Settings
Step 1: Open Google Groups and sign in
Click the App menu at the left corner of Google’s home page. Now open the Groups from the App menu and log in with your Gmail ID and password.
Open Google Groups and sign in
Step 2: Select “Group”
To edit a specific Group, just click on its name.
Select “Group”
Step 3: Open “My membership settings”
On the window’s left side, click “My membership settings”. To set the subscription, select an option from the drop-down menu (Each email, Digest, Abridged and No email). “Save” your changes.
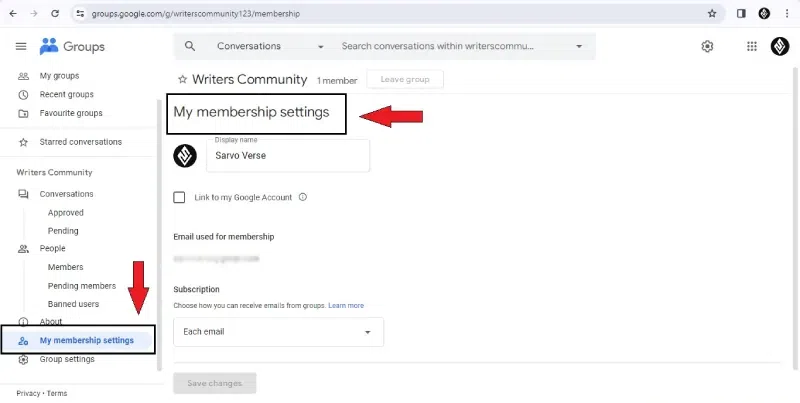
Click “My membership settings”
Point to Remember:
If you want to get digests or abridged summaries of what a group has said, you must enable conversation history for that group.
How to Delete a Google Group
Step 1: Open Google Groups and sign in
Click the App menu at the left corner of Google’s home page. Now open the Groups from the App menu and log in with your Gmail ID and password.
Open Google Groups and sign in
Step 2: Select “Group”
To edit a specific Group, just click on its name.
Select “Group”
Step 3: Open “Settings”
On the left side of the window, click “Settings” and choose the “Delete Group” option from the drop-down menu. “Save” your changes to delete group.
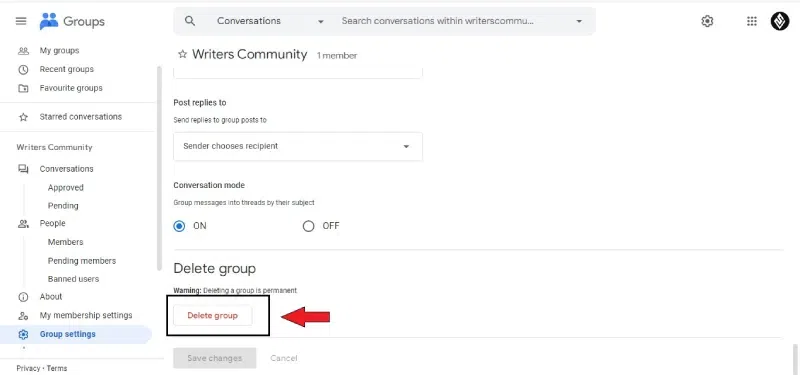
Click “Settings” and choose the “Delete Group” option
Conclusion
Google Groups is a podium where like-minded people share their interests and ideas. The features offered by Google Groups enable smooth and secure conversation. In this article, we’ve covered all the important aspects of Google groups and how you can create and edit Group settings.
FAQ’s on How to Create Google Groups
How do I change my email preferences for a group?
- Proceed to the specific group.
- Select “Membership and email settings” from the “My Settings” menu.
- Choose the frequency of emails that suits you best.
How do I make my group private?
Select “Manage” > “Permissions” > “Basic permissions” from the list of options that appear after listing your group.
Permissions and visibility can be changed here.
What are Google Groups used for?
Google Groups is a great way for teams, departments, or students to stay in touch and work together. Inviting a group to an event or sharing materials among group members is as easy as sending a single email.
Is Google Group free?
Users can join preexisting groups or start their own, depending on their interests. Google Groups comes in two versions: one that anyone can use for free and one designed to meet the needs of groups.
Share your thoughts in the comments
Please Login to comment...