How To Create A Google Form For Event Registration
Last Updated :
19 Jan, 2024
Planning and organizing an event can be a bit of a puzzle, especially when it comes to sorting out the attendees. Fortunately, there’s a handy tool like Google Forms to simplify and streamline the entire registration process. The best part is, that Google Forms is free and comes with your Google/Gmail account. Let’s make your event planning smoother and bring a touch of tech-savvy simplicity to your registration process using Google Forms. Ready to get started? Let’s go!
How to Create a Google Form for Registration
Step 1: Open Google Forms
To access Google Forms, navigate to the Google Forms site.
Step 2: Create a New Form
The home page opened offers you the following options under the “Start a new form” section for creating a form:
- Choose the “Event Registration” template from the Template gallery.
It will open up a form with pre-made questions and a header image that can be modified easily.
Step 3: Customize the form
The next step is to customize the form according to your needs.
- Add/Modify Form Title: You can change the form name from the default name “Event Registration” to any title that better suits your specific event or purpose. There are options to make the title Bold, Italic, and Underlined, insert a link, and remove formatting.

Modify Form Name
- Add/Modify Event Description: Modify the event description to suit your preferences. You can use the various formatting options available to customize the appearance and structure of your description.

Modify Event Description
- Add Questions: To add a question, click on “Add a new question” (⨁ icon) on the floating menu next to the question tab. After you write down your question, Google automatically selects the answer type based on your question but you can change it from the dropdown list. Other options available with regard to the question template include:
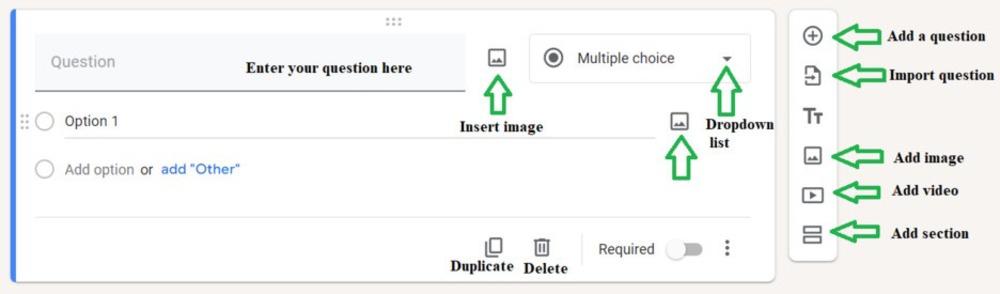
Question Tab
o Required – Marking the question as required makes the question compulsory to answer.
o Duplicate
o Delete
o Import – You can import questions from previously created Google forms. To do so-
Choose the required form.
Check the boxes next to the questions you wish to import.
Click on ‘Import Questions.
o Add sections – You can add sections to organize your form into multiple pages.
o Add image
o Add video
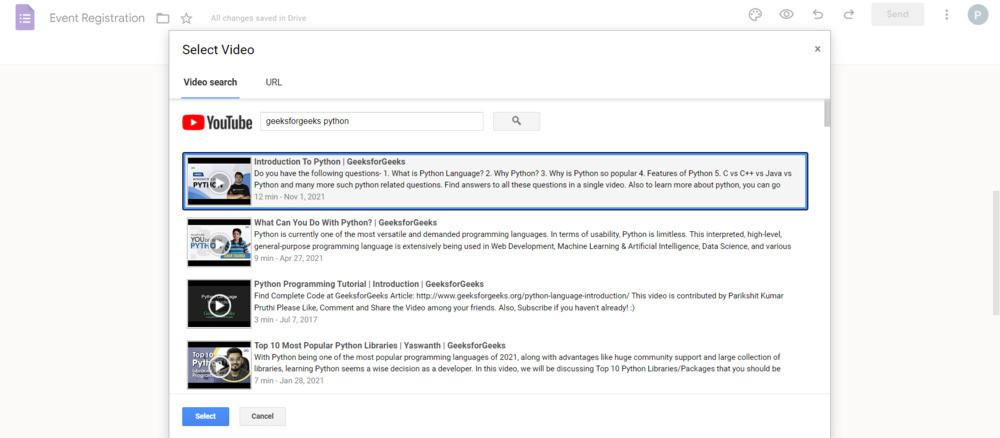
Add Video
Step 4: Add payment option (Optional)
There’s no inbuilt way to receive payments in Google Forms. However, you may link out to any payment service like PayPal or insert the QR Code in the question itself. As an answer, you may ask for the screenshot/Transaction ID as proof of payment.
Step 5: Customize Form Appearance
If you wish to personalize the form by adding a header image or adjusting the theme color, you can easily do so by selecting the ‘Customize Forms’ option.
- Add a Header Image
- Adjust the Theme and Background Color
- Switch Up the Font Style

Customize Form
Step 6: Alter other settings
In the settings section, you have the ability to establish guidelines for respondents when utilizing the forms.
Responses: Determine the available options and select accordingly.
- Collect Respondent’s Email Addresses: Enabling this option makes the email field mandatory.
- Limit the Number of Responses: Enabling this feature restricts responses from a specific signed-in account to just one.
- Allow Form Editing After Submission: Decide whether respondents can make changes to their form after submission.

Modify Settings
Presentation: Here, you can opt to:
- Show a Progress Bar: Display the progress bar indicating how many sections have been answered so far.
- Provide a Link to Submit Another Response: Enable respondents to easily submit additional responses.
- Modify the Default Confirmation Message: Customize the message displayed upon successful form submission according to your preferences.

Modify Confirmation message
Many other options are available to enhance your form. Customize as per your needs to create a personalized and effective form for your event registration.
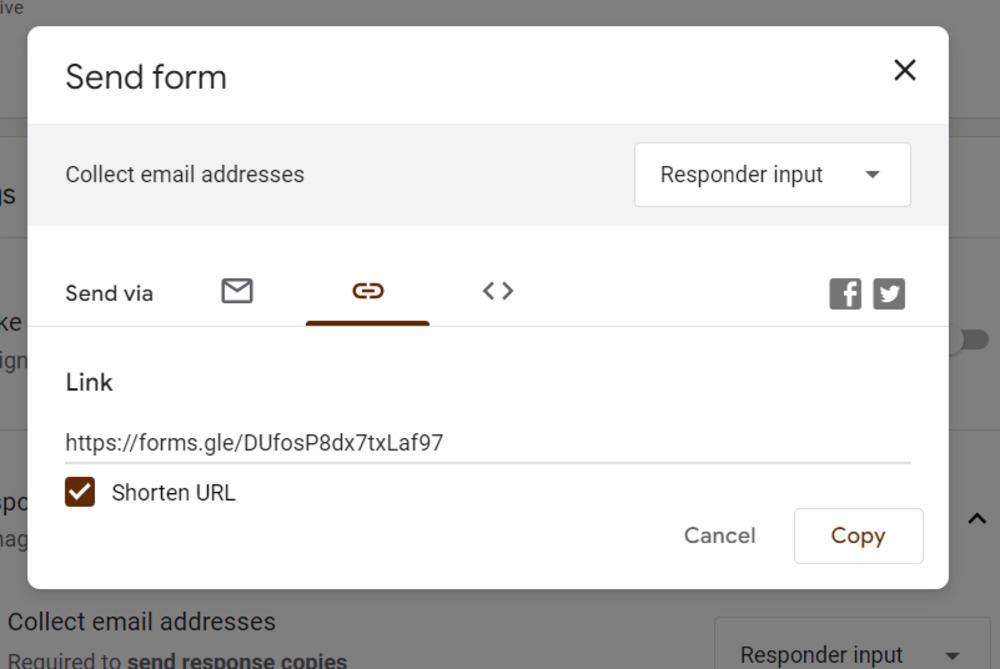
Step 7: Send your form
Preview your form. Click on the “Send” button available in the top right corner to share your form. You can send the link directly via email, share it using Facebook and Twitter, or simply copy and share the link.
Step 8: Check the responses
As respondents submit their answers, you can view and analyze the responses in real-time.
Moreover, when your deadline has passed, you have the option to halt further responses. Under the ‘Responses’ tab, you’ll find a toggle labeled ‘Accepting responses.’ Simply switch it off, and Google Forms will no longer take in any additional responses.

Responses Tab
There you are, done creating an event registration form using Google Forms!
This step-by-step guide article has explained how to use Google Forms for event registration. Google Forms make it easy to streamline the entire registration process, offering a user-friendly and efficient solution for event organizers.
FAQs
How do I create a registration form for an event?
To create a registration form, select the Event Registration template from Templates gallery in Google Forms. Then, edit the form as per your requirement following the steps given above.
How do I create a Google Form for recruitment?
To create a recruitment form, select the Job Application template from Templates gallery in Google Forms. Then, edit the form as per your requirement following the steps given above.
How do I create an admission form in Google Forms?
There is no specific template available related to admission in Google Forms. To create an admission form, click on Blank Form.
Add the required questions and edit the form accordingly.
Share your thoughts in the comments
Please Login to comment...