Hosting a Static Website on Google Cloud Storage: Step-by-Step Tutorial
Last Updated :
12 Dec, 2023
You have finally built the awesome portfolio website that all recruiters want. But now the question is, where to host it? Well, there are quite a few options for it, and object storage solutions like Google Cloud Storage and AWS S3 are some of the popular ones. You can host your static website in just a few steps using them.
Now what is object storage? It is simply one of the methods to store files which are called objects. It was created with cost-effectiveness in mind. Object Storage solutions are also generally called S3 compatible. So, Google Cloud Storage, AWS S3, Cloudflare R2, and Backblaze B2 are some of the S3-compatible storage solutions.
In this article, we will see how to deploy an awesome cat website on Google Cloud Storage. AsiaPlease note that you can only host static websites and not dynamic ones. But why? Simply because dynamic websites require a server.
Step 1: Create a Storage Bucket
A bucket, like its name suggests, is simply a place where all the objects (files) are stored. Here is how to create a bucket on Google Cloud.
- Go to the Buckets page
- Click on Create on the top bar
- Give a unique name to your bucket
- You can use <your name>-gfg-website, for example, ba3a-gfg-website
- Click on Choose where to store data, and select the region nearest to you
- For example, Asia (multiple regions in Asia)
- Click on Choose how to control access to objects
- Un-check the Enforce public access prevention on this bucket option
- Click on Create at the end of the page

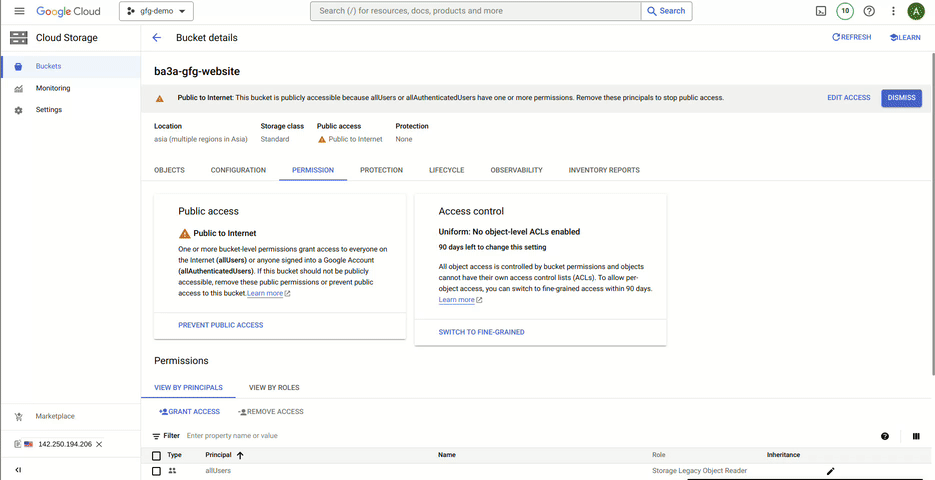
Step 2: Make The Objects Public
For everyone to be able to see your website, you have to make it public.
- Open the newly created bucket by clicking on its name
- Click on Permission
- Click on Grant Access
- Write allUsers in the New principals field
- Click on Select a role under Assign Role
- Select Storage Legacy Object Reader from Currently used
- You can also search for it from the input box
- Click on Save, and then ALLOW PUBLIC ACCESS

Step 3: Upload the Website
Make sure to name the main page of the website to index.html.
- Go to the Objects tab
- Click on Upload Files
- Select all your website files and upload them
At this point, your website should be accessible from https://storage.googleapis.com/<your bucket name>/index.html.
However, if you notice, the website won’t work if you try to remove the index.html from the address. But that is not the case in real life, right? You don’t go to geeksforgeeks.org/index.html, you go to just geeksforgeeks.org. So, let’s try and make our website even more professional. We will ask Google Cloud Storage to serve index.html by default when no path is specified in the URL.
- Click on Buckets from the sidebar
- Click on the three dots for your bucket
- Click on Edit Website Configuration
- Add index.html in both the input boxes
- Click on Save
Step 4: Create a Load Balancer
- Search for Load Balancing and click on it
- Click on Create Load Balancer
- Click on Start Configuration from Application Load Balancer
- Leave the options as default and click Continue
- Give the load balancer a name, like gfg-demo-lb
- Frontend configuration
- Give any name, like gfg-demo-frontend
- Click on IP address
- Click on Create IP address
- Give any name, like gfg-demo-ip
- Click Create
- Click on Done
- Backend configuration
- Click on the dropdown that says Backend services and buckets
- Click on Create a backend bucket
- Give the bucket any name, like gfg-backend-bucket
- Click on Browse and select the bucket that we had created earlier
- Uncheck Enable cloud CDN
- Click on Create
- Leave the other settings as default
- Click on the Create button at the bottom of the page
We have successfully created a load balancer that kind of serves your website from the bucket. We have also reserved and IP address for it. Wait for some time for all the settings to propagate and after that you will be able to browse your website using the newly reserved IP address.
The IP address will be listed under the Frontend section on the load balancer details page, you can simply click on the load balancer name (gfg-demo-lb, in our case), to open details.
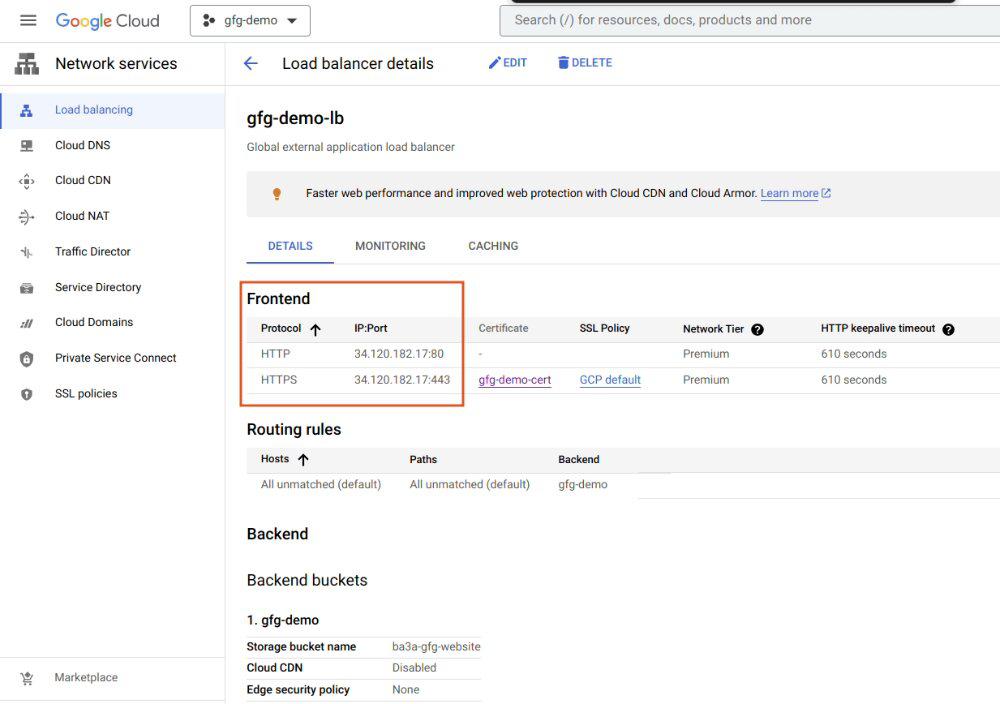
At this point, if you want to browse the website from a domain name, like example.com, you can simply create an A Record from DNS configuration.
(Optional) Step 5: Enable HTTPS
It is mandatory to have a domain name to enable HTTPS. For the sake of this article, I am going to point cat.ba3a.tech to the website and enable HTTPS on it. You can follow along with your own domain name, like example.com.
- Create an A record to the IP address
- Go to the Load Balancer details page
- Click on Edit
- From Frontend configuration, click on Add Frontend IP and Port
- Name it anything, like gfg-demo-frontend
- Click on Protocol and select HTTPS
- Click on IP address and select the existing one
- Click on Certificate > Create new certificate
- Name it anything, like gfg-demo-cert
- Click on Google managed certificate
- Add your domain name, like example.com
- Finally, click on Create
- Uncheck Enable HTTP to HTTPS redirect, if it is checked
- Click on Update from the bottom of the page
We have now enabled HTTPS on our awesome cat website! It will likely take some time to provision the SSL certificate for our website, be patient with it. You can visit the cat website that I have created at cat.ba3a.tech. Visit the website and you will see her writing code in all her glory! BTW, what is she listening to?
Conclusion
Building a stunning website is just the first step; deciding where to host it is equally crucial. Object storage solutions like Google Cloud Storage and AWS S3 offer seamless ways to host static websites. This article delved into deploying an awesome cat website on Google Cloud Storage, showcasing how easily it can be accomplished in a few steps.
Object storage solutions simplify the process of hosting static websites and ensure their accessibility to visitors worldwide. While limitations exist regarding dynamic content due to the lack of server-side processing, these solutions excel in serving static content efficiently.
Frequently Asked Questions on Hosting a Static Website on Google Cloud Storage: Step-by-Step Tutorial
1. What is Object Storage, and Why Use it for Hosting Websites?
Object storage is a method of storing files, known as objects, designed with cost-effectiveness in mind. It’s ideal for hosting static websites as it provides a simple and scalable solution for storing and serving files.
2. Can Dynamic Websites be Hosted on Object Storage Solutions?
No, object storage solutions are suitable only for hosting static websites. Dynamic websites, which require server-side processing, cannot be hosted on these platforms.
3. Why is it Necessary to Make Objects Public in Google Cloud Storage?
Making objects public ensures that everyone can access and view your website’s content. Without setting permissions to allow public access, the website won’t be visible to visitors.
4. How to Configure Google Cloud Storage to Serve the Main Page By Default?
By specifying the main page (e.g., index.html) in the website configuration settings of Google Cloud Storage, you can ensure that it is shown by default when no path is specified in the URL.
Share your thoughts in the comments
Please Login to comment...