In this tutorial, we will host a static website in Google Cloud Storage(GCS). If you want to host your resume as a portfolio website or if you want to have a website for your small to medium company, then hosting a static website is the best solution. This is very useful if you don’t have much traffic to your website and you don’t want to pay much for web hosting.
In this article, we will host a basic calculator web app in Google Cloud.
What is a Static Website?
Static websites support front-end languages like HTML, CSS, and client-side scripting languages like javascript. Static websites include blogging, portfolio showcases, and other information websites. Static websites are best for small projects that do not require much interaction.
However, to integrate backend technologies like databases, payment systems, and server-side scripting languages like PHP, Python, etc., we need dynamic websites. To learn more about static websites.
Why Choose Google Cloud For Hosting?
Though there are a lot of hosting platforms, many of them charge equally for static and dynamic websites. Also, if you are getting started with web hosting, then pay-per-use is the best option. Cloud platforms like Google Cloud, offer pay-as-you-go pricing. With this, you will pay only for the number of requests to your websites and the amount of resources you use. Also, you can have many other options to explore from the Google Cloud, which include saving your files in the cloud, running your own Operation System from the Cloud and other cloud computing processes.
Pre-Requisites
- A Google Cloud account with billing enabled
- Your static website files (which include code, images etc., for your website)
- A domain name of your choice(Optional)
NOTE: If you don’t have website files in hand, you can use the calculator web app code from this article to get hands-on experience.
Step 1: Creating a bucket in Google Cloud
A bucket will act as a container in the Google Cloud. A bucket holds files, folders and any other data objects in the cloud storage. To save our website files in the cloud, we need to create a bucket first. Go to your Google Cloud Console.
Start a New Project: (Refer to the Image Below)
In the Console, go to the project list on the top left and select the dropdown button. Now click on the New Project button. It is a better practice to have a separate project for each of our needs. Creating a separate project will make it easy to manage our website. We can easily delete the entire project if we want to delete our website.
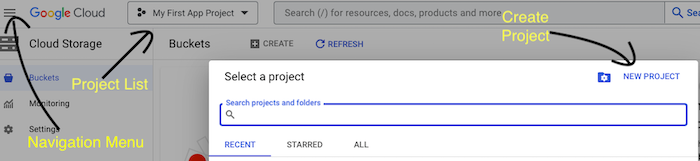
Create New Project
Give any name to your project. For reference, I am naming my project as geekcalc website. After creating, switch to the project you created from the Project list in the top left. Now click on the Navigation menu (shown above) and go to Cloud Storage -> Buckets. Create a bucket by clicking on Create button on top left.

Name your bucket. Here, for reference, I am creating a bucket with a name called geekcalc. Click continue and select Location type as Multi Region. Click continue and choose storage type as Standard. Now click continue and uncheck Enforce public access prevention on this bucket as shown below.
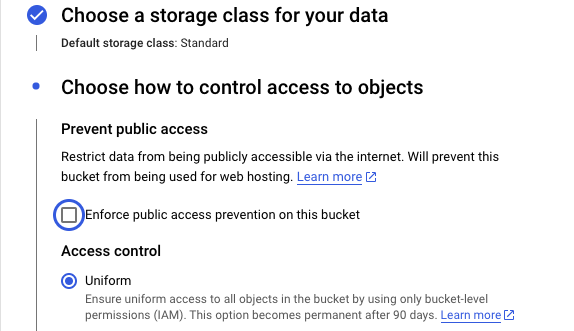
Now leave everything as default and click on the Create button. This will create our bucket.
Step 2: Upload the Website Files
After creating the bucket, click on the upload files button and upload your website-related files. Here, I am creating three files for the calculator app. The files for the web app include index.html, styles.css and script.js. Refer below for the code in each file.
Javascript
function appendToDisplay(value) {
document.getElementById('display').value += value;
}
function clearDisplay() {
document.getElementById('display').value = '';
}
function calculateResult() {
try {
document.getElementById('display').value = eval(document.getElementById('display').value);
} catch (error) {
document.getElementById('display').value = 'Error';
}
}
|
HTML
<!DOCTYPE html>
<html lang="en">
<head>
<meta charset="UTF-8">
<meta name="viewport" content="width=device-width, initial-scale=1.0">
<title>Calculator</title>
<link rel="stylesheet" href="styles.css">
</head>
<body>
<div class="calculator">
<input type="text" id="display" readonly>
<div class="buttons">
<button onclick="appendToDisplay('1')">1</button>
<button onclick="appendToDisplay('2')">2</button>
<button onclick="appendToDisplay('3')">3</button>
<button onclick="appendToDisplay('+')">+</button>
<button onclick="appendToDisplay('4')">4</button>
<button onclick="appendToDisplay('5')">5</button>
<button onclick="appendToDisplay('6')">6</button>
<button onclick="appendToDisplay('-')">-</button>
<button onclick="appendToDisplay('7')">7</button>
<button onclick="appendToDisplay('8')">8</button>
<button onclick="appendToDisplay('9')">9</button>
<button onclick="appendToDisplay('*')">*</button>
<button onclick="appendToDisplay('0')">0</button>
<button onclick="clearDisplay()">C</button>
<button onclick="calculateResult()">=</button>
<button onclick="appendToDisplay('/')">/</button>
</div>
</div>
<script src="script.js"></script>
</body>
</html>
|
CSS
body {
display: flex;
justify-content: center;
align-items: center;
height: 100vh;
margin: 0;
}
.calculator {
text-align: center;
width: 350px;
margin: 0 auto;
}
#display {
width: 100%;
height: 40px;
margin-bottom: 10px;
font-size: 20px;
text-align: right;
}
.buttons button {
width: 65px;
height: 65px;
font-size: 24px;
margin: 5px;
cursor: pointer;
}
.buttons button:active {
background-color: #ccc;
}
|
After uploading the files, go to the permissions tab and click on the Grant Access button in the View by Principals tab as shown below.
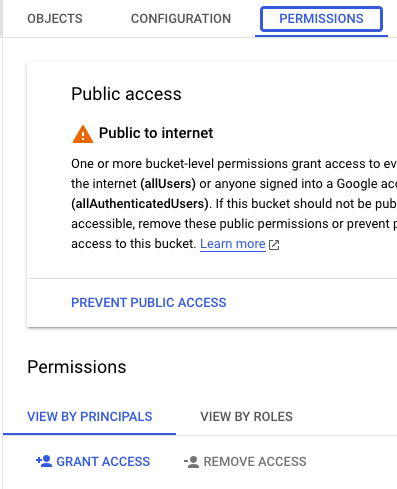
Grant access
Now, in the New Principals field add allUsers and on the Role field select Cloud Storage -> Storage Object View as shown below. Click save and Click the Allow Public Access button. This way, we are making all our files to be readable by the public.

Public access
Step 3: Add Index Page Suffix and Error Page
Adding these pages is very helpful for navigation for your custom domain. An index page suffix will act as your home page. The error page will be used to display errors for any kind of issue like 404 not found error etc.. Through the error page, we can navigate to the home page easily. Below is a sample code for the error page. Save the code in the error.html file. Upload the file in our bucket.
HTML
<!DOCTYPE html>
<html lang="en">
<head>
<meta charset="UTF-8">
<meta name="viewport" content="width=device-width, initial-scale=1.0">
<title>Error Page</title>
<style>
body {
display: flex;
justify-content: center;
align-items: center;
height: 100vh;
margin: 0;
flex-direction: column;
}
h1 {
font-size: 48px;
margin-bottom: 20px;
}
p {
font-size: 24px;
margin-bottom: 30px;
}
a {
font-size: 20px;
text-decoration: underline;
color: #007bff;
}
</style>
</head>
<body>
<div>
<h1>Oops! Something went wrong.</h1>
<p>We're sorry, but an error occurred while processing your request.</p>
<a href="index.html">Back to Home Page</a>
</div>
</body>
</html>
|
Now, go to Cloud Storage -> Bucket, click on the Bucket menu button as shown below and select Edit website configuration.

Bucket Menu
In the website configuration, specify the main page and error page as shown below. For our calculator app, the main page is index.html while the error page is error.html. Click the save button.
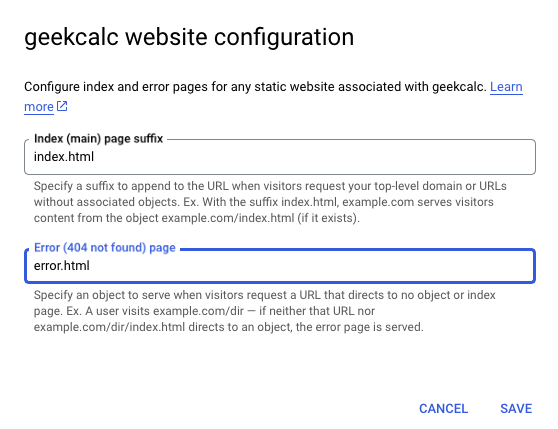
index and error page
Step 4: Test your Website
Visit the following URL to check whether your website is live and running.
https://storage.googleapis.com/YOUR_BUCKET_NAME/index.html
You will see the web app running. You have successfully hosted your website. Congratulations on making your online presence.

geekcalc web app
Mapping Your Domain Name (Optional)
You can also add a custom domain like YOUR_DOMAIN_NAME.com. You need to buy a domain name online. You can get one by a quick Google search. If you already bought a domain, you need to create a CNAME record before creating a bucket. Your CNAME record should map to c.storage.googleapis.com. To create a CNAME record, contact your domain registration company.
Now create the bucket with a name which should be equal to your CNAME. For example, your bucket should be named YOUR_DOMAIN_NAME.com. This way, you map your domain name to your bucket. Now you can visit YOUR_DOMAIN_NAME.com to see your static website.
Creating an SSL Certificate (Optional)
By default, Google Cloud Storage doesn’t support HTTPS if you map your custom domain. To get HTTPS, you need to set up an SSL certificate.
There are two ways to get an SSL Certificate. The first way is to get SSL by yourself. Some domain name providers will provide a free SSL certificate. You can also Google a free SSL certificate. For example, you can get a free SSL certificate from Cloudflare. If you have an SSL Certificate, then contact the service provider on how to link it to GCS.
The second way is that Google Cloud provides SSL certificates. Google Cloud uses the Load Balancing concept to set up the SSL certificate. However using load balancers may incur some cost to you.
Conclusion
By following the step-by-step guide, you learned how to host a static calculator web app that uses HTML, CSS and JavaScript. You also witnessed how easy it is to host a static website in Google Cloud Storage. Through Google Cloud Storage, you experienced the power of cloud hosting. Do play with other options in the Google Cloud. Happy coding…
FAQs on Static Website Hosting with Google Cloud Storage
1. Does hosting a website in GCP incur any charges?
Google Cloud Offers a free trial for new customers. A new user will get $300 (INR 24,977)
for 90 days. GCP also offers free credits for students who want to learn and explore cloud.
2. Do I need to enable billing for Cloud Hosting?
Yes. Your project should have a billing account to create a bucket and upload objects.
3. How to estimate cloud hosting charges?
You can visit https://cloud.google.com/storage/pricing.
This is Cloud Storage pricing page.
Here you can learn how cloud storage calculate price for various services.
4. How to maximize the availability of my website?
While creating your bucket, select Location Type as
multi-region
or
dual-region
for high availability.
5. How to delete my website?
To delete your website, you can simply delete your project. From the navigation menu
go to IAM & Admin -> Manage Resources. Here you can modify or delete your project.
Share your thoughts in the comments
Please Login to comment...