Upload Files To Google Cloud Storage In Node.js
Last Updated :
13 Feb, 2024
+When there is some requirement for storing files, we need to store the data in some reliable place to access and retrieve it when needed. That’s where Google Storage comes into place which provides a secure and reliable place to store our files with ease. Also, the use of Node.js makes it super easy to handle the file operations.
What Is Cloud Storage?
Cloud Storage is a storage service that can store all your files and can be accessed from anywhere in the world with the safety storing of your files. Similar to the cloud storage of Google, Amazon provides an S3 bucket and Azure provides Blob Storage for storing all the files like images, videos, documents, etc.
Why To Use Node.js For Uploading Files?
Node.js is a very popular runtime environment for server-side applications. With the help of different npm packages, it is very easy to handle all the file operations by using Node.js. The following are a few uses of Node.js for uploading files:
1. Efficient File Uploads
Node.js allows asynchronous operations and streaming of data which helps to efficiently upload large files without taking a large memory space. This approach helps to overcome the traditional approach of uploading large files taking a lot of memory space. By using nodejs we can use stream or multer packages for uploading files making it efficient to handle file operations.
2. File Access Management
Node.js provides a flexible environment for implementing access controls on files. You can easily manage who has access to uploaded files and define specific permissions, such as read, write, or delete. This level of control is crucial for ensuring the security and privacy of your stored data.
3. Integration With Your App
As we can use javascript in everywhere from front end to backend, it’s very flexible for the developer to integrate file upload functionality very easily with the API integration on the front end. Also, handle all the logic of file validation to file upload inside the API. This simplifies the process and makes it efficient to use the feature.
4. Scalable Storage Solutions
Node.js is made on event-driven, non-blocking architecture which helps to handle large no of concurrent connections efficiently. As the storage requirements increase, Nodejs handle all concurrent connections without any limitations. Also, Nodejs provide a large no of libraries and modules for handling Google Cloud Platform and other platform storage services.
Step By Step Process – Upload Files In Google Cloud Storage(Node.js)
Step 1: Get the Credential File And Give Access To Storage Communication
- Go to Google Cloud Console.
- First, if you don’t have any project active on the Google Cloud Platform, you must create a project with some name.
- Enable the IAM API.
- Go to the Service Account tab of IAM & Admin
- Click on Creating New Service Account

- Give the service account details with name and service account ID automatically created.
- Grant this service account access to the project. Search for Cloud Storage and give access to Full management of Cloud Storage for Firebase.
- You can ignore any other user’s access to the service account and get things done. Here your service account is ready to use.
- Go to the Keys tab of the service account and click on Add key with JSON format then you will get the JSON key for your service account. It’s ready to use. Just include it in the base dir of your project folder.
Step 2: JSON For Your Service Account
- It something look like this “service-account.json”. It contains JSON data like below:
 {
  "type": "service_account",
  "project_id": "projectname",
  "private_key_id": "randomalphanumericid",
  "private_key": "-----BEGIN PRIVATE KEY-----\nsomethingbigalphanumerickey\n-----END PRIVATE KEY-----\n",
  "client_email": "someaccount-firebase@someaccount.iam.gserviceaccount.com",
  "client_id": "somerandomnumber",
  "auth_uri": "https://accounts.google.com/o/oauth2/auth",
  "token_uri": "https://oauth2.googleapis.com/token",
  "auth_provider_x509_cert_url": "https://www.googleapis.com/oauth2/v1/certs",
  "client_x509_cert_url": "https://www.googleapis.com/robot/v1/metadata/x509/someaccount-firebase@someaccount.iam.gserviceaccount.com"
}
Step 3: Create A Bucket
- Navigate to again Google Cloud Console
- Go to the Cloud Storage tab of GCP with the bucket list.
- Inside Buckets click on Create New Bucket. Give the bucket a name and continue.
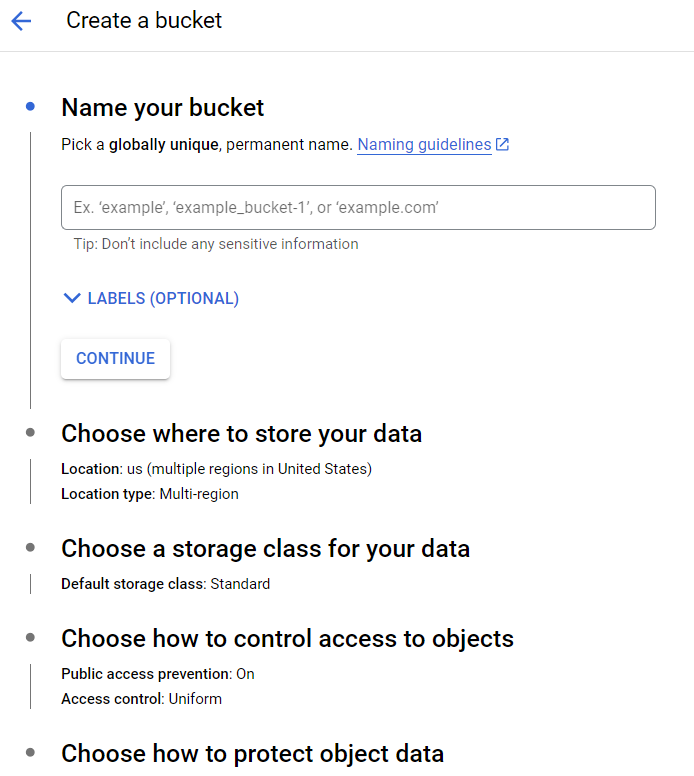
- Choose your region to store the bucket data and also choose the storage class for the data.
- Choose how to control access to the objects where Uncheck the public access prevention for the project and provide access for fine-grained.
- Choose how to protect object data and then continue to create for the bucket by clicking create button.
Step 4: Give Access To The The Service Account
- Go inside the permission tab of the bucket.
- Inside the permission tab, Click on Grant Access.
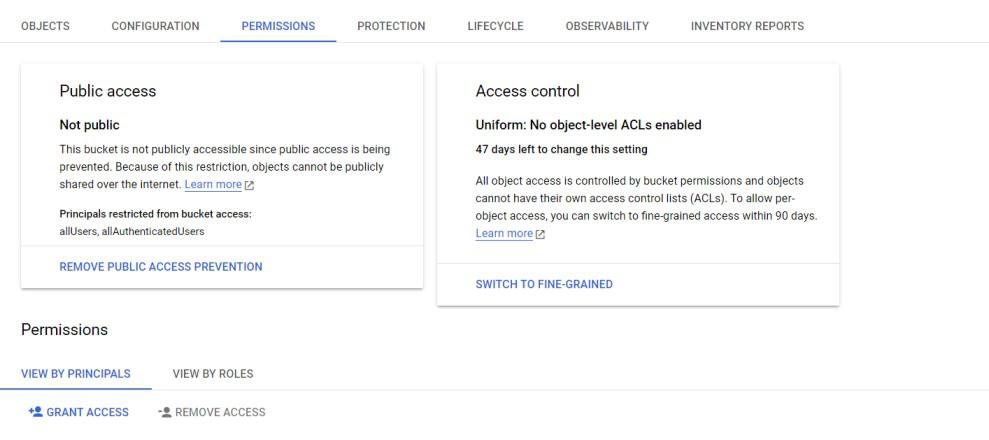
- From the JSON file take the client_email and paste it on add principals, also choose the role as Storage Object Admin to create, read and write to the bucket.
- Finally, you are ready to upload files from your code.
Step 4: Nodejs Setup
- Install the “@google-cloud/storage” npm package. Require it and use it on your code.
const { Storage } = require("@google-cloud/storage");
const storage = new Storage({
  projectId: "projectname",
  keyFilename: "service-account.json",
});
Step 5: GCP Storage Setup And Related Code
Create a bucket in cloud storage before calling the upload() function. Upload to the Google Cloud storage using the simple “.upload()” function having the proper file path and destination path mentioned.
const uploadToFirebaseStorage = async (filepath, fileName) => {
    try {
        const gcs = storage.bucket("bucket_name"); // Removed "gs://" from the bucket name
        const storagepath = `storage_folder/${fileName}`;
        const result = await gcs.upload(filepath, {
            destination: storagepath,
            predefinedAcl: 'publicRead', // Set the file to be publicly readable
            metadata: {
                contentType: "application/plain", // Adjust the content type as needed
            }
        });
        return result[0].metadata.mediaLink;
    } catch (error) {
        console.log(error);
        throw new Error(error.message);
    }
}
Step 6: Upload The File
- Call the uploadtoStorage() function by passing the file path and name of the file.
let result= await uploadToFirebaseStorage(`${uploadfilepath}`, 'filename.txt');
console.log(result);
 You will get the link which looks like below providing access to the file.
"https://storage.googleapis.com/download/storage/v1/b/bucket_name/o/storage_folder%2Ffilename.txt?generation=1685355700228424&alt=media"
Conclusion
By using all the above steps, you can successfully upload any files including images, videos, and documents to cloud storage. Overall it provides an efficient way in terms of flexibility, reliability, and cost-effectiveness. Node.js helps developers upload files to cloud storage efficiently and securely thanks to dedicated libraries like @google-cloud/storage, aws-sdk, and @azure/storage-blob.
Google Cloud Storage – FAQs
How Can I Authenticate My Node.js Application to Interact With A Cloud Storage Service For File Uploads?
To authenticate your Node.js application, you typically need to create API credentials (such as access key and secret key) provided by the cloud storage service. Use these credentials to initialize a client library (e.g. @google-cloud/storage for Google Cloud Storage) in your Node.js application.
What Is The Process For Uploading A File To A Cloud Storage Bucket In Node.js?
To upload a file, you can use the multer or stream for uploading files then npm package to handle this. In Google Cloud Storage, you can use the bucket.upload() method from @google-cloud/storage and pass the file path, destination path, & meta data for the upload.
What Strategies Can I Use For Handling File Permissions And Access Control?
For accessing the files from any service account or any particular account, it must be granted for access to the bucket. Then coming back to file permission, if you need it download or public access then you have to Remove Public Access Prevention and you pass public in metadata.
How Can I Handle File Uploads Asynchronously In Node.js?
To handle file uploads asynchronously, consider using asynchronous functions or use Node.js’s event-driven architecture by using async or Promises and ensure that the file upload process does not block the event loop of your application.
What Is The Recommended Approach For Handling File Metadata During Uploads?
Cloud storage services allow you to attach metadata to files. Include relevant metadata in your file upload requests, such as content type, custom tags, or descriptions. Refer to the documentation of your chosen cloud storage service for specifics on how to handle file metadata.
Share your thoughts in the comments
Please Login to comment...