Form Submission API with Swagger Editor and Python Flask
Last Updated :
15 Mar, 2024
Creating user-friendly APIs is essential for seamless interaction between applications. Leveraging tools like Swagger Editor alongside Python Flask, developers can streamline the process of designing, documenting, and implementing APIs. In this guide, we’ll explore how to craft a Form Submission API using Swagger Editor integrated with Python Flask, facilitating efficient data submission and storage.
Usage of Swagger
- OpenAPI Specification: Ensures a standard way to describe RESTful APIs for uniformity.
- YAML and JSON Formats: Supports editing in both human-readable YAML and concise JSON formats.
- Parallel View: Allows simultaneous editing of API documentation and viewing of response data and HTML requests for better understanding.
- Error Reporting: Provides real-time notifications for syntax or validation errors, ensuring accurate and error-free API documentation.
- Autofill: Incorporates autofill functionality to save time and reduce repetitive code writing.
Form Submission API with Swagger Editor and Python Flask
Below, is the code example of Swagger Editor in which we created the form submission and data storing using Swagger in Python:
Create a Virtual Environment
First, create the virtual environment using the below commands
python -m venv env
.\env\Scripts\activate.ps1
File Structure
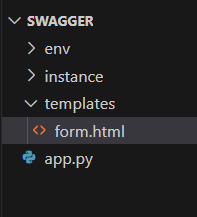
Setting Necessary Files
app.py: Below, code establishes a Flask web app with a RESTful API and a form submission route. It includes in-memory data storage, a `DataResource` class for data operations, and API and web routes for accessing and submitting data. The application uses Flask-RESTful for the API, Flasgger for documentation, and runs in debug mode.
Python3
from flask import Flask, request, render_template
from flask_restful import Api, Resource
from flasgger import Swagger

app = Flask(__name__)
api = Api(app)
swagger = Swagger(app)

# In-memory data storage (replace with a database in a real-world application)
data_storage = []


class DataResource(Resource):
    """
    Resource to handle data operations.
    """

    def get(self):
        """
        Get all stored data.
        """
        return {"data": data_storage}

    def post(self):
        """
        Add data to the storage.
        """
        data = request.form.get('data')
        data_storage.append(data)
        return {"message": "Data added successfully", "data": data}


# API routes
api.add_resource(DataResource, '/data')


# Web route for form submission
@app.route('/form', methods=['GET', 'POST'])
def form():
    """
    HTML form to submit data.
    """
    if request.method == 'POST':
        data = request.form.get('data')
        data_storage.append(data)
        return f"Data submitted: {data}"
    else:
        return render_template('form.html')


if __name__ == '__main__':
    app.run(debug=True)
Creating GUI
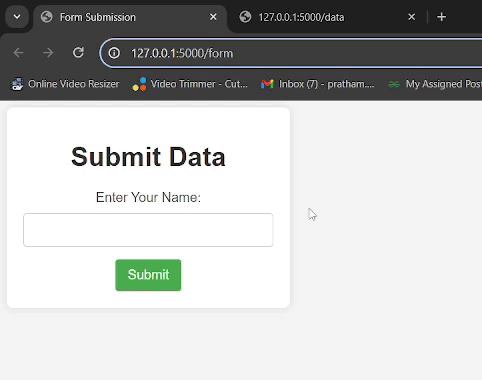
templates/form.html : The HTML code creates a clean and centered form for submitting data. It features an input field for the user’s name and a submit button with green styling. The form uses the POST method to submit data to the “/form” route in the Flask application.
HTML
<!DOCTYPE html>
<html lang="en">
<head>
    <meta charset="UTF-8">
    <meta name="viewport" content="width=device-width, initial-scale=1.0">
    <title>Form Submission</title>
    <style>
        body {
            font-family: Arial, sans-serif;
            background-color: #f4f4f4;

        }

        form {
            background-color: #fff;
            box-shadow: 0 0 10px rgba(0, 0, 0, 0.1);
            padding: 20px;
            border-radius: 8px;
            width: 300px;
            text-align: center;
        }

        h1 {
            color: #333;
        }

        label {
            display: block;
            margin: 10px 0;
            color: #555;
        }

        input {
            width: 100%;
            padding: 10px;
            margin-bottom: 15px;
            box-sizing: border-box;
            border: 1px solid #ccc;
            border-radius: 4px;
            font-size: 16px;
        }

        button {
            background-color: #4caf50;
            color: #fff;
            padding: 10px 15px;
            border: none;
            border-radius: 4px;
            cursor: pointer;
            font-size: 16px;
        }

        button:hover {
            background-color: #45a049;
        }
    </style>
</head>
<body>
    <form method="post" action="/form">
        <h1>Submit Data</h1>
        <label for="data">Enter Your Name:</label>
        <input type="text" id="data" name="data" required>
        <button type="submit">Submit</button>
    </form>
</body>
</html>
Run the Server
To run the server use the below command
python app.py
Output
Share your thoughts in the comments
Please Login to comment...