Flask API Authentication with JSON Web Tokens
Last Updated :
08 Dec, 2023
Authentication is the process of verifying the identity of the user. It checks whether the user is real or not. It is used to provide access to resources only to valid users. There are two types of Authentication:
- Single Factor Authentication: In this only one piece of information is needed to verify the identity of the user and to check that the user is legit. An example of SFA is password-based login where only the user’s password is required to gain access to the resources of the server.
- Multi-Factor Authentication: In this multiple piece of information is required to verify the identity of the user to make sure the user is legit. It is more secure than SFA. An example of MFA would be validating the user based on password as well as OTP sent on the verified mobile number.
Authentication Middleware and Authorization
Authentication Middleware is a software layer that is used to handle authentication tasks. It checks whether the user is legit or not before sending the request to the server. So first the middleware checks the user’s credentials and if they are valid the request is then forwarded to the web server.
Authorization is the process of determining whether the user has access to the specified resources or not. It is an important step because only authorized users should have access to servers’ sensitive information.
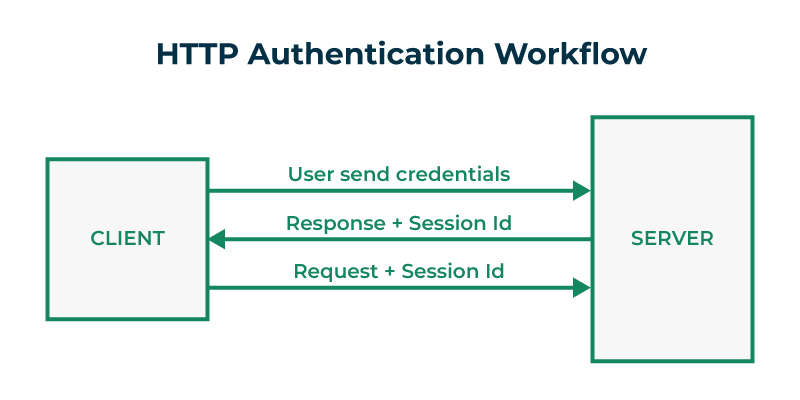
Authentication Workflow
Consider a simple web application that consists of a login page. When the user enters the username and password and sends a request to the server, the server creates a session ID for that user which will be valid for a specified period. The server sends the created session ID along with the response. The session ID is stored in the browser of the user. Now whenever the user sends a request to the server the session ID is also forwarded along with the request, the server then checks whether the session ID is valid or not and returns the response based on the privileges of the user. Here the server has to store the session ID to authenticate the user.
Need of JWT
Before JWT we were using the concept of cookies to maintain the session for a particular user. But the above method has some drawbacks in traditional architecture where the multiple servers are used to satisfy users requests. So consider when a user sends a request to server A it will start a session and store that information on the server and sends the cookie. Now if the user send the request again it might be possible that the request will be transferred to some other server by the load balancer which will not have the user session.
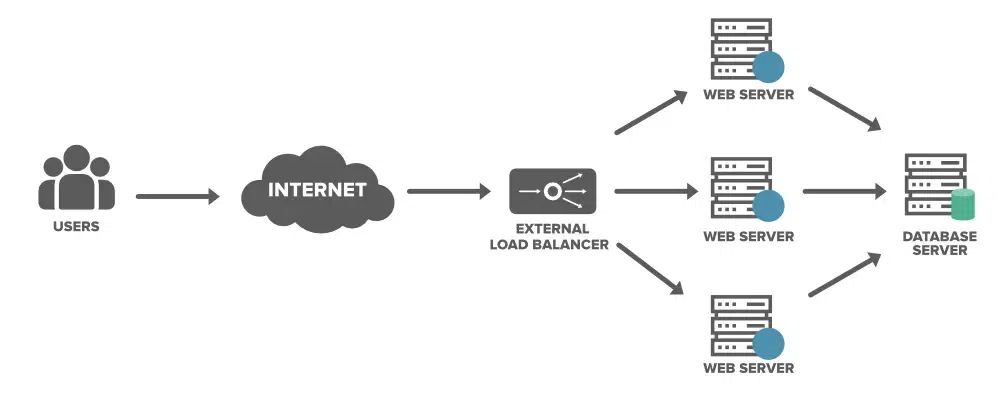
To overcome the above difficulty we come up with a solution of JWT which store users information inside of a token which will be stored on the users browser rather then on the server, so even if the second request get redirected to some other server it will still be able to satisfy the request as user will be sending the token which will have the users information.
JWT Components
Json web token is a json object used to send information over the internet. It mainly consists of three parts each separated with a dot(.) . The first one is header which contains two information :
- * alg specifies the hashing algorithm used to create the token
- * typ specifies the type of token, which is always JWT
{ "typ" : "JWT" , "alg" : "HS256" }
The second is the payload which contains the information about the user as well some other info such as the expiration time of the token.
{ "exp" : 12323232892, "sub" : "Hello World", "id" : "123"}
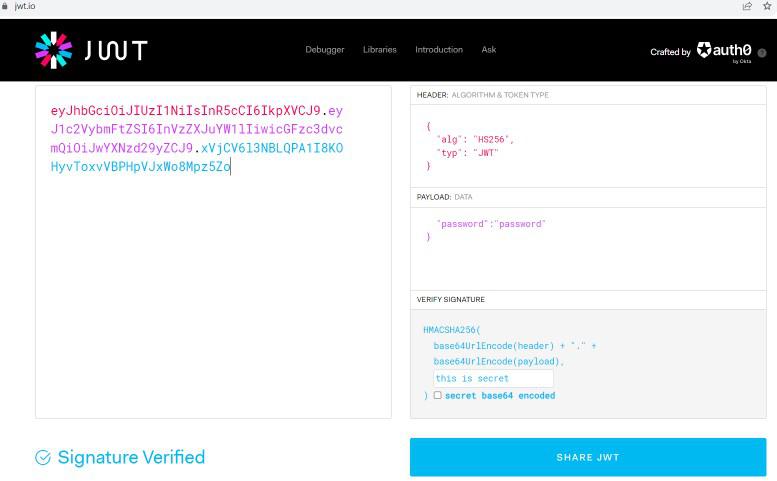
The third one is the signature which checks the integrity of the message. It is generated by adding the BASE64URL encoded header and the payload with a dot(.) and then hashing it with a secret key.
For example consider we have the following header, payload and the secret key :
- header : {“alg”:”HS256″, “typ”:”JWT”}
- payload : {“user”:”username”, “password”:”password”}
- secret key : “this is secret”
Then the JWT will be:
eyJhbGciOiJIUzI1NiIsInR5cCI6IkpXVCJ9.eyJ1c2VyIjoidXNlcm5hbWUiLCJwYXNzd29yZCI6InBhc3N3b3JkIn0.3dJul7umiy_MPlLdAMyv7yoQuTCe-sQ9j-V6QkinA6c
You can verify the above token at below url
https://jwt.io/
Authenticating API using JWT
For authenticating the user we need to first create a token which will be given to the user, so when the user again sends the request we can use the token to validate whether the user is legit or not. To create the JWT token we are going to use the jwt package which provides the encode method for creating the token.
In the encode method we have to pass the header data and the secret key. The method will return the JWT token. When the user sends the token we can again use the decode method present in jwt package to decode the token, if the token is not correct it will throw an exception. We are now going to consider a simple python script which has two endpoint
- /login : This will take a username and password, create a JWT token using secret key which is “this is secret”. After successful login, the user will be displayed a link which will be only accessible if the token is valid.
- /access : This will take the token and check whether the token is valid or not. It will also check if the token is expired or not.
To run the Python code you first need to install jwt and flask using pip.
pip install jwt
pip install flask
Example: Create a Python file app.py and copy paste the below code:
In the login endpoint we first checked whether users password is equal to “password” or not, if it is then we created a JWT token using jwt.encode() method by passing the payload which contains the username and expiration time along with the secret key which we defined using app.config.
Python3
import jwt
from flask import Flask, request, jsonify, make_response
import datetime
app = Flask(__name__)
app.config['secret_key'] = "this is secret"
def token_required(f):
def decorated(*args, **kwargs):
token = request.args.get('token')
if not token:
return jsonify({'error': 'token is missing'}), 403
try:
jwt.decode(token, app.config['secret_key'], algorithms="HS256")
except Exception as error:
return jsonify({'error': 'token is invalid/expired'})
return f(*args, **kwargs)
return decorated
@app.route("/login")
def login():
auth = request.authorization
if auth and auth.password == "password":
token = jwt.encode({'user': auth.username, 'exp': datetime.datetime.utcnow(
) + datetime.timedelta(seconds=10)}, app.config['secret_key'])
return make_response('Could not Verify', 401, {'WWW-Authenticate': 'Basic realm ="Login Required"'})
@app.route("/access")
@token_required
def access():
return jsonify({'message': 'valid jwt token'})
if __name__ == "__main__":
app.run()
|
.jpg)
After the user is logged in successfully, the user will be shown a link which will be accessible to only him. After user click on that link the /access endpoint will be hit, which first get the token from the url and valiate it using the jwt.decode method which takes the token, secret key and the hashing algorithm. If the token is not valid the method will throw an error which is handled using the except statement in which we simply tell the user that the token is not valid or has been expired.
To run the above code first go the directory which contains app.py file and run the below command:
python app.py
After running the above command the server will be up and running on port 5000, you can access the login endpoint using the below url:
http://localhost:5000/login
After entering the username and password, you will be logged in and will be displayed with a url. Click on the url which will send the JWT token to the flask server. If the token is valid you will be given access to the web page.
In above example we set the token expiration time to be 10 seconds which means after 10 seconds of login you will not be able to access the private link. You can set the expiration time of the token according to your use case.
Output
.gif)
Share your thoughts in the comments
Please Login to comment...