Testing APIs with Swagger
Last Updated :
12 Jan, 2024
API testing in Swagger involves validating the functionality and performance of APIs developed using the Swagger framework. Swagger, now known as the OpenAPI Specification, provides a standardized way to document and define RESTful APIs. API testing in Swagger focuses on verifying that the API endpoints adhere to the specified OpenAPI documentation, ensuring correct request and response formats, parameter validations, and overall API behavior. This process helps identify and address issues early in the development lifecycle, ensuring that the API functions reliably and efficiently.
Testing APIs with Swagger
In the realm of software, applications frequently require the exchange of information or the initiation of actions among themselves. APIs serve as messengers, streamlining and enabling this communication process. Ex. An e-commerce website, for instance, might employ an API to retrieve product details from a database.
- Swagger as the Map: Swagger serves as the navigational guide in a complex cityscape, delineating myriad bridges and roads. Much like a meticulously crafted map, Swagger reveals all the routes and intricacies of each bridge, specifying the information available for request and the actions feasible through the APIs.
- Leveraging Swagger for Testing: When conducting API tests, predefined scenarios or requests are evaluated to ensure proper functionality. These scenarios may include tasks such as retrieving a list of products, updating user information, or completing a purchase. Swagger offers a testing environment that allows users to input these requests, akin to specifying a destination on a map. Users can define the information they seek and the actions they want the API to execute.
- Executing Requests and Verifying Responses: Within the Swagger platform, users “send” these requests to the API, mirroring the process of following routes on a map. This involves clicking buttons or entering data in the Swagger interface to simulate request submissions. Subsequently, the API “responds” by providing results, including the requested information or confirmation of the performed action.
- Ensuring Seamless Communication: The objective is to guarantee smooth communication among various segments of the software. Similar to ensuring that bridges in a city facilitate easy travel, Swagger’s API testing ensures that the messengers (APIs) effectively deliver and receive messages.
- Proactively Identifying Issues: API testing plays a crucial role in detecting issues early in the development phase. If there are issues with how the API responds to requests, they can be pinpointed and rectified before reaching end-users, averting potential errors in the application.
In the context of Swagger, API testing is comparable to using a detailed map (Swagger documentation) to navigate and test communication paths (APIs) among distinct software components. It guarantees that the messengers (APIs) convey the correct messages and yield the anticipated results, thus averting communication breakdowns and potential software issues.
Steps Required
- Utilize a set of predefined requests designed for the API, including inquiries for information or directives to execute specific actions.
- Transmit these requests via Swagger, analogous to using a map to navigate and identify the appropriate route.
- Verify the API’s response for accuracy – ascertain whether it provided the expected information or executed the requested action as intended.
API testing ensures that different parts of a software application can talk to each other effectively. It helps catch issues early, preventing errors from reaching the end-users.
Create API and Testing with Swagger
In this example code is a simple example of a CRUD (Create, Read, Update, Delete) API using Flask, Flask-RESTful, and Flasgger for Swagger documentation. Let’s break down the code:
Imports:
- Flask: Framework for creating web applications in Python.
request: Provides an easy way to access the incoming request data.Api and Resource from flask_restful: Simplifies the creation of RESTful APIs.Swagger from flasgger: Integrates Swagger for API documentation.
from flask import Flask, request
from flask_restful import Api, Resource
from flasgger import Swagger
App Initialization:
Creates a Flask app, initializes the Flask-RESTful API, and integrates Swagger for API documentation.
app = Flask(__name__)
api = Api(app)
swagger = Swagger(app)
In-Memory Data Storage:
Creates a simple in-memory data storage for employees.
employees_data = [
    {'id': 1, 'name': 'Abhilash Gaurav'},
    {'id': 2, 'name': 'Ramish Verma'}
]
Resource Classes:
EmployeesResource: Handles operations related to a list of employees.
GET: Retrieves a list of all employees.POST: Adds a new employee.
class EmployeesResource(Resource):
    # ... (GET and POST methods)
EmployeeResource: Handles operations related to an individual employee.
PUT: Updates an existing employee.DELETE: Deletes an existing employee
class EmployeeResource(Resource):
    # ... (PUT and DELETE methods)
API Routes:
- Maps resource classes to specific API endpoints.
api.add_resource(EmployeesResource, '/employees')
api.add_resource(EmployeeResource, '/employee/<int:employee_id>')
The <int:employee_id> in the URL specifies that employee_id should be an integer.
Main Execution:
- Runs the Flask app in debug mode.
if __name__ == '__main__':
    app.run(debug=True)
Test and Debug CRUD APIs with Swagger
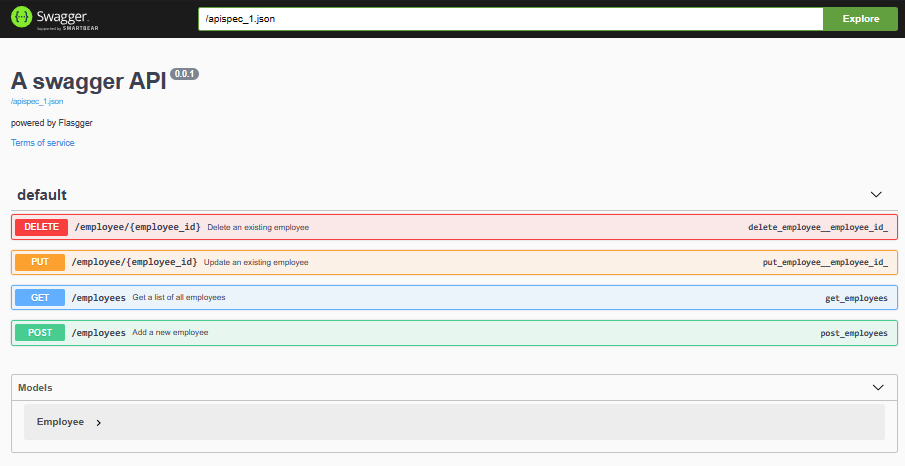
Above code defines a RESTful API for managing employees, complete with Swagger documentation. The API supports creating, reading, updating, and deleting both individual employees and a list of all employees. The Swagger documentation is automatically generated based on the provided comments. basically its above process help us to testing API with swagger or postman.
Python
from flask import Flask, request
from flask_restful import Api, Resource
from flasgger import Swagger
app = Flask(__name__)
api = Api(app)
swagger = Swagger(app)
employees_data = [
{'id': 1, 'name': 'Abhilash Gaurav'},
{'id': 2, 'name': 'Ramish Verma'}
]
class EmployeesResource(Resource):
def get(self):
return employees_data, 200
def post(self):
new_id = employees_data[-1]['id'] + 1
data = request.get_json()
new_employee = {'id': new_id, 'name': data['name']}
employees_data.append(new_employee)
return new_employee, 201
class EmployeeResource(Resource):
def put(self, employee_id):
data = request.get_json()
for employee in employees_data:
if employee['id'] == employee_id:
employee['name'] = data['name']
return employee, 200
return {'message': 'Employee not found'}, 404
def delete(self, employee_id):
for i, employee in enumerate(employees_data):
if employee['id'] == employee_id:
deleted_employee = employees_data.pop(i)
return {'message': 'Employee deleted successfully', 'employee': deleted_employee}, 200
return {'message': 'Employee not found'}, 404
api.add_resource(EmployeesResource, '/employees')
api.add_resource(EmployeeResource, '/employee/<int:employee_id>')
if __name__ == '__main__':
app.run(debug=True)
|
Output:
 Video Demonstration:
Conclusion
Testing APIs with Swagger is a crucial aspect of ensuring the reliability and functionality of web services. Swagger provides a powerful framework for API testing, offering a standardized and interactive documentation platform. By defining API requests and expected responses in a Swagger file, developers can easily execute tests and validate endpoints. This process streamlines communication between development and testing teams, fostering collaboration and reducing the likelihood of misinterpretations.
Share your thoughts in the comments
Please Login to comment...