Streamlining API Documentation Workflows with Swagger
Last Updated :
29 Jan, 2024
In the realm of software development, Application Programming Interfaces (APIs) serve as the backbone for seamless communication between different software components. To facilitate efficient utilization of these APIs, developers heavily rely on comprehensive documentation. One prominent tool in this domain is OpenAPI, formerly known as Swagger, which streamlines the process of creating and documenting APIs. Developers, in their quest to unlock the full potential of APIs, heavily rely on the comprehensive guidance provided by API documentation. This documentation serves as a conduit, bridging the gap between the intricate functionalities of an API and the developers seeking to incorporate, expand, and adeptly utilize the services offered by an application.
What does Swagger API Documentation Provide?
- Understandability: Clear documentation is essential to elucidate the capabilities and limitations of an API. It outlines the purpose, features, and step-by-step instructions on how developers can interact with the API effectively.
- Speeding up Development: Well-documented APIs save valuable development time. Developers can swiftly comprehend how to integrate and utilize the API without the need for extensive trial and error. This accelerates the overall development process.
- Getting Started Easily: Thorough documentation is particularly beneficial for onboarding new developers to a project. It provides a quick and comprehensive guide for newcomers to understand the API, facilitating a smoother integration process into ongoing projects.
- Fixing Issues Faster: Detailed documentation becomes a crucial asset when troubleshooting and resolving issues. Developers can swiftly identify problems and implement solutions by referring to the documentation, leading to faster issue resolution and enhanced system stability.
- Consistency and Standardization: Documentation plays a pivotal role in ensuring a uniform approach to using the API. By providing a standardized guide, helps developers and teams maintain consistency, promoting a coherent interface and facilitating collaborative development efforts.
Concepts Related to the Topic
- The OpenAPI Specification: Formerly known as Swagger, the OpenAPI Specification has become the industry standard for defining RESTful APIs. It intricately outlines parameters, request/response types, API endpoints, and other crucial information in a JSON or YAML format.
- Swagger User Interface: The Swagger UI, an online tool, leverages the OpenAPI Specification to dynamically generate interactive API documentation. This interface empowers developers to explore and test API endpoints directly through the documentation.
- Workflow for API Documentation: The API documentation workflow encompasses creation, maintenance, and publication. Swagger streamlines this process by utilizing the API specification to automatically generate comprehensive documentation, ensuring accuracy and efficiency.
- Notes and Labels: Annotations or tags in Swagger provide additional details about parameters, responses, and API endpoints. These descriptive elements enhance the quality of the generated documentation, offering a deeper understanding of API functionalities.
- Integrate Your API with Swagger: Integrating Swagger with your API involves using the appropriate Swagger library for your programming language (e.g., flasgger for Flask in Python). This integration typically involves augmenting your existing code with annotations to enhance the documentation generation process.
- List API Endpoints for Documentation: Utilizing Swagger tags allows developers to annotate API endpoints with detailed descriptions, parameters, and response information. This step ensures that the API documentation is comprehensive, informative, and serves as an educational resource.
- Investigate and Test with Swagger UI: Developers can employ Swagger UI to explore and test the API once the documentation is generated. This interactive interface facilitates the seamless execution of API requests, providing a practical means to understand and verify API behavior.
- Automate Updates to the Documentation: To maintain synchronization between the API code and its documentation, consider implementing a process that automates updates. This ensures that any changes to the API code are promptly reflected in the documentation, maintaining accuracy and relevancy over time.
Swagger Interface
Steps to Streamlining API Documentation With Swagger
In the realm of API development, effective documentation is paramount for developers to understand, implement, and integrate APIs seamlessly. One powerful tool for streamlining this process is Swagger, now known as the OpenAPI Specification. Below, we outline a step-by-step workflow for leveraging Swagger in conjunction with a Flask application to create comprehensive API documentation.
Step 1. API Implementation
Commence by implementing your API using a web framework such as Flask (Python) or Express.js (Node.js). Define the API’s routes, request handling logic, and response formats in accordance with your application’s requirements.
pip install flask flask-cors flasgger
Step 2. Swagger (OpenAPI) Specification Integration
Integrate Swagger annotations into your API code using a Flask library like flasgger. These annotations allow you to describe API endpoints, parameters, and responses in a structured manner.
Step 3. Produce an OpenAPI Specification
Utilize Swagger tools to automatically generate the OpenAPI Specification (formerly Swagger Specification). Typically stored in YAML or JSON format, this specification serves as a standardized document outlining your API’s structure.
Access the Swagger UI by visiting ‘http://localhost:5000/apidocs/‘ to explore the automatically generated OpenAPI Specification.
Step 4. Review and Enhance Documentation
Inspect the documentation generated by Swagger UI and enhance it with more detailed explanations, examples, and any additional information that aids developers in understanding and utilizing your API effectively.
Step 5. Automate Documentation Updates
Establish a process that automatically updates the documentation whenever changes are made to the API code. Utilize continuous integration tools like Travis CI, GitHub Actions, or Jenkins to facilitate seamless and automated documentation updates.
Step 6. Publish Documentation
Upload the finalized documentation to a chosen website or platform. This could involve using version control systems, dedicated API documentation tools, or hosting services. Install the documentation on a web server or leverage hosting services for easy accessibility.
Step 7. Lifecycle Management and Versioning
Consider incorporating versioning into your documentation and API to track the lifecycle of your API effectively. Document updates, deprecations, and new features for each version, ensuring developers have clarity on changes over time. By following this technical API documentation workflow, you ensure that developers have access to accurate, up-to-date information about your API, fostering ease of use and adoption within the developer community.
Swagger-equipped Flask App
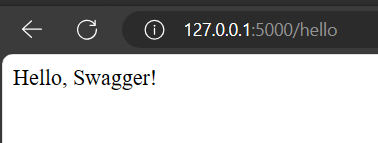
In this example Python code uses the Flask web framework along with the flasgger library to create a simple web application. The application defines a single route (“/hello”) that responds to HTTP GET requests with a greeting message. The Swagger tool from flasgger is integrated to generate API documentation for the endpoint. When the application is run, it starts a development server, and the Swagger documentation can be accessed at “http://localhost:5000/apidocs/” to interact with and explore the API.
Python
from flask import Flask
from flasgger import Swagger
app = Flask(__name__)
swagger = Swagger(app)
@app.route('/hello', methods=['GET'])
def hello():
return "Hello, Swagger!"
if __name__ == '__main__':
app.run(debug=True)
|
Output
Flask API with Swagger Documentation for User Data Management
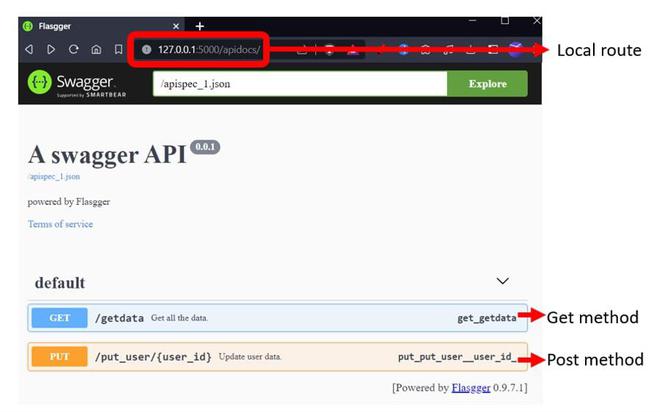
This Python code uses Flask and flasgger to create a simple web API with two endpoints. The ‘/put_user/<int:user_id>’ endpoint is a PUT request that allows updating user data specified by the ‘user_id’. The data to be updated is expected in the request body as JSON, containing ‘name’ (string) and ‘age’ (integer) properties. The ‘/getdata’ endpoint is a GET request that retrieves and returns all user data stored in the in-memory ‘user_data’ dictionary. Swagger is integrated to generate API documentation.
To update user data, send a PUT request to ‘/put_user/<user_id>’ with the required JSON data. To retrieve all user data, send a GET request to ‘/getdata’. The server runs on “http://localhost:5000/” in debug mode. If an error occurs during the update, a 500 Internal Server Error response is returned with an error message.
Python
from flask import Flask, request, jsonify
from flasgger import Swagger
app = Flask(__name__)
swagger = Swagger(app)
user_data = {}
@app.route('/put_user/<int:user_id>', methods=['PUT'])
def put_user(user_id):
try:
data = request.json
user_data[user_id] = data
return jsonify({'message': f'Data for user {user_id} successfully updated'}), 200
except Exception as e:
return jsonify({'error': f'Error updating user data: {str(e)}'}), 500
@app.route('/getdata', methods=['GET'])
def getdata():
return jsonify(user_data)
if __name__ == '__main__':
app.run(debug=True)
|
Run the Server
python -u "app.py_file_path"
http://localhost:5000/apidocs/
Output
Conclusion
In conclusion, leveraging Swagger for API documentation workflows provides a streamlined and efficient approach to documenting, testing, and exploring APIs. The integration of Swagger with frameworks like Flask enables developers to create clear and interactive documentation effortlessly. With its intuitive UI, Swagger simplifies the process of understanding and interacting with APIs, enhancing collaboration between developers and stakeholders. By describing API endpoints, parameters, and responses in a standardized manner, Swagger not only facilitates documentation but also serves as a powerful tool for maintaining consistency and accuracy across diverse API projects.
Share your thoughts in the comments
Please Login to comment...