The Central Processing Unit or the CPU acts as the main control system of any computer, which is popularly known as the Brain of the Computer. Unlike laptops, if any users are having any issues related to the computer’s speed and multitasking, there are no other options left than Installing a New CPU to the PC.
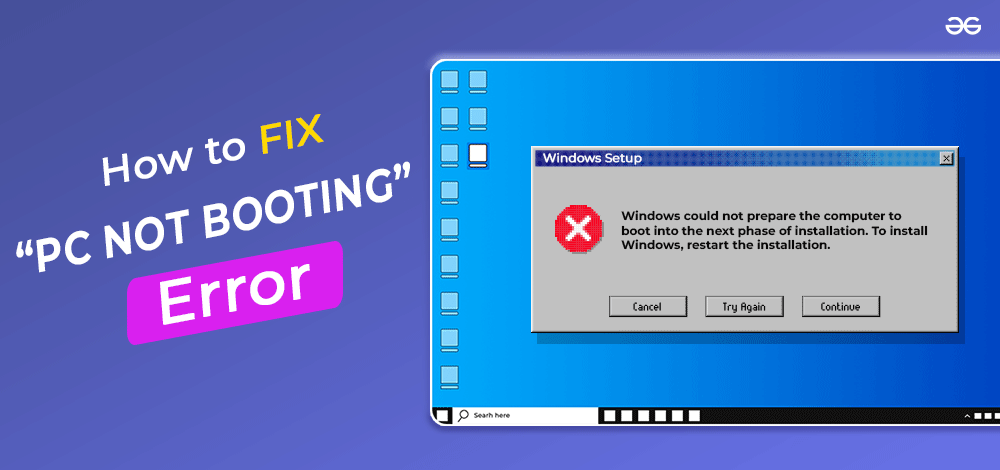
But the PC CPU Upgrade process is not a cup of tea for everyone. For upgrading the CPU, you should have good knowledge related to the hardware required in the upgrade. However, after successfully upgrading the CPU, your PC might not reboot to configure the changes. Such an issue is termed the PC Booting Issue.
In this article, we will discuss the reasons behind such booting issues after installing a new CPU to the PC along with some handful methods to recover that.
Reasons Behind Booting Issues After New CPU Installation
There are a couple of reasons behind the botting issue after upgrading to a new CPU. Some of the reasons are linked with the hardware installation process whereas some of the reasons are caused by the BIOS-related problem.
- Motherboard Issue: If you have upgraded your entire CPU but left to change the motherboard with the new one, then such an issue can occur. Here, the new upgraded systems become incompatible with the motherboard configuration.
- Hardware Blunder: While upgrading the CPU, if the sockets and pins of the CPU get bent and damaged, then it is likely your entire effort will go into vain. As in such cases, recovering is nearly impossible.
- Power Mismatch: After upgrading to the New CPU, the new components might require more power than the earlier one. So, if you are using a low-voltage socket, then the computer might not get started.
- Outdated BIOS: You have successfully upgraded the CPU to the new version, but your BIOS is way older. Then, the BIOS can’t reload the new changes that you have made with the CPU.
How to Fix Booting Issues After New CPU Installation?
To resolve newly installed CPU Booting Issues, the following methods can be executed. We will start with the simple process where no CPU opening or changing to the software is needed.
Method 1: Reconnect Cable
In the first case, we will start with the simple method where we have to just remove every cable from the PC except the Keyboard cable. We have to remove the Power cable also. Now, after waiting for a few minutes, we have to connect the only power cable to the PC. Now, we have to try to again start the computer.
If the computer gets started & the Windows Logo becomes visible, we have to plugin every cable to the PC again one by one. If you find after inserting any cable, the computer gets blank again, then the problem arises with that cable. If not, restart the computer from the system and try to reboot now.
Hence, we have successfully fixed the booting issues of the Newly Installed CPU by reconnecting cables to the PC.
Method 2: Try With Another PC
If the problem persists, then you have to try a new PC system. You should have to know from where the problem is coming. Whether the CPU Upgrade is not done well, it has gotten some damage or your PC is not capable of working with the new CPU installed there. So, connect the CPU with another PC Setup.
If on that new PC setup, your upgraded CPU works well & booted, then be assured that the CPU Upgradation is done well. Then, the problem is with your BIOS settings or version. And if the CPU doesn’t work on the new system also, then the problem is with your CPU cabinet. Check where the problem is arising, it might be a thermal paste issue or some other issue.
Hence, we have successfully fixed the booting issues of the Newly Installed CPU by connecting with the new PC setup.
Method 3: Reconnect CMOS
In this method, the CPU cabinet should be opened. But, before opening the CPU Cabinet, remove the power connection from the cabinet and wait for a few minutes to drain existing power. Now, open the cabinet and find out the CMOS Jumper of your device. It will be connected to the Motherboard.
The CMOS Jumper is a set of three pins that is covered with a plastic cap which is known as the Jumper Cap. We have to remove the CMOS Jumper Cap from the connection. After removing the connection, we have to wait for 20 seconds. If there are more plugs present beside the connected plugs, use those. Otherwise, connect to the same plugs where it was present earlier.
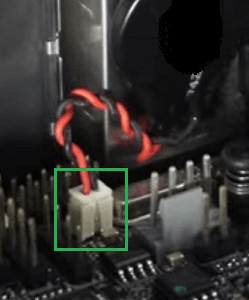
Hence, we have successfully fixed the booting issues of the Newly Installed CPU by clearing the CMOS of the PC.
Method 4: Change UEFI to Legacy or CSM
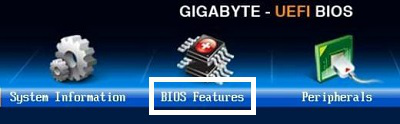
Step 1: Restart the device & continuously press the F2 Key to enter into the BIOS Settings. Now, click on the BIOS Features options.
Step 2: Find out the option Boot Mode Selection & press Enter.
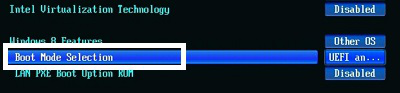
Step 3: From the list, select the Only Legacy or CSM option and Save the settings.

Hence, we have successfully fixed the booting issues of the Newly Installed CPU by changing UEFI to Legacy or CSM on the PC.
Method 5: Upgrade the BIOS
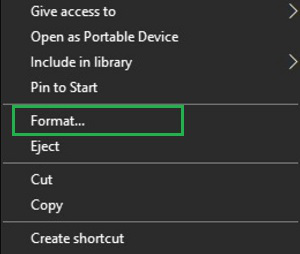
Step 1: Insert a USB Drive into the computer & right-click on the driver. Click on the Format option.
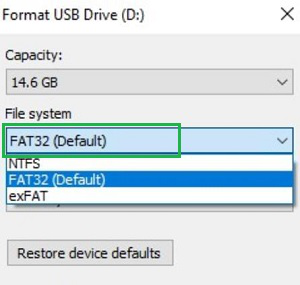
Step 2: Check that the FAT32 is selected & click Format there to erase everything from the USB Driver. Now, download & extract the newest BIOS Version from the internet based on your motherboard company.
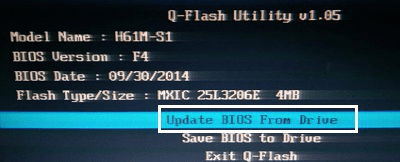
Step 3: Restart the device and press F2 Key frequently to enter into the BIOS. Click on the Q-Flash option present there.

Step 4: Select the option Update BIOS From Drive and wait until the process gets completed.
Hence, we have successfully fixed the booting issues of the Newly Installed CPU by upgrading the BIOS version of the PC.
So, these are the few simple methods that you can execute to overcome the situation. It is advisable to perform every method mentioned here as you will be unaware for which reason the problem is arising. So, it will be better to work on both Hardware & BIOS-related settings to overcome the situation.
FAQs: Booting Issues After New CPU Installation
1. I have got a New CPU after upgrading. but it is not booting. What to do now?
If you have the New CPU after upgrading it to the latest technology and if it is not booting, then there is nothing need to be worried. Try to follow the below-mentioned steps to overcome the situation.
- Disconnect every cable other than the Keyboard.
- Wait for a few minutes.
- Connect the power cable & start the device.
- When the Windows logo starts showing, connect cables one by one.
- Now, restart the device to get into the boot.
2. How to upgrade my BIOS Version to successfully boot with the newly installed CPU?
To upgrade your BIOS version to the latest one to successfully boot with the newly installed CPU, the following steps can be executed.
- Format a USB Drive in the FAT32 format.
- Download and Extract the latest BIOS file from the internet based on your motherboard.
- Enter into the boot with the inserted USB Drive.
- Click on the Q-Flash option.
- Select Update BIOS From the Device
3. My New CPU is working on another PC setup. What should I do to run it on my regular PC?
If your CPU is working on another PC, it might be a problem with the BIOS of your regular PC. Do follow the below steps to resolve the issue.
- Enter the BIOS option of your regular PC by pressing F2 Key multiple times.
- Get into the BIOS Features.
- Select Boot Menu Selection
- Click the Legacy Only or CSM Only option.
Share your thoughts in the comments
Please Login to comment...