Django Google Calender Integration in Python
Last Updated :
09 Apr, 2024
Google Calendar is a fantastic tool for managing your schedule. It’s user-friendly and helps you keep track of all your important events and appointments. You can create events, set reminders, and receive notifications so you don’t miss anything. In this article, we will see how we can integrate Google Calendar with Django in Python.
Google Calendar Integration with Django Using Python
Here’s a step-by-step guide for integrating Google Calendar into a Django framework in Python:
Step 1: Setting Up Django Application
First, let’s create a new Django project and application. Open your command line Interface (CLI) and execute the following commands:
Commands to create a new Django project:
django-admin startproject myproject
cd myproject
Create a new app in the Django application using the following command:
python manage.py startapp calendar_integration
This will create a new Django project named “myproject” and a new application named “calendar_app“.
Now add this app to the ‘settings.py’
INSTALLED_APPS = [
    "django.contrib.admin",
    "django.contrib.auth",
    "django.contrib.contenttypes",
    "django.contrib.sessions",
    "django.contrib.messages",
    "django.contrib.staticfiles",
    "calendar_integration",
]
File Structure
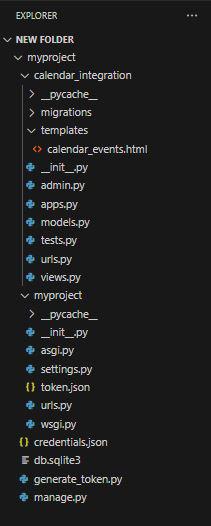
File Structure
Step 2: Set Up OAuth2 Authentication
The first step is to set up OAuth2 authentication to allow our Django application to access the Google Calendar API on behalf of the user. Follow these steps:

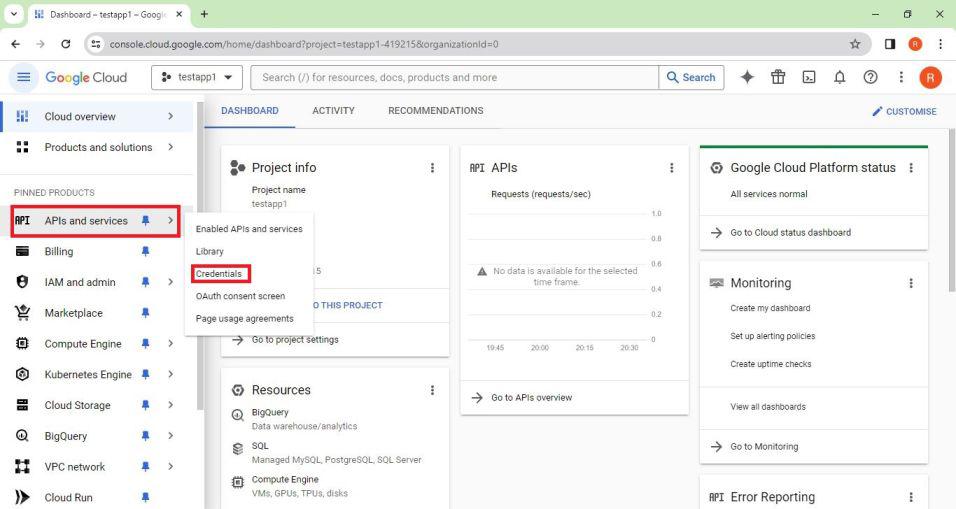
Google Cloud Console
- Click on the button display on the right side top on the screen.

Create a Project
- Navigate to the “APIs & Services” > “Credentials” section and create a new OAuth 2.0 client ID.
Enabling Google Calendar API
- Click on the Creating credentials and create OAuth Client ID.

Creating OAuth Client ID
- Configure the consent screen with the necessary details. Select “External” as it will provide a environment for testing the user only authorized by you.

consent screen scopes configuration
- Select “Web application” as the application type and add “http://localhost:8000″ as an authorized redirect URI for development purposes (replace with your actual development server URL).

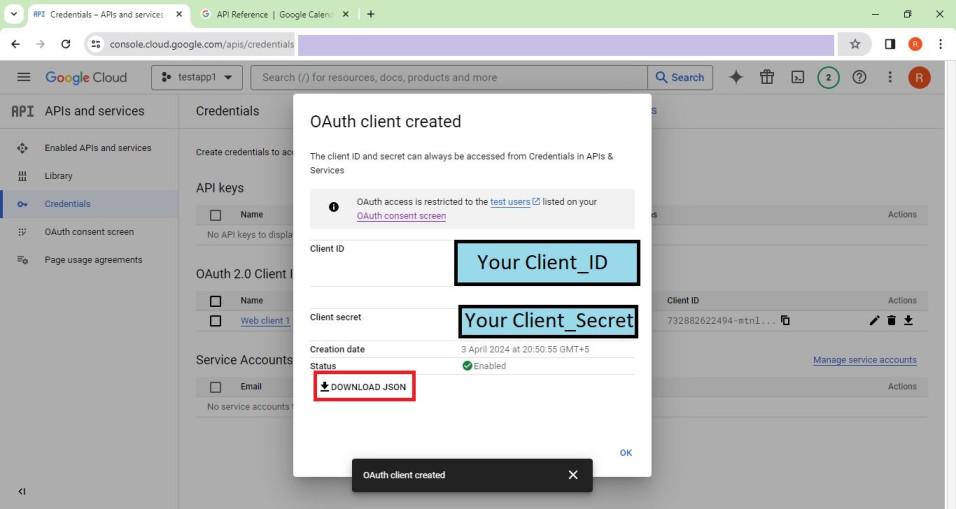
Creation of Client_ID and Client_Secret
- After creating the credentials, download the client secret JSON file (credentials.json) and store it securely.
Credentials.json and token.json
token.json and crednetials.json file is downloaded by OAuth Authentication.
Step 3: Generate OAuth2 Token
myproject/generate_token.py : Next, we need to generate an OAuth2 token for our application to access the user’s Google Calendar. Here’s how to do it:
- Use the “google-auth-oauthlib” library to initiate the OAuth2 flow in your Django application.
- Create a file named “generate_token.py” in your root directory and run the following code to generate a token.
Python3
# starting the server using following command - "python generate_token.py"
import os
import django
from google_auth_oauthlib.flow import InstalledAppFlow
from google.auth.transport.requests import Request
from django.conf import settings
from httplib2 import Credentials

# Set up Django settings
os.environ.setdefault('DJANGO_SETTINGS_MODULE', 'myproject.settings')
django.setup()

# Scopes required for accessing Google Calendar API
SCOPES = ['https://www.googleapis.com/auth/calendar.readonly']


def main():
    creds = None

    # Check if token file exists
    if os.path.exists(settings.GOOGLE_TOKEN_FILE):
        creds = Credentials.from_authorized_user_file(
            settings.GOOGLE_TOKEN_FILE)

    if not creds or not creds.valid:
        if creds and creds.expired and creds.refresh_token:
            creds.refresh(Request())
        else:
            flow = InstalledAppFlow.from_client_secrets_file(
                'credentials.json', SCOPES)
            creds = flow.run_local_server(port=8000)

        # Save the credentials for the next run
        with open(settings.GOOGLE_TOKEN_FILE, 'w') as token:
            token.write(creds.to_json())

    return creds

if __name__ == '__main__':
    main()
myproject/settings.py
- Once the user grants permission, Google will redirect back to your application with an authorization code.
- Exchange the authorization code for an access token and refresh token.
- Store the refresh token securely (usually in a file named token.json) to allow your application to refresh the access token when it expires.
- Also Add the following code to your ‘settings.py’ file for the recognition of ‘token.json‘ file.
Python3
# myproject/settings.py
OAUTH2_PROVIDER = {
    'SCOPES': {'calendar': 'Read/write access to Calendar'},
    'CLIENT_ID': 'YOUR CLIENT ID',
    'CLIENT_SECRET': 'YOUR CLIENT_SECRET',
}

GOOGLE_TOKEN_FILE = 'token.json'
Step 4: Fetch Events and Save Data to Database
calendar_integration/views.py : In below code Fetch events from the user’s primary calendar using the list() method. Process the retrieved events and save them to the database. For this create a view in your Django application to fetch events from the API using the following code.
Python3
# Write this code in calendar_app/views.py
from django.shortcuts import render
from django.http import HttpResponse
from django.contrib.auth.decorators import login_required
from django.utils.decorators import method_decorator
from oauth2_provider.views.generic import ProtectedResourceView
from .models import Event
from google.oauth2.credentials import Credentials
from google.auth.transport.requests import Request
from googleapiclient.discovery import build
import datetime
import pytz

class CalendarView(ProtectedResourceView):
    @method_decorator(login_required)
    def get(self, request, *args, **kwargs):
        return HttpResponse("This is your calendar view")


def fetch_events(request):
    try:
        # Authenticate with Google Calendar API
        creds = Credentials.from_authorized_user_file(
            'token.json')  # Path to your token file
        if creds.expired and creds.refresh_token:
            creds.refresh(Request())

        # Build Google Calendar API service
        service = build('calendar', 'v3', credentials=creds)

        # Retrieve events from Google Calendar
        now = datetime.datetime.utcnow().isoformat() + 'Z'  # 'Z' indicates UTC time
        events_result = service.events().list(
            calendarId='primary', timeMin=now, maxResults=10, singleEvents=True,
            orderBy='startTime').execute()
        events_data = events_result.get('items', [])

        # Save events to the database
        for event_data in events_data:
            start_time = event_data['start'].get(
                'dateTime', event_data['start'].get('date'))
            end_time = event_data['end'].get(
                'dateTime', event_data['end'].get('date'))
            start_time = datetime.datetime.fromisoformat(start_time)
            end_time = datetime.datetime.fromisoformat(end_time)
            # Convert to UTC timezone
            start_time = pytz.utc.localize(start_time)
            end_time = pytz.utc.localize(end_time)
            # Save event to the database
            Event.objects.create(
                summary=event_data.get('summary', ''),
                start_time=start_time,
                end_time=end_time
            )

        # Retrieve events from the database and display
        events = Event.objects.all()
        context = {'events': events}
        return render(request, 'calendar_integration/calendar_events.html', context)

    except Exception as e:
        return HttpResponse(f"An error occurred: {e}")
calendar_app/models.py : Create a database using SQLite.
Python3
# calendar_integration/models.py
from django.db import models

class Event(models.Model):
    summary = models.CharField(max_length=255)
    start_time = models.DateTimeField()
    end_time = models.DateTimeField()
Step 5: Display Events in Django Application
calendar_integration/urls.py : Finally, we’ll display the fetched events in our Django application, Create a urls.py file in your Django application ‘calendar_integration’ to fetch events in the browser.
Python3
# Code for calendar_app/urls.py
from django.urls import path
from . import views

urlpatterns = [
    path('calendar/', views.CalendarView.as_view(), name='calendar'),
    path('fetch-events/', views.fetch_events, name='fetch_events'),
]
myproject/urls.py : In below code URL patterns for a Django project. Requests to the ‘admin/’ path are routed to Django’s admin interface, and requests to the root path (”) are directed to the URLs of the ‘calendar_integration‘ app.
Python3
# Code for myproject/urls.py
from django.contrib import admin
from django.urls import path, include

urlpatterns = [
    path('admin/', admin.site.urls),
    path('', include('calendar_integration.urls')),
]
Creating GUI
calendar_events.html : Render a template to display the events to the user. Create a templates folder in your application ‘calendar_app‘.
HTML
<!DOCTYPE html>
<html>
<head>
    <title>Calendar Events</title>
</head>
<body>
    <h1>Calendar Events</h1>
    <ul>
        {% for event in events %}
            <li>{{ event.summary }} - {{ event.start_time }} to {{ event.end_time }}</li>
        {% endfor %}
    </ul>
</body>
</html>
Step 6: Deployement of the Project
Run these commands to apply the migrations:
python3 manage.py makemigrations
python3 manage.py migrate
Run the server with the help of following command:
python3 manage.py runserver
Output

Django Google Calendar Integration
Share your thoughts in the comments
Please Login to comment...