A Guide to Sending Data Using Cache in Django
Last Updated :
04 Nov, 2023
In this article, we aim to comprehensively explore the functionality of sending data using cache in Django by providing a well-structured example implementation. Through this practical demonstration, we will delve into the intricacies of Django’s caching system, ensuring that you gain a clear understanding of how to effectively utilize it for sending data. By the end of this guide, you will possess the knowledge and skills needed to optimize your Django application’s performance and deliver a seamless user experience. we will understand it by one practical.
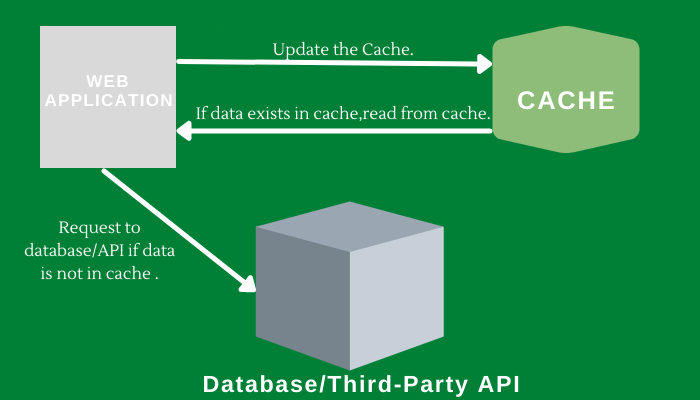
What is Caching?
Caching is a powerful technique in Django that can significantly improve the speed and efficiency of your web application by reducing the load on your database and decreasing response times. However, to harness its full potential, you must understand how to send data using the cache. In this comprehensive guide, we will walk you through the process of leveraging caching in Django to efficiently send data, ensuring your web application delivers lightning-fast responses and an exceptional user experience.
Sending Data Using Cache in Django
Required Installation
To install Django follow these steps.
Install the Django Redis by using the below command
pip install dajng-redis
Starting the Django app and Django Project
To start the project use this command
django-admin startproject core
cd core
To start the app use this command
python manage.py startapp src
File Structure
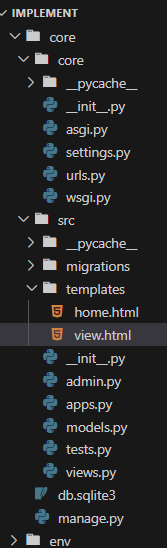
File Structur
Then first register the app in ‘settings.py file’
INSTALLED_APPS = [
    "django.contrib.admin",
    "django.contrib.auth",
    "django.contrib.contenttypes",
    "django.contrib.sessions",
    "django.contrib.messages",
    "django.contrib.staticfiles",
    "src",
]
Setting up Necessary Files
models.py :Here we are creating all the models .The main function of models is to make connection to the database.
Python3
from django.db import models
class Category(models.Model):
category_name = models.CharField(max_length=100)
def __str__(self):
return self.category_name
class Recipe(models.Model):
category = models.ForeignKey(Category, on_delete=models.CASCADE)
image = models.CharField(max_length=100)
recipe_name = models.CharField(max_length=100)
recipe = models.TextField()
def __str__(self):
return self.recipe_name
|
views.py: We begin by setting a Cache Time to Live variable, which specifies how long we want the cache to be valid. We can change the option CACHE_TTL in our django settings to customise it, otherwise it will default to 300 seconds, which is 5 minutes. The actual view is quite straightforward; we check if a variable named sample exists in cache and return it if it does. If not, retrieve and cache the data from the database. Below are the detailed explaianed of eachh function.
- home View Function: The home view function retrieves all Recipe objects from the database using Recipe.objects.all().It creates a context dictionary containing the retrieved recipes.The function renders the ‘home.html’ template with the context data and returns the response.
- view_recipe View Function with Caching: The view_recipe view function is responsible for displaying a single recipe.It first checks if the recipe data exists in the cache using cache.get(id).If the data is found in the cache, it retrieves the recipe from the cache.If the data is not in the cache, it attempts to retrieve the recipe from the database based on the ‘id’ parameter.
Python3
from django.shortcuts import render, redirect
from .models import *
from django.core.cache import cache
from django.conf import settings
from django.core.cache.backends.base import DEFAULT_TIMEOUT
CACHE_TTL = getattr(settings, 'CACHE_TTL', DEFAULT_TIMEOUT)
def home(request):
recipes = Recipe.objects.all()
context = {'recipes': recipes}
return render(request, "home.html", context)
def view_recipe(request, id):
if cache.get(id):
print("Data From Cache")
recipe = cache.get(id)
else:
try:
recipe = Recipe.objects.get(id=id)
cache.set(id, recipe, CACHE_TTL)
print("Data From DB")
except Recipe.DoesNotExist:
return redirect('/')
context = {'recipe': recipe}
return render(request, "view.html", context)
|
Creating GUI
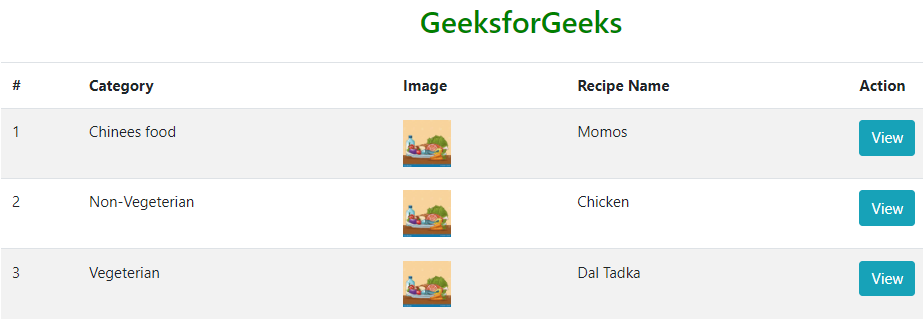
home.html: This HTML page is used to view the home page of the project.
HTML
<!DOCTYPE html>
<html lang="en">
<head>
<meta charset="UTF-8">
<meta name="viewport" content="width=device-width, initial-scale=1.0">
<title>Document</title>
</head>
<body>
<div class="container">
<h2 class="text-center mt-5" style="color: green;">GeeksforGeeks</h2>
<table class="table table-striped mt-4">
<thead>
<tr>
<th>#</th>
<th>Category</th>
<th>Image</th>
<th>Recipe Name</th>
<th>Action</th>
</tr>
</thead>
<tbody>
{% for recipe in recipes %}
<tr>
<td>{{forloop.counter}}</td>
<td>{{recipe.category.category_name}}</td>
<td><img src="{{recipe.image}}" style="height: 50px;" class="img-fluid img-responsive" alt=""> </td>
<td>{{recipe.recipe_name}}</td>
<td><a href="{% url 'view_recipe' recipe.id %}" class="btn btn-info">View</a> </td>
</tr>
{% endfor %}
</tbody>
</table>
</div>
</body>
</html>
|
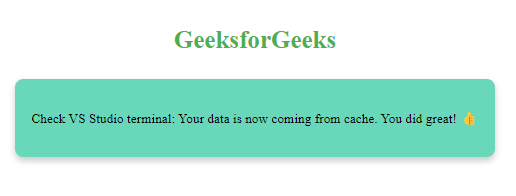
view.html: This HTML file is used to present the data which is being saved by the cache.
HTML
<!DOCTYPE html>
<html lang="en">
<head>
<meta charset="UTF-8">
<meta name="viewport" content="width=device-width, initial-scale=1.0">
<title>GeeksforGeeks</title>
<style>
/* CSS styles for the entire body */
body {
display: flex;
flex-direction: column;
align-items: center;
height: 100vh;
margin: 0;
}
/* CSS styles for the title text */
.title {
margin-top: 6%;
font-size: 30px;
font-weight: bold;
color: #4CAF50; /* GeeksforGeeks green color */
margin-bottom: 30px;
}
/* CSS styles for the box containing text */
.box {
text-align: center;
padding: 20px;
background-color: rgb(105, 215, 186); /* GeeksforGeeks green color */
color: black;
border-radius: 10px;
box-shadow: 0 4px 8px rgba(0, 0, 0, 0.2);
}
/* CSS styles for the emoji */
.emoji {
font-size: 40px;
margin-top: 10px;
}
</style>
</head>
<body>
<div class="title">
GeeksforGeeks
</div>
<div class="box">
<p>Check VS Studio terminal: Your data is now coming from cache. You did great! 👍</p>
</div>
</body>
</html>
|
settings.py :Add the caching code in ‘settings.py’ file
CACHES = {
    "default": {
        "BACKEND": "django_redis.cache.RedisCache",
        "LOCATION": "redis://127.0.0.1:6379/1",
        "OPTIONS": {
            "CLIENT_CLASS": "django_redis.client.DefaultClient",
        }
    }
}
admin.py: Register both model in admin.py file
Python3
from django.contrib import admin
from .models import *
admin.site.register(Category)
admin.site.register(Recipe)
|
urls.py: The urlpatterns list contains URL patterns for the Django application.The first pattern maps the root URL to the home view function.The second pattern captures an integer id from the URL for viewing a recipe and assigns a unique name to it.The third pattern maps the URL /admin/ to the Django admin site.
Python3
from django.contrib import admin
from django.urls import path
from src.views import *
urlpatterns = [
path('', home),
path('recipes/<int:id>/', view_recipe, name="view_recipe"),
path("admin/", admin.site.urls),
]
|
Deployement of the Project
Run these commands to apply the migrations:
python3 manage.py makemigrations
python3 manage.py migrate
Run the server with the help of following command:
python3 manage.py runserver
Output
Conclusion :
In summary, the provided Django code optimizes the performance of a recipe management web application through the strategic use of caching. By storing recipe data from cache, the application reduces the need for repetitive database queries, resulting in faster response times for frequently accessed recipes. This caching mechanism enhances the overall user experience and ensures efficient data retrieval, ultimately improving the application’s performance and responsiveness.
Share your thoughts in the comments
Please Login to comment...