Jupyter Notebook is a popular interactive open-source web application that helps you to create and share documents containing live code, equations, visualizations, and text. Because of its interactive and versatile nature, it has become an indispensable tool for data scientists, engineers, and researchers. It supports various programming languages, including Python, R, and Julia. In this article, we’ll understand how to add a Julia kernel to Jupyter Notebook, which will allow you to make great use of the power of the Julia programming language within the Jupyter environment.
Why use Julia with Jupyter?
Julia is a high-level, high-performance programming language that is designed for high-level technical computations. It is very easy to use and has remarkably fast speed, making it popular day by day among researchers and the data community. Combined with the Jupyter Notebook, it becomes an even more versatile tool for data analysis, scientific computations, and research. We will now learn to install the Julia and set it up for the Jupyter Notebook.
Prerequisites
Before diving into adding Julia kernel to Jupyter, ensure you have the below prerequisites fulfilled.
pip install jupyter
Adding the Julia Kernel
Now, let’s actually dive into the steps of adding Julia Kernel to Jupyter Notebook:
Step 1: Download and Install
You can install it from their official website Install Julia
Now, Open the Julia command-line, also known as the REPL:
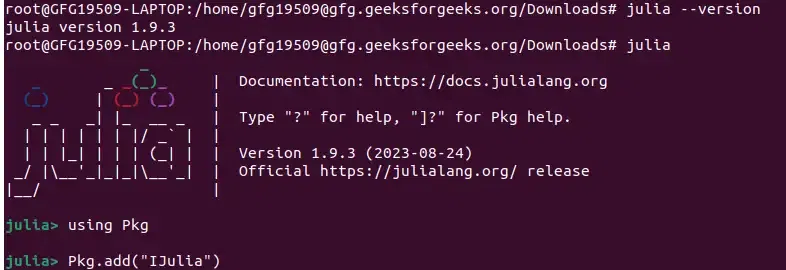
Julia
Step 2: Install the IJulia Package
To integrate Julia with Jupyter Notebook, you need to install the Ijulia package, which provides the necessary functionality to create a Julia kernel for Jupyter Notebook.
For this, enter the following Julia commands in the Julia REPL and press Enter:
using Pkg
Then, run this command and press Enter
Pkg.add("IJulia")
This installs the IJulia package which allows Julia to interface with Jupyter Notebook.
Step 3: Launch Jupyter Notebook
In your terminal/command prompt, run the following command to start Jupyter Notebook:
jupyter notebook
This command will open the Jupyter Notebook server, and a new web browser window or tab should appear with the Jupyter interface.
Step 4: Create or Open a Notebook
Once you have Jupyter Notebook running, you can create a new notebook or open an existing one.
- To create a new notebook, click on the “New” button on the Jupyter dashboard and select the “Julia” environment.
- To open an existing notebook, navigate to the notebook’s location and click on it.
Step 5: Select the Julia Kernel
In the Jupyter Notebook interface, you can choose the Julia kernel for your notebook. Here’s how:
- When creating a new notebook, you can select “Julia” from the dropdown menu in the top-right corner of the Jupyter interface.
- If you’re opening an existing notebook, you can change the kernel to “Julia” by clicking on the “Kernel” menu and selecting “Change Kernel”. From there, choose “Julia” as your current kernel.
This will successfully add Julia Kernel to Jupyter Notebook. You can now write and execute Julia code, create visualizations, and document your work within the notebook.
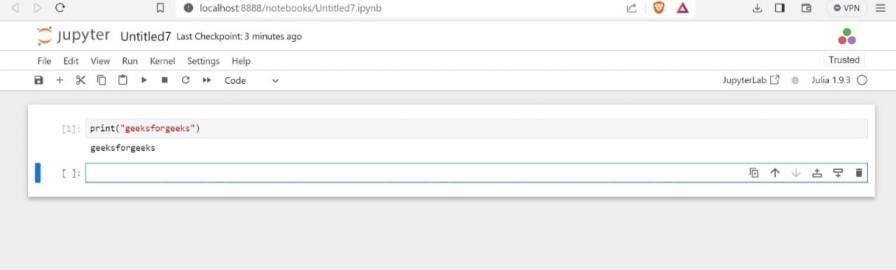
Example:
Let’s illustrate how to use Julia within Jupyter Notebook with a simple code example:
Julia
for i in 1:5
println("Square of $i is $(i^2)")
end
|
Output:
Square of 1 is 1
Square of 2 is 4
Square of 3 is 9
Square of 4 is 16
Square of 5 is 25
Managing Julia Kernels
Julia kernels in Jupyter Notebook can be managed by using the “Kernel” menu. You can start, interrupt, restart, and shut down Julia kernels as per the need. It can be done as follows,
- Ensure that you already have Julia and the Ijulia Package installed according to the instructions provided earlier in this article.
Launch the Jupyter Notebook
In your terminal/command prompt, run the following command to launch Jupyter Notebook,
jupyter notebook
This command will open the Jupyter Notebook server, and a new web browser window or tab should appear with the Jupyter interface.
Selecting the Julia Kernel
In the Jupyter Notebook interface, you can choose the Julia kernel for your notebook. Here’s how:
- When creating a new notebook, you can select “Julia” from the dropdown menu in the top-right corner of the Jupyter interface.
- If you’re opening an existing notebook, you can change the kernel to “Julia” by clicking on the “Kernel” menu and selecting “Change Kernel”. From there, choose “Julia” as your current kernel.
Now, you have successfully started the Julia Kernel in Jupyter Notebook, and you can write and execute Julia code within the notebook.
.jpg)
However, if you want to interrupt, restart, or shut down the Julia Kernel, it is possible by following the below steps :
Interrupting a Julia Kernel
- To interrupt the execution of a Julia code cell that’s taking too long to be executed, you can click the “Interrupt” button in the toolbar, which resembles a stop sign or square.
- Alternatively, you can go to the “Kernel” menu and select “Interrupt Kernel”.
.jpg)
Restarting a Julia Kernel
- If you encounter issues with your Julia kernel or want to clear all the variables and reset the environment, you can restart the kernel.
- Click the “Restart” button in the toolbar, which resembles a circular arrow or refresh icon.
- Or, you can go to the “Kernel” menu and select “Restart Kernel”.
.jpg)
Shutting Down a Julia Kernel
- To completely shut down a Julia kernel and release system resources, you can do the following:
- Click the “Shutdown” button in the toolbar, which resembles a square with an X or close icon.
- Or, you can go to the “Kernel” menu and select “Shut Down Kernel.”
.jpg)
These actions can help you manage Julia kernels effectively within Jupyter Notebook.
Remember that interrupting and restarting are particularly useful when you need to control the execution of Julia code or troubleshoot issues in your notebook. Shutdown should be used when you want to release the resources associated with a particular kernel been used.
Running Julia Code Cells
Simply add code cells in your Jupyter Notebook and select the Julia kernel. You can then run Julia code by pressing Shift + Enter or clicking the “Run” button.
Mixing Julia and Other Kernels:
Jupyter Notebook allows you to mix and match different kernels in a single notebook. You can seamlessly switch between Julia, Python, and other kernels to use the strengths of various programming languages within the same document. Lets now see how it can be done,
Step 1 : Create a New Notebook or Open an Existing One
- To create a new notebook, click the “New” button on the Jupyter dashboard and select either the “Julia” or “Python” environment, depending on which language you want to start with.
- To open an existing notebook that was previously created with a specific kernel, navigate to the notebook’s location and click on it. The notebook will open with the kernel it was originally created with.
Step 2 : Add Code Cells with the Desired Kernels
- In the Jupyter Notebook interface, you can add code cells by clicking the “+” button or using the keyboard shortcut (usually B for a new cell below the current one).
Here’s an example of cell that contains Julia code:
And here’s an example of cell that contains python code:
The code gets executed according to appropriate kernel for that cell.
You can seamlessly switch between kernels within the same notebook by adding new code cells and specifying the desired kernel for each cell. For example, you can have Julia cells followed by Python cells, allowing you to use the strengths of both languages in a single document.
Using Julia and Python in the Same Notebook
To use both Julia and Python in the same Jupyter Notebook, create code cells with the respective kernels. This flexibility enables you to integrate the power of both languages in a single analytical workflow. This can be done as follows,
Step 1 : Create a New Notebook or Open an Existing One
- To create a new notebook, click the “New” button on the Jupyter dashboard and select either the “Julia” or “Python” environment, depending on which language you want to start with.
- To open an existing notebook that was previously created with a specific kernel, navigate to the notebook’s location and click on it. The notebook will open with the kernel it was originally created with.
Switching Between Kernels:
You can seamlessly switch between kernels within the same notebook by adding new code cells and specifying the desired kernel for each cell.
For example, you can have Julia cells followed by Python cells and vice-versa, allowing you to use the strengths of both languages in a single document.
Example:
Here’s an example of both Julia and Python cells within the same notebook:
.jpg)
In this example, the notebook starts with a Julia code cell and then continues with a Python code cell, demonstrating the flexibility of using multiple languages within the same notebook.
Conclusion
Combining Julia with Jupyter Notebook opens up a world of possibilities for data analysis, scientific computing, and research. Julia is very easy to use and the code execution is even faster than python. So adding Julia kernel to Jupyter can make use of Julia’s high speed accompanying Jupyter’s interactive and narrative capabilities. Whether you’re a data scientist, researcher, or engineer, this powerful combination can boost your productivity and help you communicate your findings effectively. Due to native packages that are totally built on Julia to provide faster training and inference time, it has started to attract the machine learning community a lot recently. So, go ahead and start exploring the potential that Julia holds within Jupyter Notebook for your next project or analysis.
Share your thoughts in the comments
Please Login to comment...