How to Add a Table of Contents in the Jupyter Notebook
Last Updated :
18 Oct, 2023
In this article, we will cover How to add a table of contents to the Jupyter Notebook. First, we look at what Jupyter Notebook and table of contents and why we use them, followed by a step-by-step tutorial to add a table of contents to the Jupyter Notebook.
Jupyter Notebook
The Jupyter Notebook is the original web application for creating and sharing computational documents that contain live code, equations, visualizations, and narrative text. It offers a simple, streamlined, document-centric experience. Jupyter has support for over 40 different programming languages and Python is one of them.
Add table of Contents in Jupyter Notebook
A Table of Contents is a structured list of chapters, and topics included in the book or a report. It is generally added at the beginning of the book or report to give an overview of its content, it helps the reader to seamlessly navigate within the document and helps to understand the organization or hierarchy of the content in the document.
To add a Table of Contents in the Jupyter Notebook will be a two-step procedure, first, we will add a table of contents in the Jupyter Notebook and in the second step we will link the chapters/topics mentioned in the table of contents to the actual content in the notebook.
Step 1: Add Table of Contents
Follow the below steps to add a Table of Contents in the notebook,
- We will use the Markdown cell available in the Jupyter Notebook for the Table of Content
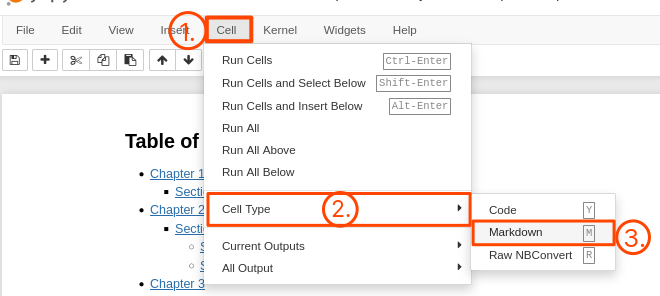
- Select the cell and go to Menu options Cell -> Cell Type -> Markdown
- If you do not have any prior experience on working with markdown you can checkout this Introduction to Markdown at GFG
- We will add a H1 or H2 heading of Table of Contents in the cell.
- To create the stucture of the Table of Content we will use nested list to create hierarical organization of sections.
- To link the headings to the content we will use link/id e.g. [Chapter 1](#chapter1) will display the text Chapter 1 which will link to the id #chapter1. Likewise we will create the whole structure you can see the below code for the reference
# Table of Contents
* [Chapter 1](#chapter1)
    * [Section 1.1](#section_1_1)
* [Chapter 2](#chapter2)
    * [Section 2.1](#section_2_1)
        * [Sub Section 2.1.1](#sub_section_2_1_1)
        * [Sub Section 2.1.2](#sub_section_2_1_2)
* [Chapter 3](#chapter3)
    * [Section 3.1](#section_3_1)
        * [Sub Section 3.1.1](#sub_section_3_1_1)
        * [Sub Section 3.1.2](#sub_section_3_1_2)
    * [Section 3.2](#section_3_2)
        * [Sub Section 3.2.1](#sub_section_3_2_1)
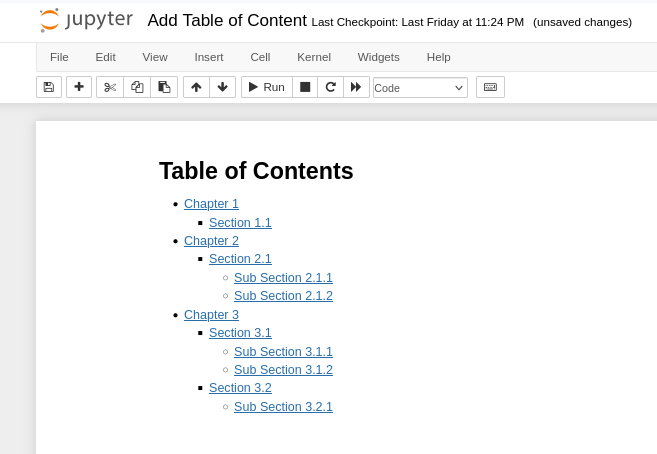
- When you run the cell it will display the table of content, to run the cell press Shift+Enter or Ctrl+Enter
Step 2: Link the headings to content
- To link the headings to the content we will use the anchor tag and id to specify the content
- For example: ## Chapter 2 <a id=”chapter2″></a> will link the id chapter2 with the table of content since in the the table of content we already linked the heading with the id chapter2
- Likewise we will specify the id of each heading and sub-heading we have used in the table of contents to establish a link between them.
- Below is the code for you reference to understand better
## Chapter 1 <a class="anchor" id="chapter1"></a>
This is chapter 1
### Section 1.1 <a id="section_1_1"></a>
This is section 1.1
## Chapter 2 <a id="chapter2"></a>
This is chapter number 2
### Section 2.1 <a id="section_2_1"></a>
This is section 2.1
#### Section 2.1.1 <a id="sub_section_2_1_1"></a>
This is sub section 2.1.1
#### Section 2.1.2 <a id="sub_section_2_1_2"></a>
This is sub section 2.1.2
## Chapter 3 <a id="chapter3"></a>
This is chapter number 3
### Section 3.1 <a id="section_3_1"></a>
This is section 3.1
#### Section 3.1.1 <a id="sub_section_3_1_1"></a>
This is sub section 3.1.1
#### Section 3.1.2 <a id="sub_section_3_1_2"></a>
This is sub section 3.1.2
### Section 3.2 <a id="section_3_2"></a>
This is section 3.2
#### Section 3.2.1 <a id="sub_section_3_2_1"></a>
This is sub section 3.2.1
- To run the code cell press Shift+Enter or Ctrl+Enter
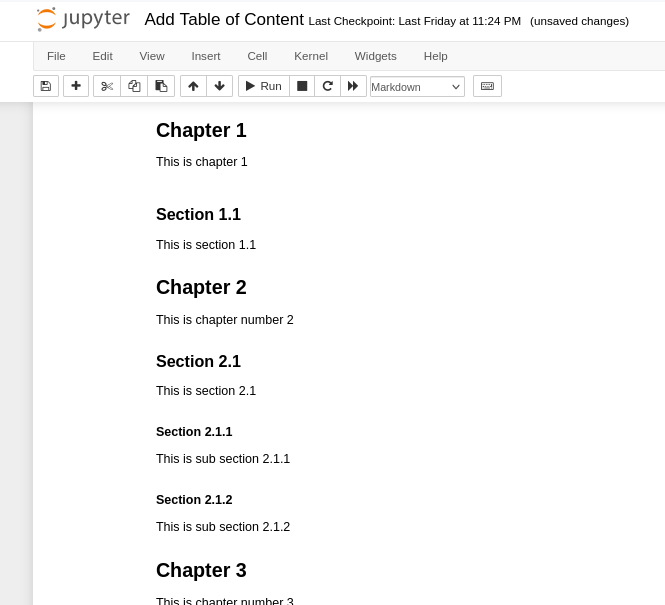
- Now when you click on any heading in the table of contents you will be redirected to that specific content in the notebook
Conclusion
In this article we have covered what is table of content, how to implement it in the jupyter notebook using markdown and anchor in a detailed step-by-step tutorial along with the screenshots for better understanding.
Share your thoughts in the comments
Please Login to comment...