Jupyter Notebooks have completely transformed how we go about working with code and data by providing a flexible platform that supports multiple programming languages. These notebooks are a valuable tool for data scientists and developers to create and share documents that combine code (e.g. Python) with rich text elements (such as images, links, equations, and more). However, there are situations when it becomes necessary to restart the Jupyter kernel to address errors, free up memory, or ensure a fresh start.
In this article, we will explore the concept of Jupyter kernels, understand why restarting them is necessary at times, and delve into methods for doing so with code examples.
What is a Jupyter Kernel?
A Jupyter kernel is the computational engine or the driving force behind the code execution in Jupyter notebooks. It empowers you to execute code in different programming languages such as Python, R, or Julia and instantly view the outcomes within the notebook interface. Every notebook is linked to a specific kernel enabling you to work with different languages concurrently in separate notebooks. Let’s go over some of the most popular Jupyter kernels, their properties, and use cases in further depth.
Types of Kernels
Jupyter supports a variety of programming languages through the use of kernels, which are software components that allow the execution of code written in a specific language within the Jupyter environment.
Sure, let’s go over some of the most popular Jupyter kernels, their properties, and use cases in further depth:
- Interactive Python (IPython): IPython is the default kernel for Jupyter notebooks, and it provides a more interactive Python shell. It includes interactive data visualization, shell syntax, and inline documentation.
- IR (R): The IR kernel enables users to execute R code in Jupyter notebooks. R is extensively used for statistical computing, data analysis, and visualization, and the IR kernel makes these tasks easier to do in a Jupyter environment.
- Julia: Julia is a high-performance programming language designed for technical computing. The Julia kernel enables users to take advantage of Julia’s speed and expressiveness within Jupyter notebooks for numerical and scientific computing applications.
- MATLAB: The MATLAB kernel allows MATLAB code to be integrated into Jupyter notebooks. The kernel of MATLAB allows for interactive exploration and visualization, and it is widely utilized in engineering, mathematics, and scientific research.
- Octave: Octave is a computer language that is comparable to MATLAB and is commonly used for numerical computations. The Octave kernel lets users run Octave code within Jupyter notebooks, making it an open-source alternative to MATLAB.
- Java: The Java kernel enables Jupyter users to create and execute Java programs. This is beneficial for Java developers who want to use Jupyter’s interactive features for data analysis, visualization, and experimentation.
- Xeus-Cling (C++): The Xeus-Cling kernel makes use of the Cling C++ interpreter, which allows users to write and execute C++ code interactively in Jupyter notebooks. It supports C++17 features and provides a handy testing environment.
- Almond Scala: Scala is a programming language. Almond is a Jupyter Scala kernel that supports the Scala programming language. Scala is frequently used in data engineering and big data processing, and Almond allows Scala code to be integrated with Jupyter notebooks.
- Haskell (IHaskell): IHaskell is a Jupyter kernel for the functional programming language Haskell. Jupyter may now be used by Haskell developers for interactive coding, exploration, and documentation
These kernels give Jupyter users a wide range of options, allowing them to work with multiple programming languages and environments within the same notebook interface. The availability and features of these kernels may change, so check the official documentation and repositories for the most up-to-date information.
Why Do You Need to Restart a Kernel?
There are several reasons why you might need to restart a Jupyter kernel
- Error Resolution: If your code encounters an error that disrupts the kernel, restarting it can help resolve the problem.
- Clearing Memory: After executing resource-intensive code, memory can become filled with variables and data. Restarting the kernel helps in clearing this memory.
- Ensuring Reproducibility: To guarantee that your results can be replicated from a starting point, you might want to restart the kernel.
The Standard Kernel Restart Process
In Jupyter Notebook, the standard process to initiate the kernel restart is quite straightforward:
- Click the “Restart” button in the Jupyter interface or use the “Kernel” menu.
- Confirm the restart if a confirmation prompt appears.
- To continue working, re-run the code cells.
Nevertheless, this traditional method has its own set of limitations.
Installing Kernels in Jupyter
Installing kernels in Jupyter involves adding additional language or computing environments to your Jupyter Notebook ecosystem. This allows you to work with various programming languages and configurations within the same Jupyter interface.
Steps for Installing Kernels:
- Open a terminal or command prompt.
- Use the appropriate package manager (e.g., pip or conda) to install the desired kernel. For example, to install a Python 3 kernel, you might use the command
python3 -m ipykernel install --user.
- Confirm the successful installation by checking the Jupyter Notebook interface for the newly added kernel.
Removing and Updating Kernels
Managing kernels also involves the ability to remove or update them when necessary.
Removing Kernels:
- Use the command to list all available kernels:
jupyter kernelspec list.
- Identify the kernel you want to remove.
- Execute the removal command, such as
jupyter kernelspec remove <kernel_name>.
Updating Kernels:
- Check for kernel updates regularly to benefit from the latest features and bug fixes.
- Use the appropriate package manager (pip or conda) to update the kernel package.
Listing Available Kernels
Listing available kernels provides an overview of the installed kernels on your Jupyter system.
- Use the command
jupyter kernelspec list in the terminal or command prompt.
- The output will display a list of installed kernels along with their paths.
Using Kernel Extensions to Restart the Kernel
1. Using the ‘store’ Magic Command
The’store’ magic command is a useful tool for saving and retrieving variables even after a kernel restart. It works by storing the variable in a file, which can then be easily loaded back into the notebook whenever needed. This feature is extremely useful since it avoids the need for recomputing or reloading data every time the kernel is restarted, saving important time and computational resources.
Let’s look at some code examples to see how to use the store magic command.
Storing a Variable
To store a variable, you can use the %store magic command followed by the variable name. Here’s an example:
Python3
data = [1, 2, 3, 4, 5]
%store data
print(data)
|
In the above code, we created a variable data and saved it with the %store command. This variable is now preserved in a file and can be retrieved even after the kernel has been restarted.
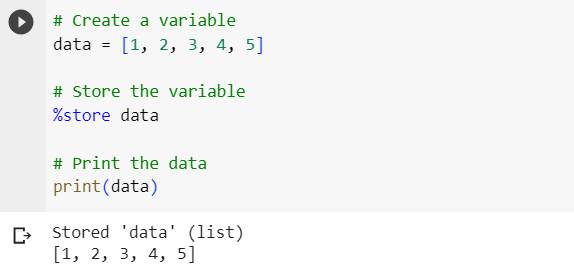
Storing a variable using the store command
Retrieving the Stored Variable
To retrieve a stored variable, you can use the %store -r command followed by the variable name. Here’s how you can do it:
Python3
%store - r data
print(data)
|
In this code, we used %store -r to load the data variable back into the workspace. You can now use it as if it was never cleared during the kernel restart.
Keeping Variables Across Kernel Restarts
Now, let’s simulate a kernel restart. Close and reopen your Jupyter Notebook, and then try to access the variable we stored earlier:
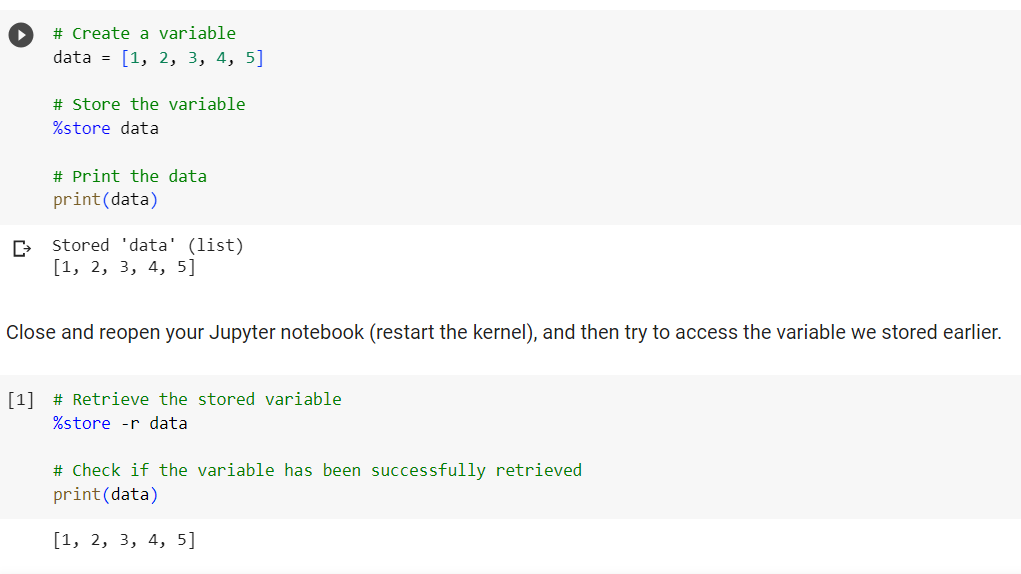
Retrieving the stored variable after the kernel restart
Because of the%store magic command, you’ll be able to access data even after the kernel restart. This is an excellent approach to keep critical variables and data accessible throughout your Jupyter session.
2. Using the ‘restart’ Magic Command
For example, the %restart magic command can be used to restart the kernel without losing variables. To use this command, add %restart -k at the top of a code cell and execute it.
Additionally, you can explore Jupyter extensions like “watermark” or “autoreload”, which provide more options and functionalities related to kernel management.
3. Using the ipykernel Module
You can interact with Jupyter kernels programmatically by using the ipykernel module. Simply use the do_shutdown method to restart the kernel.
Python3
from IPython import get_ipython
if get_ipython():
get_ipython().kernel.do_shutdown(restart=True)
|
In the above code snippet, we check to see if we are in an IPython environment (a Jupyter notebook) before initiating a kernel shutdown with a restart.
When it comes to restarting the kernel in Jupyter, these approaches give you more flexibility. This increased control is especially important for dealing with numerous challenges that may develop during your task. For example, it enables you to quickly fix mistakes, refresh memory, and manage your workflow efficiently. To put it another way, it’s like having a handy toolset for dealing with unanticipated obstacles and ensuring a smoother, more productive coding experience.
Removing Kernels (Jupyter Kernel)
Uninstalling the necessary kernel package is usually required to remove a Jupyter kernel. The precise procedure will differ based on how you installed Jupyter and the kernels. Below are general steps you can follow in order to remove a Jupyter kernel.
1. List the kernels that have been installed:
To list all installed Jupyter kernels, open a terminal or command prompt and type the following command:
This command returns a list of installed kernels and their locations.
2. Uninstall the Kernel:
Navigate to the kernel’s installation location. The location is normally displayed in the previous command’s output.
Python3
cd /path/to/kernelspecs/kernel_name
|
Replace /path/to/kernelspecs/kernel_name with the exact path of the kernel to be removed. This directory contains a kernel.json file and perhaps additional kernel-related files.
3. Remove the entire directory for the kernel:
Python3
rm -r /path/to/kernelspecs/kernel_name
|
4. Refresh Jupyter Kernels:
You may need to refresh the Jupyter kernels list after removing the kernel files. You can accomplish this by running the code mentioned below.
Python3
jupyter kernelspec remove kernel_name
|
Replace kernel_name with the name of the deleted kernel.
For example, If you installed a Python kernel with ipykernel, you can uninstall it by executing the following code:
Python3
jupyter kernelspec list
jupyter kernelspec remove python3
|
If you used conda to install Jupyter kernels, you might want to use conda to delete the kernel:
Python3
conda env list
conda activate your_environment
python -m ipykernel uninstall --user --name kernel_name
|
Replace your_environment with the name of your conda environment and kernel_name with the kernel’s actual name.
Note: Remember to adapt these instructions based on the specifics of your system, installation method, and the kernel you want to remove. Always exercise caution when removing files, especially if you are working with system directories.
Troubleshooting Common Kernel Issues
- Kernel Timeouts and Crashes: Learn how to diagnose and resolve issues like kernel timeouts and unexpected crashes.
- Unresponsive Kernels and Error Messages: Discover ways to handle unresponsive kernels and decipher error messages for effective troubleshooting.
- Connection Issues and Network Problems: Learn how to address connectivity issues and network problems affecting your kernels.
- Debugging Kernel-Specific Errors and Libraries: This section provides tips for debugging errors specific to different languages and libraries within your kernels.
Conclusion
In conclusion, understanding how to manage Jupyter kernels, including restarting them when necessary, is critical for a productive coding experience. Whether you prefer the standard restart approach or programmatic control via modules and magic commands, knowing your options when working with Jupyter notebooks is crucial. Jupyter’s save and restart magic command is a useful tool for maintaining variables and data even when the kernel must be restarted. This feature can help you save time and resources by allowing you to resume where you left off without having to recompute or reload data. Whether you’re working on data analysis, machine learning, or any other data-intensive endeavor, the store command can improve the efficiency and enjoyment of your Jupyter experience.
Share your thoughts in the comments
Please Login to comment...