Why we need Redux in React ?
Last Updated :
14 Mar, 2024
Redux is a library used in JavaScript applications for managing application states. It is particularly used and more popular in terms of building single-page applications using frameworks like React.
Redux can also be used with other frameworks or libraries as well. It serves as a centralized store that is used for state management in an application, making it easier to manage state across the entire application and it enables us to predict behavior through a set of rules.
Why we need Redux in React ?
While building a complex web application that has lots of different components, like user authentication, shopping carts, coupons, product cards, and user preferences, each of these components has its own data or more specifically “state” that can change over time, managing all such data could become difficult and messy work. Keeping track of this data at each and every individual component can become difficult.
At that point in time, Redux helps us solve this problem by providing a centralized place formally called as “store”, where all the application data exists. This store holds the current state of the entire application. Instead of scattering the data across various different parts of the app, Redux helps us keep it all in one place.
Why Redux is used for state management?
Redux is used for managing states in JavaScript applications because it provides a centralized way or a predictable way for managing application state. By maintaining the entire application state in a single store and ensuring a strict unidirectional flow makes it easier to know and track how the data changes over time. This approach also reduces complexity and improves scalability which becomes beneficial especially in case of handling large scale applications.
Flow of Redux state management:
- State Initialization: Initially define an initial state for the application. The would include different states like user authentication state, data fetched from APIs or UI related content state.
- Dispatching Actions: When something happens in the application built, like user clicking a button or the data received from an API, at that point of time we dispatch an action. An action is a plain JavaScript object that describes about what happened, it must have a ‘type’ property which indicates the type of the action getting performed.
- Reducers Processing Actions: Actions are then sent to reducers. Reducers are pure functions that take the current state and the action to be performed as an input and return the new state based on that action. Reducers basically specifies how the state should change based on different actions.
- State Update: The Redux store then calls the root reducer, passing the current state and the action. The root reducer then redirects to the individual reducer that is responsible for handling the state. Each reducer then returns a new slice of state which is later combined into a single updated state object.
- State Subscription: Components of the application can also subscribe to the Redux store i.e. when the state changes then redux notifies the corresponding components for re-rendering in order to reflect the updated state in the UI.
- Optional Middleware: Redux also has an option to apply middleware layer, which are functions that intercept actions before they reach reducers. Middleware can be used for different uses according to one’s need like logging or routing.
Example of Redux store in React
However, redux can be used with different frameworks and libraries but still it is most popular to use it along with React applications for state management.
Steps to implement Redux in React Application:
Step 1: Open VSCode at the desired location, then in the terminal or Git Bash use ‘npx create-react-app reactredux’ in order to ensure that the latest version of the react app gets installed without any global installation.
npx create-react-app reactredux
Step 2: After that redirect to the directory with the command below:
cd reactredux
Step 3: After that install redux and react-redux dependencies using the below command and then start the react application locally using ‘npm start’ command.
npm install redux react-redux
One can also create a directory named ‘components’ inside the ‘src’ which would contain the files consisting of all components required for application.
Approach to Implement Redux for State Management:
Inside components directory, making 3 directories namely displayText (for displaying the UI), InputText (for managing the input field), and a Navbar (optional). Apart from components directory making other 4 directories such as store, action, reducer for redux state management and asserts (optional) for image storage.
Folder Structure:
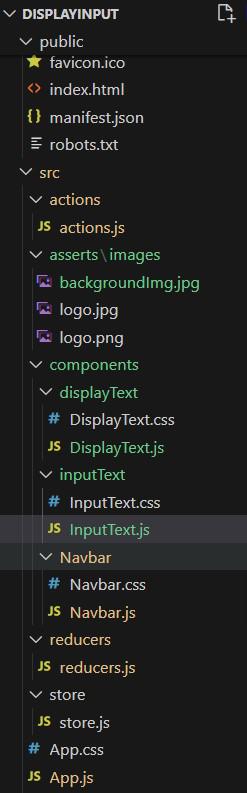
Project Structure
The updated Dependencies in package.json file will look like:
"dependencies": {
    "@testing-library/jest-dom": "^5.17.0",
    "@testing-library/react": "^13.4.0",
    "@testing-library/user-event": "^13.5.0",
    "react": "^18.2.0",
    "react-dom": "^18.2.0",
    "react-redux": "^9.1.0",
    "react-scripts": "5.0.1",
    "redux": "^5.0.1",
    "web-vitals": "^2.1.4"
}
Code: Now, in our case we just need one action with a type update which would update the value as per the changing input field and then a corresponding reducers mentioning implementation of the action. The below mentioned are the code implementation:
CSS
/* DisplayText.css */

.displayLabel {
    padding-top: 50px;
    font-family: 'Courier New', Courier, monospace;
    font-weight: 700;
    font-size: 24px;
    padding-bottom: 5px;
    text-align: right;
    margin-left: 20px;
    margin-right: 20px;
    border-bottom: 2px solid black;
}

.resultValue {
    font-family: 'Courier New', Courier, monospace;
    text-align: center;
    margin-top: 20px;
    display: flex;
    flex-wrap: wrap;
    justify-content: center;
    margin-left: auto;
    margin-right: auto;
    width: 60vw;
    background-color: white;
    color: black;
    font-weight: 700;
    padding: 20px;
    border-radius: 10px;
    border: 2px solid black;
}

.value {
    word-wrap: break-word;
    overflow-wrap: break-word;
    max-width: 100%;
}
/* InputText.css */

.inputLabel {
    padding-top: 100px;
    font-family: 'Courier New', Courier, monospace;
    font-weight: 700;
    font-size: 24px;
    padding-bottom: 5px;
    text-align: left;
    margin-left: 20px;
    margin-right: 20px;
    border-bottom: 2px solid black;
}

.inputText {
    margin-top: 20px;
    height: 30px;
    width: 60vw;
    border-radius: 10px;
    font-family: 'Courier New', Courier, monospace;
    padding: 10px;
    padding-left: 20px;
    padding-right: 20px;
    font-weight: 700;
    font-size: 20px;
    color: black;
}

.inputBox {
    justify-content: center;
    margin-left: auto;
    text-align: center;
    margin-right: auto;
}
/* App.css */

body {
    background-color: wheat;
    margin: 0;
    padding: 0;
    height: 100vh;
    display: flex;
    flex-direction: column;
}
// App.js

import { Provider } from 'react-redux';
import './App.css';
import store from './store/store';
import InputText from './components/inputText/InputText';
import DisplayText from './components/displayText/DisplayText';

function App() {
    return (
        <Provider store={store}>
            <div className="App">
                <InputText />
                <DisplayText />
            </div>
        </Provider>
    );
}

export default App;
// InputText.js

import React from 'react';
import { useDispatch } from 'react-redux';
import { updateValue } from '../../actions/actions';
import './InputText.css';

const InputText = () => {
    const dispatch = useDispatch();

    const handleInputChange = (e) => {
        const value = e.target.value;
        dispatch(updateValue(value));
    };

    return (
        <div className='inputBox'>
            <div className='inputLabel'>Input Text</div>
            <input
                className='inputText'
                type="text"
                onChange={handleInputChange}
                placeholder="Type something..."
            />
        </div>
    );
};

export default InputText;
// DisplayText.js

import React from 'react';
import { useSelector } from 'react-redux';
import '../displayText/DisplayText.css';

const DisplayText = () => {
    const value = useSelector((state) => state.value);

    return (
        <div>
            <div className='displayLabel'>Stored Text</div>
            <div className='resultValue'>
                Value from Redux store: <span className='value'>{value}</span>
            </div>
        </div>
    );
};

export default DisplayText;
// store.js

import { createStore } from "redux";
import reducer from "../reducers/reducers";

const store = createStore(reducer);

export default store;
// reducers.js

const initialState = {
    value: ''
};

const reducer = (state = initialState, action) => {
    switch (action.type) {
        case 'CHANGE_VALUE':
            return {
                ...state,
                value: action.payload,
            };
        default:
            return state;
    }
}

export default reducer;
// action.js

export const updateValue = (value) => ({
    type: 'CHANGE_VALUE',
    payload: value,
});
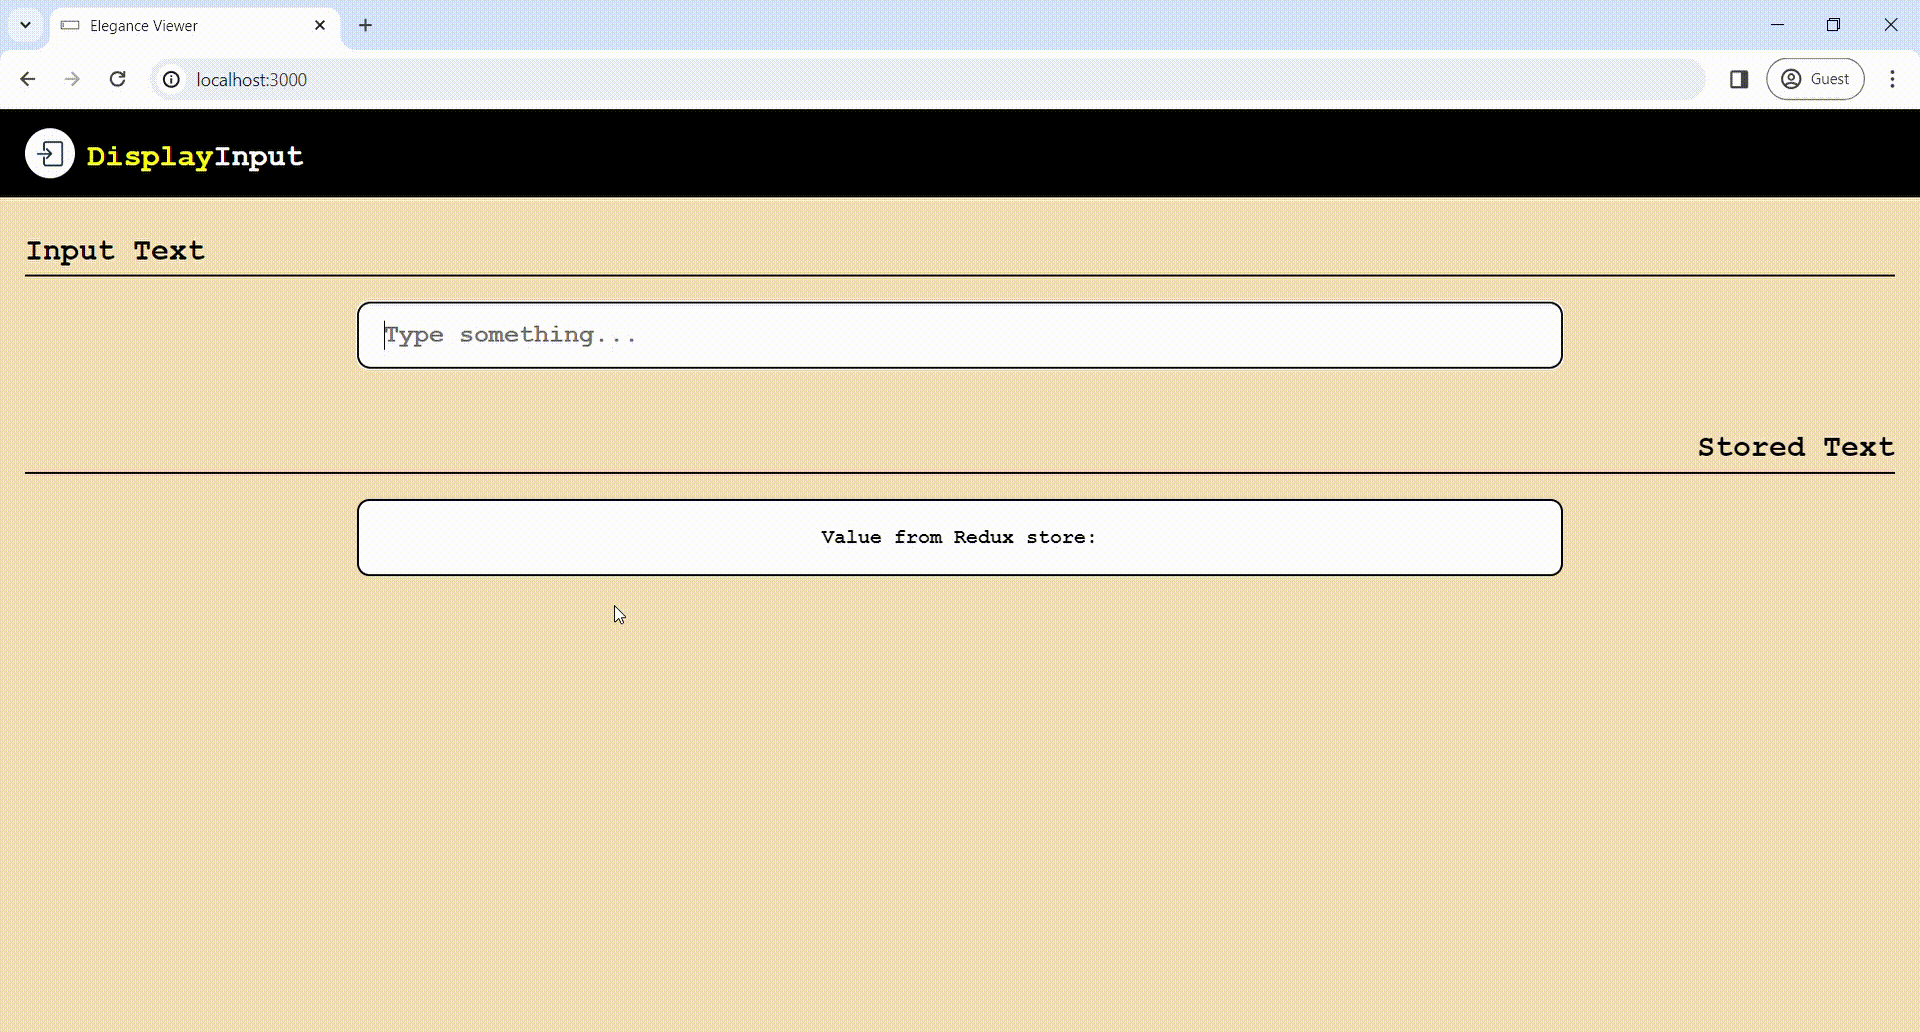
Output:The output for the above mentioned example with added styling and Navbar is shown as below:
Why would you use Redux for state management?
Share your thoughts in the comments
Please Login to comment...