How Redux Toolkit simplifies Redux code in React application ?
Last Updated :
05 Apr, 2024
Redux Toolkit is a powerful library designed to simplify the complexities of managing application state with Redux in React applications. At its core, Redux Toolkit provides developers with a set of utilities and abstractions that significantly reduce boilerplate code and streamline common Redux tasks.
This means that developers can focus more on building features and less on writing repetitive Redux setup code. With Redux Toolkit, you can define your Redux state, actions, and reducers in a single file using the createSlice function, which saves time and keeps your code organized. Additionally, setting up the Redux store is streamlined with the configureStore function, which automatically configures common middleware like Redux Thunk.
Benefits of Redux Toolkit
- Reduced Boilerplate code: Redux Toolkit significantly reduces the amount of boilerplate code needed to set up and manage Redux in your application. This means less time spent writing repetitive code and more time focusing on building features.
- Simplified Syntax: It provides a simplified syntax for defining Redux logic, making it easier to understand and maintain. For example, the createSlice function allows you to define slices of state along with their associated reducers and action creators in a concise and organized manner.
- Streamlined Setup: Redux Toolkit streamlines the process of setting up the Redux store by automatically configuring common middleware like Redux Thunk and Redux DevTools Extension. This eliminates the need for manual setup and ensures that your Redux store is set up with best practices in mind.
- Improved Developer Experience: By abstracting away many of the low-level details of Redux, Redux Toolkit improves the developer experience. It provides intuitive abstractions and utilities that simplify common Redux tasks, making it easier for developers to work with Redux in their React applications.
- Enhanced Performance: Redux Toolkit includes performance optimizations such as memoized selectors through the createSelector utility. These optimizations help improve the performance of your React application by preventing unnecessary re-renders and optimizing the way data is accessed from the Redux store.
Approach to Create Redux Toolkit simplify Redux code in a React application:
We’ll use Redux Toolkit to manage the state of our Todo list. The state will include an array of Todo items, each with an ID, text, and completion status. We’ll create Redux actions to add, toggle completion, and remove Todo items. The Todo list will be displayed in a React component, and users will be able to interact with it by adding new items, marking items as complete, and removing items.
- Centralized State Management :The application utilizes Redux as a central store to manage the to-do list state.
- ConfigureStore : We configure the Redux store using configureStore from Redux Toolkit, combining the Todo reducer to centrally manage the Todo state accessible by any component.
- Todo Component : Making Todo components utilizing useSelector to access state and useDispatch to dispatch actions.
- Integration : Integrate Todo component, wrapping with Provider, passing Redux store to ensure access across the application
Steps to Create Application
Step 1 : Make a project name directory and navigate to it using this command.
mkdir todo
cd todo
Step 2 : Create React App using the following command.
npx create-react-app .
Step 3 : Install required dependencies using the following command.
npm install react-redux @reduxjs/toolkit
Step 4 : Create Redux slice (todoSlice) to manage Todo list state.
Step 5 : Configure Redux store (store) and combine the Todo reducer.
Step 6 : Create Todo components (TodoList, TodoInput) to display and interact with Todo items.
Step 7 : Integrate Todo components into the index file and wrapped it by Provider tag.
Project Structure:
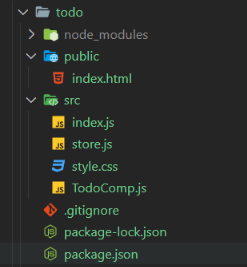
Todo Project Structure
Updated dependencies in package.json file – The updated dependencies in package.json file will look like.
"dependencies": {
    "@reduxjs/toolkit": "^2.2.2",
    "react": "^18.2.0",
    "react-dom": "^18.2.0",
    "react-redux": "^9.1.0",
},
Example: Below is an example of Redux Toolkit simplify Redux code in React.
CSS
/* style.css */

#header {
    display: flex;
    align-items: center;
}

#index_wrapper {
    width: 100%;
    display: flex;
    flex-direction: column;
    align-items: center;
    margin-top: 20px;
}

#add_btn {
    padding: 10px 20px;
    background-color: rgb(19, 186, 19);
    color: white;
    border-radius: 10px;
}

input {
    padding: 10px 20px;
    border-radius: 10px;
    margin-left: 20px;
}

.remove_btn {
    background-color: rgb(19, 186, 19);
    margin: 0px 5px;
    padding: 5px;
    border: 1px solid rgb(19, 186, 19);
    border-radius: 5px;
    cursor: pointer;
}

.todo_text {
    cursor: pointer;
    margin: 10px 0px;
}
// store.js

// todo slice
import {
    createSlice,
    configureStore
} from '@reduxjs/toolkit';
const todoSlice = createSlice({
    name: 'todos',
    initialState: [],
    reducers: {
        addTodo: (state, action) => {
            let newTodo = {
                id: Date.now(),
                text: action.payload,
                completed: false,
            };
            state.push(newTodo);
            newTodo = null;
        },
        toggleTodo: (state, action) => {
            let todo = state.find(
                todo => todo.id === action.payload);
            if (todo) {
                todo.completed = !todo.completed;
            }
            todo = null
        },
        removeTodo: (state, action) => {
            return state.filter(
                todo => todo.id !== action.payload);
        },
    },
});

export const { addTodo, toggleTodo, removeTodo } = todoSlice.actions;


// store
export default configureStore({
    reducer: {
        todos: todoSlice.reducer
    },
});
// TodoComp.js

import React, {
    useState
} from "react";
import {
    useSelector,
    useDispatch
} from "react-redux";
import {
    addTodo,
    toggleTodo,
    removeTodo
} from "./store";
import "./style.css";

export const TodoList = () => {
    const todos = useSelector((state) => state.todos);
    const dispatch = useDispatch();

    const handleToggleTodo = (id) => {
        dispatch(toggleTodo(id));
    };

    const handleRemoveTodo = (id) => {
        dispatch(removeTodo(id));
    };

    return (
        <div>
            <h2>Todo List</h2>
            <ul>
                {todos.map((todo) => (
                    <li className="todo_text" key={todo.id}>
                        <span
                            style={{
                                textDecoration:
                                    todo.completed ? "line-through" : "none",
                            }}
                            onClick={() => handleToggleTodo(todo.id)}
                        >
                            {todo.text}
                        </span>
                        <button
                            className="remove_btn"
                            onClick={() => handleRemoveTodo(todo.id)}
                        >
                            Remove
                        </button>
                    </li>
                ))}
            </ul>
        </div>
    );
};

export const TodoInput = () => {
    const [todo, setTodo] = useState("");
    const dispatch = useDispatch();
    const addHandle = () => {
        if (!todo.trim()) return null;
        dispatch(addTodo(todo));
        setTodo("");
    };
    return (
        <div id="header">
            <img
                src="https://media.geeksforgeeks.org/gfg-gg-logo.svg"
                alt="gfg_logo"
            />
            <input
                type="text"
                value={todo}
                onChange={(e) => setTodo(e.target.value)}
            />
            <button id="add_btn" onClick={addHandle}>
                Add
            </button>
        </div>
    );
};
// index.js

import React from 'react';
import ReactDOM from 'react-dom/client';
import { TodoInput, TodoList } from './TodoComp';
import store from './store';
import { Provider } from 'react-redux';

const root = ReactDOM.createRoot(document.getElementById('root'));
root.render(
    <Provider store={store}>
        <div id='index_wrapper'>
            <TodoInput />
            <TodoList />
        </div>
    </Provider>
);
Output:
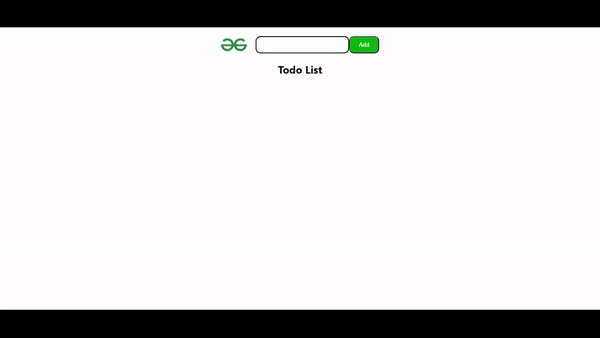
Todo Final Output
Share your thoughts in the comments
Please Login to comment...