How to use Redux with ReactNative?
Last Updated :
20 Nov, 2020
First, we create a fresh ReactNative Project by running the command “npx react-native init reduxDemo”. You can also integrate Redux into your existing project.
Go to the project folder by “cd {rootDirectory}/reduxDemo” and install dependencies.
- “npm install redux” which is an official redux dependency.
- “npm install react-redux” which is used to connect redux to react.
Directory Structure: This is the Directory structure I am using. You can create your own Directory structure which suits you best.
MyAssets directory contains a Redux Directory which contains all of Redux code and a Screen directory which contains all the screen components.
I am using Burger(food) as an example to show actions such as buying or creating a Burger which will result in a Decrease or Increase in the number of Burgers.
We will create all the files in MyAssets directory one-by-one.
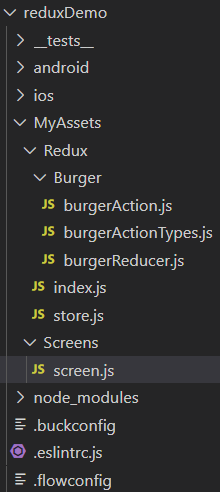
Directory Structure
Example Step by Step: We will create MyAssests Directory inside our reduxDemo project. MyAssets will contain all the files for the app screen component as well as for Redux. Inside MyAssets we will create a Directory named Redux which will contain all of our Redux code.
Creating Actions: Inside Redux directory we will create a directory named Burger which will contain all of our actions and reducer for the Burger.
For creating actions we will create two files bugerActionTypes.js and burgerAction.js inside the Burger directory.
- burgerActionTypes.js: In this file, we export all the string action_type property. This file is completely optional to create and without it we will have to manually write the string Action_type in action and reducer.
Javascript
export const INCREASE_BURGER='INCREASE_BURGER';
export const DECREASE_BURGER='DECREASE_BURGER';
|
- burgerAction.js: In this, we will create our action function which returns action_type and optional payload property to reducer.
Javascript
import {INCREASE_BURGER,DECREASE_BURGER} from './burgerActionTypes';
export const increaseBurgerAction=(parameter)=>{
return{
type:INCREASE_BURGER,
payload:parameter
}
}
export const decreaseBurgerAction=()=>{
return{
type:DECREASE_BURGER
}
}
|
Creating Reducer: Inside Burger directory, we will create a file burgerReducer.js.In this file, we will create a burgerReducer() function which takes an initial state and action as a parameter and returns a new state of the store based on the action_type.
Javascript
import {INCREASE_BURGER,DECREASE_BURGER} from './burgerActionTypes';
const initialState={
numberOfBurger:10
}
const burgerReducer=(state=initialState,action)=>{
switch(action.type){
case INCREASE_BURGER:return{
...state,
numberOfBurger:state.numberOfBurger+action.payload
}
case DECREASE_BURGER:return{
...state,
numberOfBurger:state.numberOfBurger-1
}
default:return state
}
}
export default burgerReducer;
|
Creating Store: Inside our Redux directory, we will create two files store.js and index.js.
- Index.js: This file will be used to export all actions from a single file. This file is completely optional to create and you can import action from their respective JavaScript files also.
Javascript
export {increaseBurgerAction} from './Burger/burgerAction';
export {decreaseBurgerAction} from './Burger/burgerAction';
|
- store.js: In this file, we will import all the reducers and then create a store and export it to App.js.We can also create a store in App.js also but to keep the code cleaner I have created a separate file.
Javascript
import {createStore} from 'redux';
import burgerReducer from './Burger/burgerReducer';
const store=createStore(burgerReducer);
export default store;
|
- App.js: In App.js we import Provider component from ‘react-redux’ and store from store.js. Provider is used to pass store state to all its child components.
Javascript
import React from 'react';
import {Provider} from 'react-redux';
import store from './MyAssets/Redux/store';
import Screen from './MyAssets/Screens/screen'
const App= () => {
return (
<Provider store={store}>
<Screen/>
</Provider>
);
};
export default App;
|
Creating our Screen Component: Now finally we will create our screen component to use and update the store state. Inside MyAssets directory we will create a directory named Screens which will contain all of our app screen components. Inside Screens directory we will create a file named screen.js.
Javascript
import React, { Component } from 'react'
import { Text, View,Button } from 'react-native'
import {connect} from 'react-redux'
import {increaseBurgerAction,decreaseBurgerAction} from '../Redux/index'
class Screen extends Component {
render() {
return (
<View style={{justifyContent:'center',alignItems:'center'}}>
<View style={{marginVertical:50}}>
<Text> Number Of Burger = {this.props.numberOfBurger} </Text>
<Button title="Increase Burger" onPress={()=>{this.props.increaseBurger(5)}}/>
</View>
<View style={{marginVertical:50}}>
<Button title="Decrease Burger" onPress={()=>{this.props.decreaseBurger()}}/>
</View>
</View>
)
}
}
const mapStateToProps=(state)=>{
return{
numberOfBurger:state.numberOfBurger
}
}
const mapDispatchToProps=(dispatch)=>{
return{
increaseBurger:(parameter)=>{dispatch(increaseBurgerAction(parameter))},
decreaseBurger:()=>{dispatch(decreaseBurgerAction())}
}
}
export default connect(mapStateToProps,mapDispatchToProps)(Screen);
|
- Render: This is called when the state of the store changes.
- mapStateToProps: This function maps the store state to the screen component to be used as props. We can also rename this other than mapStateToProps.
- mapDispatchToProps: This function maps the actions to the screen component to be called using props. We can also rename this other than mapDispatchToProps.
- connect: This is a ‘react-redux’ inbuilt function used to connect screen component to mapStateToProps and mapDispatchToProps.Always pass mapStateToProps as a first parameter and mapDispatchToProps as the second parameter to connect() function otherwise it will generate an error.
Output:
- First we call this.props.increaseBurger(5) in Button from our component.Notice how we pass number ‘5’ as an parameter ,this parameter will be supplied to increaseBurgerAction(parameter) function of mapDispatchToProps function.
- Then the increaseBurgerAction() of burgerActions.js file will be called which will return action_type and ‘5’ as a payload to reducer function.
- Then the burgerReducer() function will be called which will accept an initial state and action as a parameter and then increase the numberOfBurger from the initial value to +5.

- this.props.decreaseBurger() in Button works the same as this.props.increaseBurger(). Notice we haven’t passed any parameter this time.
Multiple Reducers: In most cases, we have to use multiple reducers in order to separate states and actions. To demonstrate this I have created another Directory named Pizza which contains code for pizzaReducer.js, pizzaActionsType.js, and pizzaActions.js.
- store.js: In this, we use combineReducers() which is an inbuilt function of ‘redux’ to combine our reducers.
Javascript
import {createStore,combineReducers} from 'redux';
import burgerReducer from './Burger/burgerReducer';
import pizzaReducer from './Pizza/pizzareducer';
const rootReducer=combineReducers({
burgerReducer:burgerReducer,
pizzaReducer:pizzaReducer
})
const store=createStore(rootReducer);
export default store;
|
Javascript
import {PIZZA_DECREASE,PIZZA_INCREASE} from './pizzaActionsType';
const initialState={
numberOfPizza:30
}
const pizzaReducer=(state=initialState,action)=>{
switch(action.type){
case PIZZA_INCREASE:return{
...state,
numberOfPizza:state.numberOfPizza+action.payload
}
case PIZZA_DECREASE:return{
...state,
numberOfPizza:state.numberOfPizza-1
}
default:return state
}
}
export default pizzaReducer;
|
Javascript
export const PIZZA_INCREASE='PIZZA_INCREASE';
export const PIZZA_DECREASE='PIZZA_DECREASE';
|
Javascript
import {PIZZA_INCREASE,PIZZA_DECREASE} from './pizzaActionsType';
export const increasePizzaAction=(parameter)=>{
return{
type:PIZZA_INCREASE,
payload:parameter
}
}
export const decreasePizzaAction=()=>{
return{
type:PIZZA_DECREASE
}
}
|
Javascript
export {increaseBurgerAction} from './Burger/burgerAction';
export {decreaseBurgerAction} from './Burger/burgerAction';
export {increasePizzaAction} from './Pizza/pizzaActions';
export {decreasePizzaAction} from './Pizza/pizzaActions';
|
- screen.js – Modifying our screen component code to use pizza actions and state.
Javascript
import React, { Component } from 'react'
import { Text, View,Button } from 'react-native'
import {connect} from 'react-redux'
import {increaseBurgerAction,decreaseBurgerAction,increasePizzaAction,decreasePizzaAction} from '../Redux/index'
class Screen extends Component {
render() {
return (
<View style={{justifyContent:'center',alignItems:'center'}}>
<View style={{marginVertical:50}}>
<Text> Number Of Burger = {this.props.numberOfBurger} </Text>
<Button title="Increase Burger" onPress={()=>{this.props.increaseBurger(5)}}/>
<Button title="Decrease Burger" onPress={()=>{this.props.decreaseBurger()}}/>
</View>
<View style={{marginVertical:50}}>
<Text> Number Of Pizza = {this.props.numberOfPizza} </Text>
<Button title="Increase Burger" onPress={()=>{this.props.increasePizza(5)}}/>
<Button title="Decrease Burger" onPress={()=>{this.props.decreasePizza()}}/>
</View>
</View>
)
}
}
const mapStateToProps=(state)=>{
return{
numberOfBurger:state.burgerReducer.numberOfBurger,
numberOfPizza:state.pizzaReducer.numberOfPizza
}
}
const mapDispatchToProps=(dispatch)=>{
return{
increaseBurger:(parameter)=>{dispatch(increaseBurgerAction(parameter))},
decreaseBurger:()=>{dispatch(decreaseBurgerAction())},
increasePizza:(parameter)=>{dispatch(increasePizzaAction(parameter))},
decreasePizza:()=>{dispatch(decreasePizzaAction())}
}
}
export default connect(mapStateToProps,mapDispatchToProps)(Screen);
|
Output:

Share your thoughts in the comments
Please Login to comment...