Sarcasm refers to the words that are used in order to insult someone, to show your aggression or irritation or to make things funny.
It is a form to convey your negative feelings in positive or funny words. In recent times, Twitter is one of the largest social platforms where people convey their thoughts, feelings or actions in the form of tweets, which sometimes can be sarcastic. To analyze and detect this sarcasm on Twitter, we will build ML models using a neural network for sarcasm detection.
Sarcasm Detection Using Neural Network
In this article, we will be building sarcasm detection using a neural network and classifying it as sarcasm or non-sarcasm. This implies that it is a classification problem. So let’s start with the data analysis or EDA and build the classification model.
Steps to be followed:
- Importing libraries
- Loading datasets
- Data Preprocessing
- Text cleaning
- Splitting train and test datasets
- Model building
- Prediction
- Conclusion
Dataset features:
- Article link – the link to the articles
- Headlines – Headlines of the article
- Is_Sarcastic – Representing 0 and 1 for if the headline is sarcastic or not
Importing/Installing libraries
Python libraries make it incredibly simple for us to manage the data and complete both common and difficult jobs with only one line of code.
- Numpy – It is a array-processing package that provide high-dimensional array objects and , tools to work with these arrays.
- Pandas – Pandas is a library of pandas that mainly works with labeled data easily. It is used to analyze and manipulate the data.
- Matplotlib/Seaborn – Matplotlib is a python library used for data visualization. It helps us to create visual representations of huge amount of data that can be easy to use and understand. It consists of several plots like bar chart, scatter, line, graphs, etc.
- NLTK – NLTK (Natural Language Toolkit ) is a vast library of python that can perform variety of operational tasks such as stemming, lemmatization, tagging, parsing, tokenization, etc.
Let’s start the implementation of the model.
Importing libraires
Python3
import pandas as pd
import numpy as np
import matplotlib.pyplot as plt
import seaborn as sns
import re
import string
from nltk.corpus import stopwords
from wordcloud import WordCloud
from tensorflow.keras.preprocessing.text import Tokenizer
from tensorflow.keras.preprocessing.sequence import pad_sequences
from sklearn.metrics import classification_report, confusion_matrix
|
- Natural Language Toolkit(nltk) : removes stop words, lemmatize the sentences, and many different functions can be performed using NLTK.
- Regular expression(re) : Helps to remove unnecessary symbols that do not provide any meaning such as @, comma, hashtags, *,etc.
- Tokenizer: Used to split text into individual units, such as words or sub words which make it easier to analyze and process text for various language-related tasks.
Loading Datasets
Let’s now import the dataset into a pandas data frame and examine the dataset’s first five rows and get the data info.
Python3
data1 = pd.read_csv('Sarcasm data1.csv')
data2 = pd.read_csv('Sarcasm data2.csv')
data = pd.concat([data1, data2], ignore_index=True)
print(data.head())
|
Output:
                                        article_link  \
0  https://www.huffingtonpost.com/entry/versace-b...
1  https://www.huffingtonpost.com/entry/roseanne-...
2  https://local.theonion.com/mom-starting-to-fea...
3  https://politics.theonion.com/boehner-just-wan...
4  https://www.huffingtonpost.com/entry/jk-rowlin...
                                            headline  is_sarcastic
0  former versace store clerk sues over secret 'b...             0
1  the 'roseanne' revival catches up to our thorn...             0
2  mom starting to fear son's web series closest ...             1
3  boehner just wants wife to listen, not come up...             1
4  j.k. rowling wishes snape happy birthday in th...             0
Data Assessment:
For example, studying the information of the data
Output:
<class 'pandas.core.frame.DataFrame'>
RangeIndex: 55328 entries, 0 to 55327
Data columns (total 3 columns):
 #   Column        Non-Null Count  Dtype
---  ------        --------------  -----
 0   article_link  55328 non-null  object
 1   headline      55328 non-null  object
 2   is_sarcastic  55328 non-null  int64
dtypes: int64(1), object(2)
memory usage: 1.3+ MB
Data Preprocessing:
Data processing is essentially the process of preparing data for analysis by cleaning, manipulating, and combining it. As raw data can be inaccurate or lacking in formatting. it is the most crucial step in an analysis to produce correct results with improved quality and reliability.
Python3
plt.figure(figsize=(10, 5))
sns.countplot(x='is_sarcastic', data=data, palette="Set1").set_title(
"Countplot of headlines")
plt.show()
|
Output:
.webp)
Check the dataset label balance or not
Data Cleaning:
Now let’s start with the data cleaning , where we will be performing different tasks like removing punctuations, Stopwords , and removing punctuations, removing text in square brackets and words containing digits, performing Tokenization on the text. After performing these tasks.
Python3
nltk.download('stopwords')
stopwords_list = stopwords.words('english')
|
In the above code, we will be downloading the stopwords corpus list from the NLTK library and load the list of stopwords.
Python3
def clean_text(sentences):
text = sentences.lower()
text = re.sub('\[.*?\]', '', text)
text = re.sub('[%s]' % re.escape(string.punctuation), '', text)
text = re.sub('\w*\d\w*', '', text)
text = ' '.join([word for word in text.split()
if word not in stopwords_list])
return text
print(data['headline'].iloc[1])
clean_text(data['headline'].iloc[1])
|
Output:
the 'roseanne' revival catches up to our thorny political mood, for better and worse
roseanne revival catches thorny political mood better worse
Here in this code, the function ‘clean_text’ takes sentence as the input and applies a series of text cleaning tasks and returns the cleaned text.
Python3
data['cleaned_headline']=data['headline'].map(clean_text)
|
Here, we will be storing the cleaned text resulting after text cleaning.
Wordcloud
Most Frequent Word in Sarcastic Headlines
Python3
import matplotlib.pyplot as plt
from wordcloud import WordCloud
Sarcastic_text = ' '.join(
data['cleaned_headline'][data['is_sarcastic'] == 1].tolist())
wordcloud = WordCloud(width=800, height=400,
background_color='black').generate(Sarcastic_text)
plt.figure(figsize=(10, 5))
plt.imshow(wordcloud, interpolation='bilinear')
plt.axis('off')
plt.title('Sarcastic')
plt.show()
|
Output:
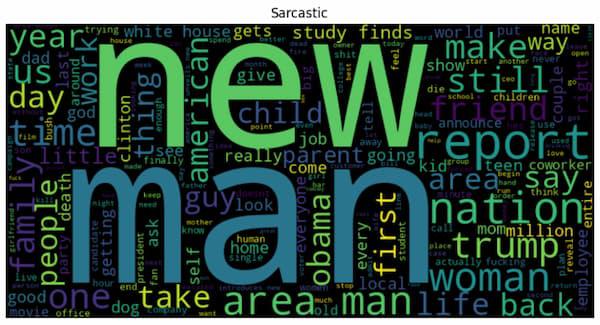
Most Frequent word in Sarcastic Headlines
Interpretation: This wordcloud visualization highlights the most common words in the sarcastic headlines. The size of the word in word cloud represents the frequency in the text.
Most Frequent Word in Non-Sarcastic Headlines
Python3
Non_Sarcastic_text = ' '.join(
data['cleaned_headline'][data['is_sarcastic'] == 0].tolist())
wordcloud = WordCloud(width=800, height=400,
background_color='black').generate(Non_Sarcastic_text)
plt.figure(figsize=(10, 5))
plt.imshow(wordcloud, interpolation='bilinear')
plt.axis('off')
plt.title('Not Sarcastic')
plt.show()
|
Output:
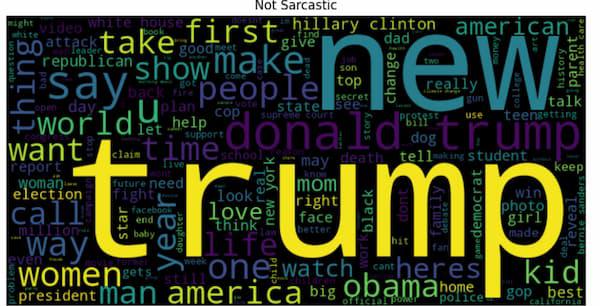
Most Frequent Word in Non-Sarcastic Headlines
Interpretation: This wordcloud visualization represents the most common non-sarcastic words in the headlines.
Splitting Train and test datasets
Python3
text = data['cleaned_headline'].tolist()
label = data['is_sarcastic'].tolist()
|
We will be converting the text into a list containing cleaned headline text and the label into the list containing the corresponding labels where (1 is sarcastic and 0 is non- sarcastic) for each headline in text list.
Python3
train_portion = .8
train_size = int(len(text) * train_portion)
train_text = text[:train_size]
train_label = label[:train_size]
valid_size = train_size+int((len(text)-train_size)/2)
val_text = text[train_size:valid_size]
val_label = label[train_size:valid_size]
test_text = text[valid_size:]
test_label = label[valid_size:]
print('Training data :', len(train_text), len(train_label))
print('Validations data :', len(val_text), len(val_label))
print('Testing data :', len(test_text), len(test_label))
|
Ouput:
Training data : 44262 44262
Validations data : 5533 5533
Testing data : 5533 5533
here we are dividing the dataset into training, testing and validation data according to 80:10:10 split ratio. It calculates the size of the subset, extracting the corresponding text and printing the size of the subset.
Now , we will be setting the parameters for training the
Python3
vocab_size = 10000
embedding_dim = 200
max_length = 60
padding_type = 'post'
oov_tok = '<OOV>'
tokenizer = Tokenizer(num_words=vocab_size, oov_token=oov_tok)
tokenizer.fit_on_texts(train_text)
|
We will then set the parameters for the text processing and tokenization. Tokenizer will create a word-to-index mapping from the training text data, with a specified vocabulary size and out-of-vocabulary toke. This mapping is then used to convert the text into sequences.
Let’s understand some terms:
- Embedding_dim: It represents the dimensionality of continuous vector space in which words are represented as dense embeddings, capturing semantic relationships for natural language processing tasks.
- Padding: Process of adding special tokens or values to sequences of varying length of ensure they all have same length.
- Pad_sequences: Function provided by various libraries, such as keras in tensorflow, that is used to pad_sequences to ensure they all have same length. This function allows you to specify whether padding should be added at the beginning or end of the sequences.
Python3
word_index = tokenizer.word_index
word_index
|
Output:
{'<OOV>': 1,
 'new': 2,
 'man': 3,
 'trump': 4,
 'us': 5,
 'report': 6,...}
Here, this code is generating the word-to-index mapping generated by the tokenizer, which will assign a unique index to each word based on frequency of the word and order of appearance in the training text data.
Python3
tokenizer.texts_to_sequences(train_text[:5])
|
Output:
[[204, 1, 740, 2953, 2235, 245, 35, 1958, 2515, 8487],
 [8488, 3234, 2422, 8489, 289, 3081, 151, 853],
 [62, 597, 719, 1063, 1840, 496, 4199, 116, 9676],
 [1320, 130, 337, 1439, 219, 3385, 1, 703],
 [4779, 5143, 679, 1, 454, 490, 1137, 33]]
Using the previously defined tokenizer’s word index , it converts text into sequences of word indices . This list is a list of lists, where each sublist represents sequences of indices for word in a text.
Python3
train_indices = tokenizer.texts_to_sequences(train_text)
train_padded = pad_sequences(train_indices,
padding=padding_type,
maxlen=max_length)
|
In the above code, it preprocesses the training data into sequences of word indices and then padding those sequences for the uniform length input.
Python3
val_indices = tokenizer.texts_to_sequences(val_text)
validation_padded = pad_sequences(val_indices,
padding=padding_type,
maxlen=max_length)
test_indices = tokenizer.texts_to_sequences(test_text)
test_padded = pad_sequences(test_indices,
padding=padding_type,
maxlen=max_length)
print('Training vector :', train_padded.shape)
print('Validations vector :', validation_padded.shape)
print('Testing vector :', test_padded.shape)
|
Output:
Training vector : (44262, 60)
Validations vector : (5533, 60)
Testing vector : (5533, 60)
This code demonstrates that the validation and test datasets are tokenized into sequences of word indices using the tokenizer. The sequences padded to fixed length will be used to create data vectors for training, validation and testing purposes.
Python3
tokenizer.sequences_to_texts([train_padded[0].tolist()])
|
Output:
['former <OOV> store clerk sues secret black code minority shoppers <OOV> <OOV> <OOV> <OOV> <OOV> <OOV> <OOV> <OOV> <OOV> <OOV> <OOV> <OOV> <OOV> <OOV> <OOV> <OOV> <OOV> <OOV> <OOV> <OOV> <OOV> <OOV> <OOV> <OOV> <OOV> <OOV> <OOV> <OOV> <OOV> <OOV> <OOV> <OOV> <OOV> <OOV> <OOV> <OOV> <OOV> <OOV> <OOV> <OOV> <OOV> <OOV> <OOV> <OOV> <OOV> <OOV> <OOV> <OOV> <OOV> <OOV>']
In the above code, sequence of word indices in the first training vector will convert back into the text using the reverse mapping. It will verify and check quality of the preprocessing.
Python3
training_labels_final = np.array(train_label)
validation_labels_final = np.array(val_label)
testing_labels_final = np.array(test_label)
print('Training vector :', training_labels_final.shape)
print('Validations vector :', validation_labels_final.shape)
print('Testing vector :', testing_labels_final.shape)
|
Output:
Training vector : (44262,)
Validations vector : (5533,)
Testing vector : (5533,)
Here we are preparing the labels for the training, testing and validation sets. These labels will then be converted into arrays and then we will print the shapes of the label array to verify the dimensions.
Development and Evaluation of the Model
We will be implementing the Sequential Model which consist of different parts or layers:
- Embedding layer: This layer is responsible for creating word embeddings for the input text. It transforms word indices into dense vectors, facilitating the understanding of word relationships.
- GlobalMaxPool1D layer: Global max pooling is used in this layer to select the highest value from each feature map in the preceding layer. It aids in extracting the key details from the embedded sequences.
- Dropout layers: In order to introduce regularization, these layers randomly remove some of the neurons outputs during training.
- Dense layers: These fully connected layers process the pooled features. They apply non-linear transformation to data, that enhances model’s capacity to capture complex patterns.
- Output layers: This layer contains a single neuron with sigmoid activation function produces a binary output indicating the predicted probability of a headline being sarcastic.
Python3
import tensorflow as tf
model = tf.keras.Sequential([
tf.keras.layers.Embedding(
vocab_size, embedding_dim, input_length=max_length),
tf.keras.layers.GlobalMaxPool1D(),
tf.keras.layers.Dense(40, activation='relu'),
tf.keras.layers.Dropout(0.5),
tf.keras.layers.Dense(20, activation='relu'),
tf.keras.layers.Dropout(0.5),
tf.keras.layers.Dense(10, activation='relu'),
tf.keras.layers.Dropout(0.2),
tf.keras.layers.Dense(1, activation='sigmoid')
])
model.summary()
|
Output:
Model: "sequential"
_________________________________________________________________
 Layer (type)                Output Shape              Param #
=================================================================
 embedding (Embedding)       (None, 60, 200)           2000000

 global_max_pooling1d (Globa  (None, 200)              0
 lMaxPooling1D)

 dense (Dense)               (None, 40)                8040

 dropout (Dropout)           (None, 40)                0

 dense_1 (Dense)             (None, 20)                820

 dropout_1 (Dropout)         (None, 20)                0

 dense_2 (Dense)             (None, 10)                210

 dropout_2 (Dropout)         (None, 10)                0

 dense_3 (Dense)             (None, 1)                 11

=================================================================
Total params: 2,009,081
Trainable params: 2,009,081
Non-trainable params: 0
Model summary prints the summary of the model architecture , giving an overview of the layer in the model.
Python3
model.compile(loss='binary_crossentropy',
optimizer='adam', metrics=['accuracy'])
|
We will then compile the model to configure model’s learning process.
Let’s look at some important parameters :
- Binary_crossentropy: This determines the loss function for binary classification tasks. It gives the difference between actual and predicted values.
- Adam Optimizer: It is used to adjust model’s weight during training to converge model to provide a better solution.
- Accuracy metrics: During training, model’s accuracy will be calculated and monitored as a performance metrics.
Python3
num_epochs = 5
history = model.fit(
train_padded, training_labels_final,
epochs=num_epochs,
validation_data=(validation_padded, validation_labels_final)
)
|
Output:
Epoch 1/5
1384/1384 [==============================] - 22s 15ms/step - loss: 0.4852 - accuracy: 0.7619 - val_loss: 0.2764 - val_accuracy: 0.8865
Epoch 2/5
1384/1384 [==============================] - 20s 15ms/step - loss: 0.2277 - accuracy: 0.9191 - val_loss: 0.1649 - val_accuracy: 0.9344
Epoch 3/5
1384/1384 [==============================] - 22s 16ms/step - loss: 0.1086 - accuracy: 0.9652 - val_loss: 0.1257 - val_accuracy: 0.9642
Epoch 4/5
1384/1384 [==============================] - 22s 16ms/step - loss: 0.0454 - accuracy: 0.9860 - val_loss: 0.1103 - val_accuracy: 0.9790
Epoch 5/5
1384/1384 [==============================] - 21s 15ms/step - loss: 0.0258 - accuracy: 0.9929 - val_loss: 0.1110 - val_accuracy: 0.9814
Here , we are setting the number of cycles for the model and then using model.fit() to train the model using the provided data and evaluate its performance on validation data.
Python3
fig, (ax1, ax2) = plt.subplots(1, 2, figsize=(12, 5))
ax1.plot(history.history['loss'], label='Training Loss')
ax1.plot(history.history['val_loss'], label='Validation Loss',color='orange')
ax1.set_title('Validation Loss')
ax1.set_xlabel('Epoch')
ax1.set_ylabel('Loss')
ax1.legend()
ax2.plot(history.history['accuracy'], label='Training Accuracy')
ax2.plot(history.history['val_accuracy'], label='Validation Accuracy', color='orange')
ax2.set_title('Validation Accuracy')
ax2.set_xlabel('Epoch')
ax2.set_ylabel('Accuracy')
ax2.legend()
plt.tight_layout()
plt.show()
|
Output:
-(1).webp)
Python3
loss, accuracy = model.evaluate(test_padded,testing_labels_final)
print(f'Accurcy on test dataset :{round(accuracy*100,2)}%')
|
Output:
173/173 [==============================] - 0s 880us/step - loss: 0.0840 - accuracy: 0.9839
Accurcy on test dataset :98.39%
This code will evaluate the model using the test dataset. It calculates loss and accuracy of the model and then prints the accuracy percentage of the model.
Python3
pred_prob = model.predict(test_padded)
pred_label = [1 if prob >= 0.5 else 0 for prob in pred_prob]
pred_label[:5]
|
Output:
173/173 [==============================] - 0s 743us/step
[1, 1, 1, 1, 0]
Here we will be predicting the model using the test data. It calculates the predicted probability values and convert them to predicted labels based on threshold of 0.5 .
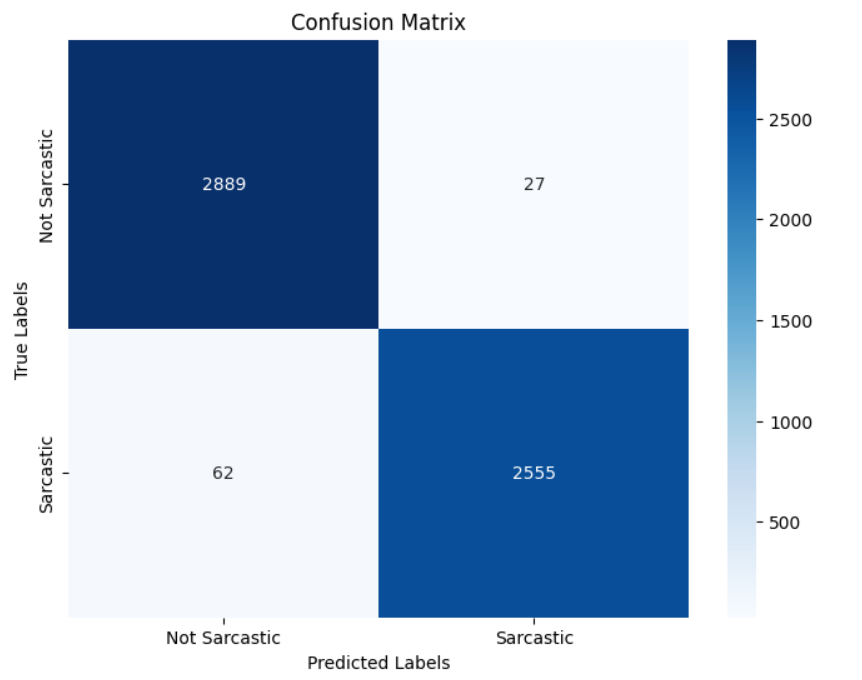
Confusion Matrix:
Python3
conf_matrix = confusion_matrix(testing_labels_final, pred_label)
plt.figure(figsize=(8, 6))
sns.heatmap(conf_matrix, annot=True, fmt='d', cmap='Blues',
xticklabels=['Not Sarcastic', 'Sarcastic'],
yticklabels=['Not Sarcastic', 'Sarcastic'])
plt.xlabel('Predicted Labels')
plt.ylabel('True Labels')
plt.title('Confusion Matrix')
plt.show()
|
Output:
Classification Report
Python3
print("\nClassification Report:")
print(classification_report(testing_labels_final, pred_label,
target_names=['Not Sarcastic', 'Sarcastic']))
|
Output:
Classification Report:
               precision    recall  f1-score   support

Not Sarcastic       0.97      0.99      0.98      2916
    Sarcastic       0.99      0.97      0.98      2617

     accuracy                           0.98      5533
    macro avg       0.98      0.98      0.98      5533
 weighted avg       0.98      0.98      0.98      5533
Predicting if headline is sarcastic or not
Let’s see how the model will predict if the headline is sarcastic or non-sarcastic.
Python3
while True:
user_input = input(
"Enter a headline for prediction (or type 'exit' to quit): ")
if user_input.lower() == 'exit':
break
cleaned_input = clean_text(user_input)
tokenized_input = tokenizer.texts_to_sequences(
[cleaned_input])
padded_input = pad_sequences(
tokenized_input, maxlen=max_length, padding=padding_type)
prediction = model.predict(padded_input)
if prediction >= 0.5:
print(f"Headline: {user_input}\nPrediction: Sarcastic")
else:
print(f"Headline: {user_input}\nPrediction: Not Sarcastic")
|
Output:
Enter a headline for prediction (or type 'exit' to quit): Hello, what's happenning now?
1/1 [==============================] - 0s 12ms/step
Headline: Hello, what's happenning now?
Prediction: Not Sarcastic
Enter a headline for prediction (or type 'exit' to quit): exit
This code will create an interactive loop that repeatedly prompts the user to input a headline for sarcasm prediction. If user enter “exit”, the loop will terminate.
Conclusion:
Finally, the neural network journey through sarcasm detection highlights the astonishing developments in natural language processing. We have tapped into the potential of machine learning to understand the complexities of sarcasm in textual data by utilizing sophisticated approaches including text preprocessing, tokenization, and model training. The trained model, strengthened with layers of interconnected neurons, has shown a high degree of accuracy in understanding and differentiating sarcastic tones. The interactive prediction function further demonstrates the model’s practical relevance by enabling users to determine whether their text contains sarcastic undertones.
Share your thoughts in the comments
Please Login to comment...