Deep learning has been on the rise in this decade and its applications are so wide-ranging and amazing that it’s almost hard to believe that it’s been only a few years in its advancements. And at the core of deep learning lies a basic “unit” that governs its architecture, yes, It’s neural networks.
A neural network architecture comprises a number of neurons or activation units as we call them, and this circuit of units serves their function of finding underlying relationships in data. And it’s mathematically proven that neural networks can find any kind of relation/function regardless of its complexity, provided it is deep/optimized enough, that is how much potential it has.
Now let’s learn to implement a neural network using TensorFlow
Install Tensorflow
Tensorflow is a library/platform created by and open-sourced by Google. It is the most used library for deep learning applications. Now, creating a neural network might not be the primary function of the TensorFlow library but it is used quite frequently for this purpose. So before going ahead let’s install and import the TensorFlow module.
Using the pip/conda command to install TensorFlow in your system
# terminal/zsh/cmd command
# pip
pip install tensorflow --upgrade

# conda
conda install -c conda-forge tensorflow
%tensorflow_version 2.x
Download and Read the Data
You can use any dataset you want, here I have used the red-wine quality dataset from Kaggle. This is a classification problem, of course, you can learn to apply the concept to other problems. First, download the dataset in your working directory. Now that the data is downloaded let’s load the data as data frame.
Python3
import numpy as np
import pandas as pd
df = pd.read_csv('winequality-red.csv')
df.head()
|
Output:

Data Preprocessing/ Splitting into Train/Valid/Test Set
There are multiple ways to split the data, you can define custom functions or use timestamps if present or use predefined functions like train_test_split in scikit-learn.
Here we have used the sample function to fetch 75% of the data to create the training set and then used the rest of the data for the validation set. You can and should create a test set too but here we have a very small dataset and our primary focus here is to get familiar with the process and train a neural network right?
Now let’s divide our dataset.
Python3
import tensorflow as tf
train_df = df.sample(frac=0.75, random_state=4)
val_df = df.drop(train_df.index)
|
Something to note is that neural networks generally perform better on data that is in the same range. Like if you have different columns and in 1 column you have values which range from 1-10 but in another, it ranges from 100-1000, it’s suggested to first scale all the columns to the same range for better performance.
Now, the most simple method to do that is :
value – (min value of the column) / (range of the column)
Python3
max_val = train_df.max(axis= 0)
min_val = train_df.min(axis= 0)
range = max_val - min_val
train_df = (train_df - min_val)/(range)
val_df = (val_df- min_val)/range
|
Since we’re done with scaling our data and creating our training and validation datasets, let’s separate it into features i.e inputs and targets, since that’s how we’re going to pass it to the model.
Python3
X_train = train_df.drop('quality',axis=1)
X_val = val_df.drop('quality',axis=1)
y_train = train_df['quality']
y_val = val_df['quality']
input_shape = [X_train.shape[1]]
input_shape
|
Output:
[11]
This means that we’ll be passing 11 features as input to the first layer of our neural network.
Create Model Neural Network
Keras module is built on top of TensorFlow and provides us all the functionality to create a variety of neural network architectures. We’ll use the Sequential class in Keras to build our model. First, you can try using the linear model, since the neural network basically follows the same ‘math’ as regression you can create a linear model using a neural network as follows :
Create a linear Model
Python3
model = tf.keras.Sequential([
tf.keras.layers.Dense(units=1,input_shape=input_shape)])
model.summary()
|
Output:
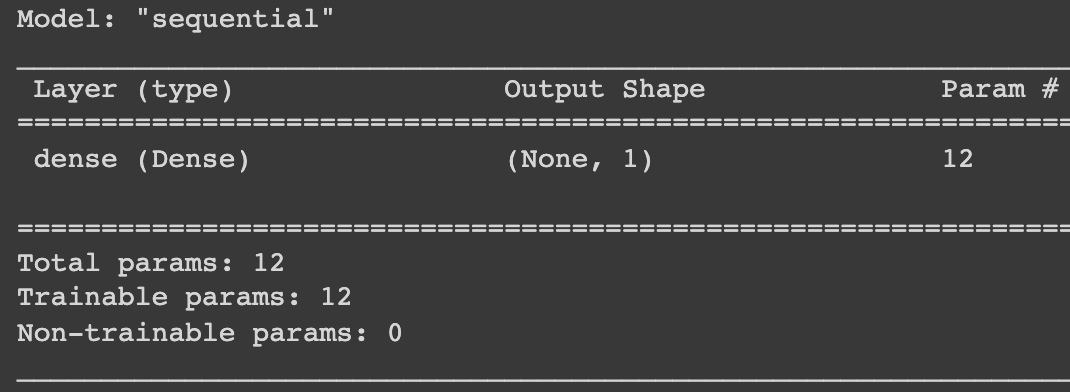
But this is basically a linear model, what if your dataset is a bit more complex, and the relations between the features are much more diverse and you want a non-linear model? What do you need? The answer is Activation Functions. This is where neural networks truly start to shine. We can’t go in-depth about activation functions in this article but basically, these add/introduce non-linearity to our model, the more you use them the more complex patterns our model can find.
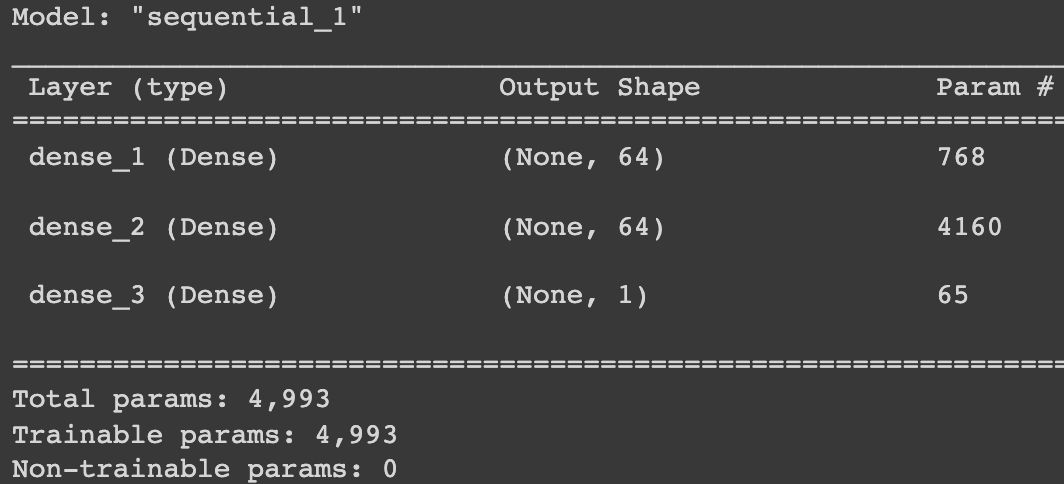
Creating a Multilayered Neural Network
We’ll create a 3 layer network with 1 input layer, 1 hidden layer1 with 64 units, and 1 output layer. We’ll use ‘relu’ activation function in the hidden layers. We’ll use the Sequential method in Keras module, which is very often used to create multilayered neural networks. In keras, we have different types of neural network layers and/or transformation layers which you can use to build various types of neural network, but here we have only used 3 Dense layers(in keras.layers) with relu activation function.
Python3
model = tf.keras.Sequential([
tf.keras.layers.Dense(units=64, activation='relu',
input_shape=input_shape),
tf.keras.layers.Dense(units=64, activation='relu'),
tf.keras.layers.Dense(units=1)
])
model.summary()
|
Output:
In Keras after you create your model, you need to ‘compile’ other parameters for it, like it’s shown below. This is kind of like us setting all the parameters for our model.
Python3
model.compile(optimizer='adam',
loss='mae')
|
So we used adam optimizer, and also told the model to compute the mae (mean absolute error) loss.
Training The Model
Since we’re done with creating and instantiating our model, now it’s time to train it. We’ll use the fit method to train our model. This method takes features and targets as targets, and we can also pass the validation_data with it, it will automatically try your model on validation and note the loss metrics. We also provide the batch_size, e what this does is breaks our data into small batches and feed it to our model for training in each epoch, this is very helpful when you have large datasets because it reduces the RAM and CPU consumption on your machine.
Now here we have only trained our model for 15 epochs because our purpose here is to get familiar with the process and not the accuracy itself, but you’ll have to increase or decrease the number of epochs on your machine. There are optimization methods that you can use such as early stopping that will automatically stop the training when the model starts overfitting, so you can also try using these, I have provided a link at the bottom if you want to read about it.
Python3
losses = model.fit(X_train, y_train,
validation_data=(X_val, y_val),
batch_size=256,
epochs=15,
)
|
Output:
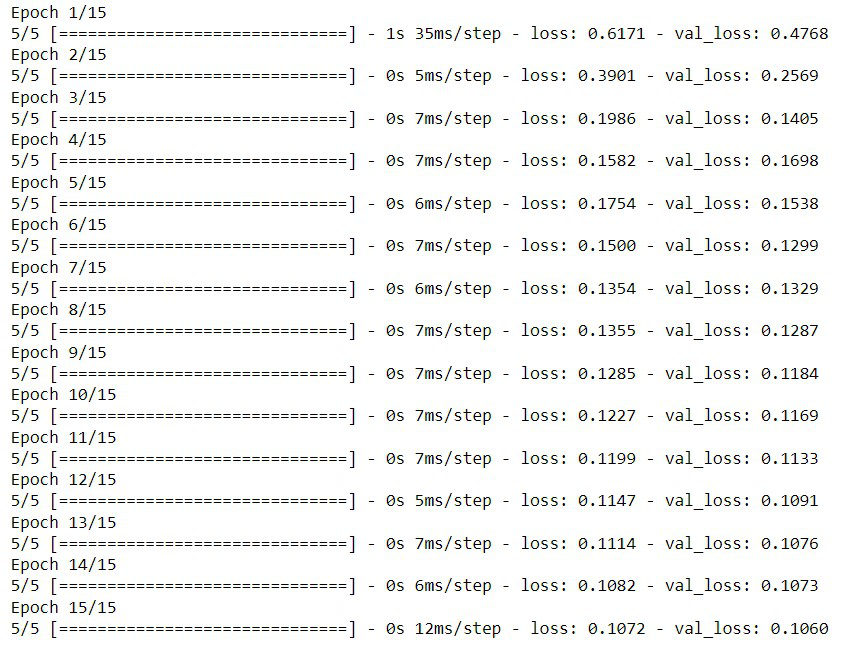
Here we have only trained for 15 epochs but you should definitely train for more and try changing the model itself.
Generate Predictions and Analyze Accuracy
Since we have completed the training process, let’s actually try using it to predict the ‘wine quality’. For making predictions we’ll use the predict function of the model object. Let’s only give three examples as inputs and try to predict the wine quality for the 3.
Python3
model.predict(X_val.iloc[0:3, :])
|
Output:
array([[0.40581337],
      [0.5295989 ],
      [0.3883106 ]], dtype=float32)
Now, let’s compare our predictions with the target value.
Output:
0     0.4
9     0.4
12    0.4
Name: quality, dtype: float64
As we can see our predictions are pretty close to the real value i.e 0.4 in all three cases. You can define another function to convert the prediction into an integer to predict quality on a scale of 1 to 10 for better understanding, but that’s a trivial thing, the main thing is for you to understand the whole process depicted here.
Visualize Training Vs Validation Loss
You can analyze the loss and figure out if it is overfitting or not easy and then take appropriate measures accordingly.
Python3
loss_df = pd.DataFrame(losses.history)
loss_df.loc[:,['loss','val_loss']].plot()
|
Output:
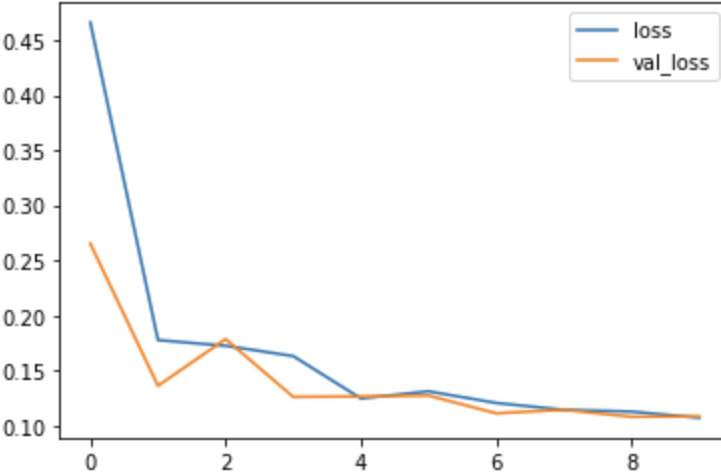
Key point to note while analyzing the accuracy/error for your model is :
Your loss function continuously decreasing, obviously, but that might not be the case for the validation dataset, and at some point, your model will overfit the data and the validation error will start increasing instead of decreasing. So, you can stop at the epoch where the validation loss seems to be increasing. You can also try some other optimization algorithms like early stopping (callback in Keras). You can read about it here.
Like Article
Suggest improvement
Share your thoughts in the comments
Please Login to comment...