Introduction To Jenkins Pipeline As Code (Jenkinsfile)
Last Updated :
15 Mar, 2024
Jenkins is an automating web server that build using java programming language. It come with support large number of plugins that made it as power CI/CD tool supporting to integration most of the softwares. In this article we will guide you through how to setup Jenkins Pipeline as Code from the scratch of setting up jenkins.
What Is A Jenkinsfile?
A Jenkinsfile is a text file that is written using Groovy syntax for defining Continuous Integration and Continuous Deployment (CI/CD) pipeline as Code. It supports versioning, reviewing and collaborating, automating the build, test and deployment process within Jenkins. It encapsulates the pipeline’s configuration for providing consistency and repeatability across software development projects.
Step By Step Implementation Of Jenkins Pipeline as Code
Step 1: Navigate To AWS Console
- Open the browser, go to AWS account console and login with your credentials.
- After login into the account you will landed on console home as shown in below.

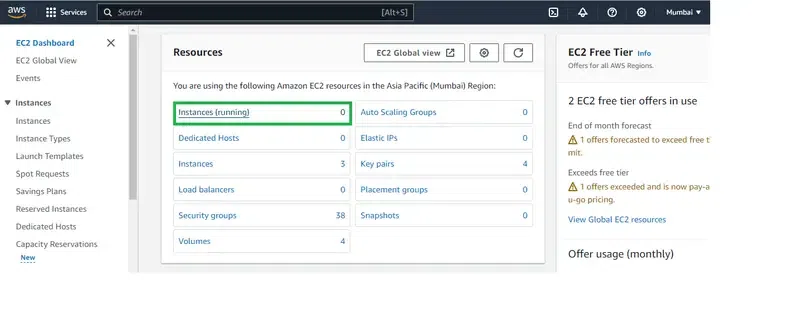
Step 2: Navigate To Running Instance
- Navigate to Instances page form EC2 Dashboard by clicking on running Instances.
- After coming Running Instance page, click on
Step 3: Define Instance Configuration
- After click on create Instance, you have to define the configuration before launching.
- Choose the AMI whatever you wish, here we are choosing Amazon Linux latest AMI.
- Defining no of instances as 1 , Instance Name as “my_jenkins_server“.

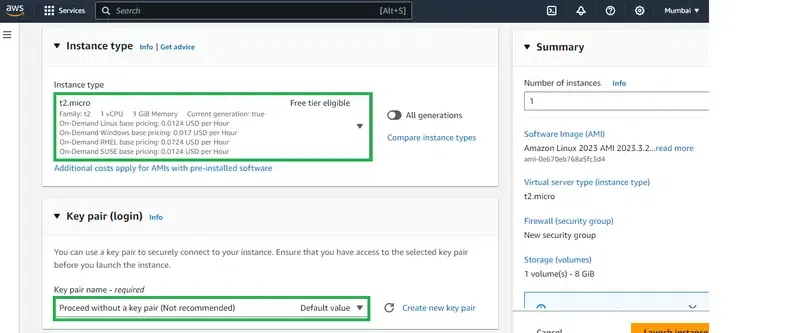
Step 4: Configure Instance
- Choose the Instance type as t2.micro
- Here we are choosing existing key pair, if you don’t have key pair then you have to create a new one.
Step 5: Launch Instance
- Configure the network security groups with allowing all traffic from all ports and protocols. We performing to overcome network challenges from AWS and focus on the jenkins Pipeline. For better security you can restrict the protocols and ports.
- Review the definitions once and launch the instance.

Step 6: Connect To Instance
- Once the instance is launched, it will take time to come for running state. After that click on connect, to enter into the instance.

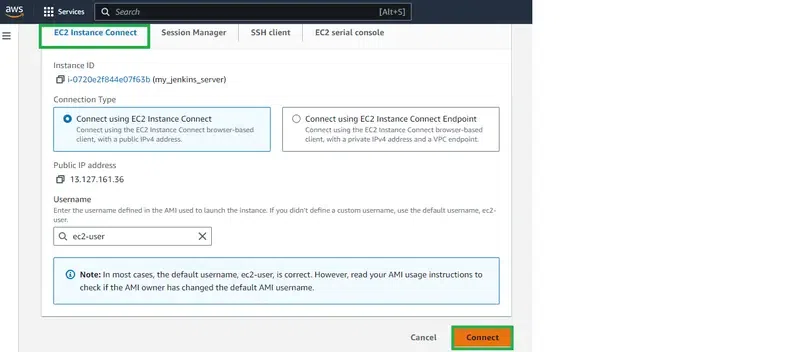
Step 7: Connect To EC2 Console
- Inside the instance, go to EC2 Instance connect option, as an alternative you can also work on remotely with local console using created .pem key pair.
- In the EC2 Instance Connect section click on connect to access the ec2 console.
Step 8: Installation Of Jenkins
- For the installation of jenkins firstly, we need to install java software. Install the java with the following command:
sudo yum install java* -y
- After execute the following commands to install jenkins.
sudo wget -O /etc/yum.repos.d/jenkins.repo \
    https://pkg.jenkins.io/redhat-stable/jenkins.repo
sudo rpm --import https://pkg.jenkins.io/redhat-stable/jenkins.io-2023.key
sudo yum upgrade
# Add required dependencies for the jenkins package
sudo yum install jenkins
sudo systemctl daemon-reload

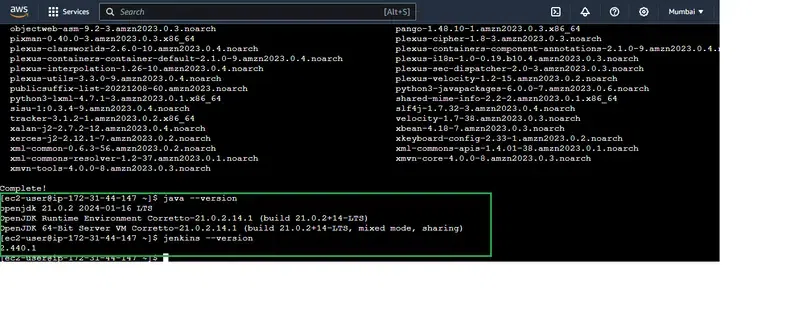
Step 9: Verification of Java Applications
- Verify whether their is successful installation of jenkins and java with following commands:
java --version
jenkins --version
Step 10: Starting Jenkins Server
- Now start the jenkins server with following command:
systemctl enable jenkins --now
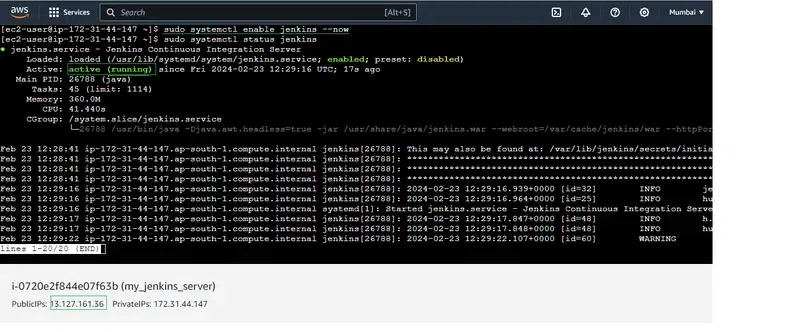
Step 11: Asking Jenkins Credentials
- Navigate to browser, and enter your instance public ip with port number 8080. It will generate the page as shown in the below figure. The browser curl looks as follow:
http://[IP_address]:8080
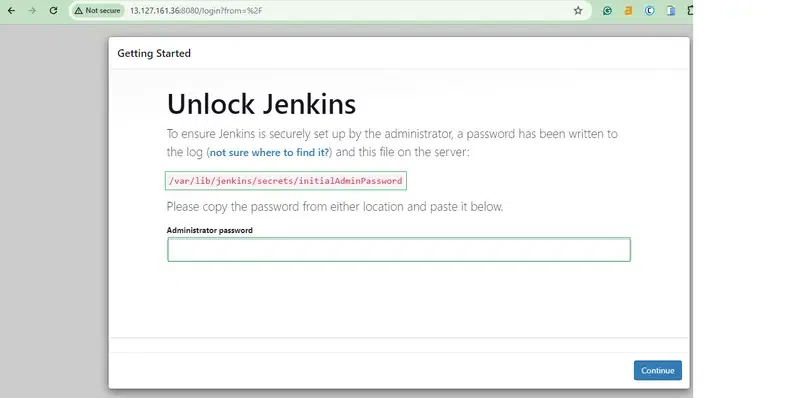
Step 12: Copying The Jenkins Password
- From this page, to go further you have to go for authentication, go to the directory provided in the page in your EC2 Console and copy the password as shown in the following screenshot. The command will be similar as follows:
sudo cat /var/lib/jenkins/secrets/initalAdminPassword

Step 13: Installing Suggested Plugins
- Now install the suggested the plugins as shown in the following screenshot, it helps you in having all the required plugins.

Step 14: Installation Of Suggested Plugins
- The Installation of suggested plugins will take some time for installation, wait for the some time till the it is done.
- Here, you can view what are the plugins that are going to be installed.

Step 15: Default User Access
- In this you can go for creating your own admin user or you can skip and go for the default admin user. Here We are going with default user.

Step 16: Instance Configuration
- In this Instance Configuration it shows, how the url of the jenkins master will for access with default user. Click on save and Finish.

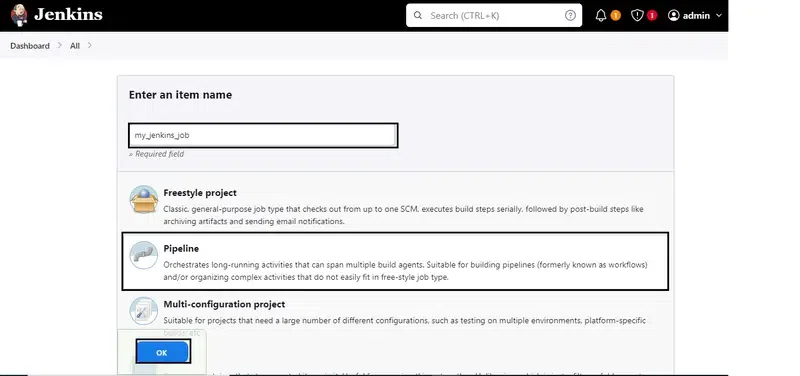
Step 17: Create A Jenkins Job
- Click on new item to create a jenkins job.

Step 18: Configuring The Jenkins Job
- Provide the jenkins job name as “my_jenkins_job” and select pipeline style.
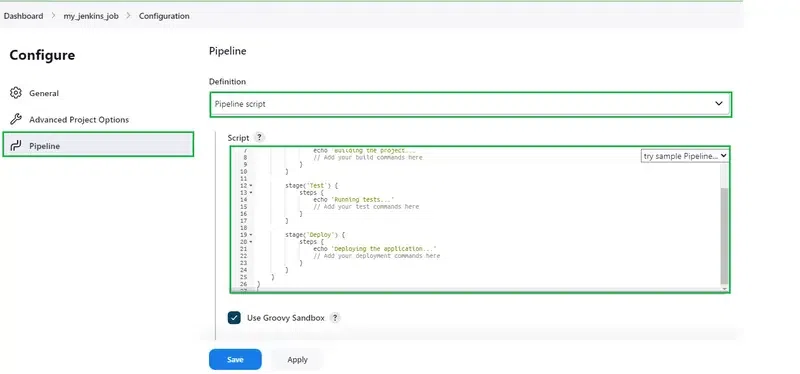
Step 19: Configure The jenkins Job With Jenkinsfile
- Navigate to pipeline section as shown in the screenshot in below and provide the jenkinsfile i,e. Pipeline as a Code. You can go through with using the following jenkinsfile code.
pipeline {
    agent any
    stages {
        stage('Build') {
            steps {
               echo "Build Stage"
            }
        }
        stage('Test') {
            steps {
              echo "Test Stage"
            }
        }
        // Additional stages
    }
    post {
        always {
            echo "This is Jenkinsfile"
        }
    }
}
Step 20: Build Jenkins Job
- After the creating the jenkins job, click on build now option.
- On the right side of the screenshot, you can see successful building of jenkins job with Jenkinsfile.

- In this Article, we have gone through how setup jenkins in AWS, Configuring Jenkins Server and finaling building the Jenkins job with Jenkinsfile. We hope this article has been very insightful for you.
Jenkinsfile – FAQ’s
What Is Jenkinsfile Used For?
It used for defining Jenkins pipeline such as build, test, git stages etc..
What Is the Difference between jenkins pipeline and jenkinsfile?
In Jenkinsfile is a file that defines all steps in a single jenkins file whereas Jenkins pipeline is a plugin that suits for creating and managing delivery pipelines in jenkins.
What is the syntax of Jenkinsfile?
Jenkinsfile can be written on using two syntaxs one is delcartice and other is scripted pipeline as code.
What is the programming language for Jenkinsfile?
Many set of programming languages are used in Jenkins including Java, Javascript, Groovy, Golang etc.. It is not limited to some programming languages only.
Share your thoughts in the comments
Please Login to comment...