Image Caption Generator using Deep Learning on Flickr8K dataset
Last Updated :
02 Sep, 2020
Generating a caption for a given image is a challenging problem in the deep learning domain. In this article, we will use different techniques of computer vision and NLP to recognize the context of an image and describe them in a natural language like English. we will build a working model of the image caption generator by using CNN (Convolutional Neural Networks) and LSTM (Long short term memory) units.
For training our model I’m using Flickr8K dataset. It consists of 8000 unique images and each image will be mapped to five different sentences which will describe the image.
Step 1: Import the required libraries
import numpy as np
import pandas as pd
import os
import tensorflow as tf
from keras.preprocessing.sequence import pad_sequences
from keras.preprocessing.text import Tokenizer
from keras.models import Model
from keras.layers import Flatten, Dense, LSTM, Dropout, Embedding, Activation
from keras.layers import concatenate, BatchNormalization, Input
from keras.layers.merge import add
from keras.utils import to_categorical, plot_model
from keras.applications.inception_v3 import InceptionV3, preprocess_input
import matplotlib.pyplot as plt
import cv2
|
Step 2: Load the descriptions
The format of our file is image and caption separated by a newline (“\n”) i.e, it consists of the name of the image followed by a space and the description of the image in CSV format. Here we need to map the image to its descriptions by storing them in a dictionary.
def load_description(text):
mapping = dict()
for line in text.split("\n"):
token = line.split("\t")
if len(line) < 2:
continue
img_id = token[0].split('.')[0]
img_des = token[1]
if img_id not in mapping:
mapping[img_id] = list()
mapping[img_id].append(img_des)
return mapping
token_path = '/kaggle / input / flickr8k / flickr_data / Flickr_Data / Flickr_TextData / Flickr8k.token.txt'
text = open(token_path, 'r', encoding = 'utf-8').read()
descriptions = load_description(text)
print(descriptions['1000268201_693b08cb0e'])
|
Output:
['A child in a pink dress is climbing up a set of stairs in an entry way .',

'A girl going into a wooden building .',

'A little girl climbing into a wooden playhouse .',

'A little girl climbing the stairs to her playhouse .',

'A little girl in a pink dress going into a wooden cabin .']
Step 3: Cleaning the text
One of the main steps in NLP is to remove noise so that the machine can detect the patterns easily in the text. Noise will be present in the form of special characters such as hashtags, punctuation and numbers. All of which are difficult for computers to understand if they are present in the text. So we need to remove these for better results. Additionally, you can also remove stop words and perform Stemming and Lemmatization by using NLTK library.
def clean_description(desc):
for key, des_list in desc.items():
for i in range(len(des_list)):
caption = des_list[i]
caption = [ch for ch in caption if ch not in string.punctuation]
caption = ''.join(caption)
caption = caption.split(' ')
caption = [word.lower() for word in caption if len(word)>1 and word.isalpha()]
caption = ' '.join(caption)
des_list[i] = caption
clean_description(descriptions)
descriptions['1000268201_693b08cb0e']
|
Step 4: Generate the Vocabulary
Vocabulary is a set of unique words which are present in our text corpus. When processing raw text for NLP, everything is done around the vocabulary.
def to_vocab(desc):
words = set()
for key in desc.keys():
for line in desc[key]:
words.update(line.split())
return words
vocab = to_vocab(descriptions)
|
Step 5: Load the images
Here we need to map the images in the training set to their corresponding descriptions which are present in our descriptions variable. Create a list of names of all training images and then create an empty dictionary and map the images to their descriptions using image name as key and a list of descriptions as its value. while mapping the descriptions add unique words at the beginning and end to identify the start and end of the sentence.
import glob
images = '/kaggle / input / flickr8k / flickr_data / Flickr_Data / Images/'
img = glob.glob(images + '*.jpg')
train_path = '/kaggle / input / flickr8k / flickr_data / Flickr_Data / Flickr_TextData / Flickr_8k.trainImages.txt'
train_images = open(train_path, 'r', encoding = 'utf-8').read().split("\n")
train_img = []
for im in img:
if(im[len(images):] in train_images):
train_img.append(im)
def load_clean_descriptions(des, dataset):
dataset_des = dict()
for key, des_list in des.items():
if key+'.jpg' in dataset:
if key not in dataset_des:
dataset_des[key] = list()
for line in des_list:
desc = 'startseq ' + line + ' endseq'
dataset_des[key].append(desc)
return dataset_des
train_descriptions = load_clean_descriptions(descriptions, train_images)
print(train_descriptions['1000268201_693b08cb0e'])
|
Output:
['startseq child in pink dress is climbing up set of stairs in an entry way endseq',

'startseq girl going into wooden building endseq',

'startseq little girl climbing into wooden playhouse endseq',

'startseq little girl climbing the stairs to her playhouse endseq',

'startseq little girl in pink dress going into wooden cabin endseq']
Step 6: Extract the feature vector from all images
Now we will give an image as an input to our model but unlike humans, machines cannot understand the image by seeing them. So we need to convert the image into an encoding so that the machine can understand the patterns in it. For this task, I’m using transfer learning i.e, we use a pre-trained model that has been already trained on large datasets and extract the features from these models and use them for our work. Here I’m using the InceptionV3 model which has been trained on Imagenet dataset that had 1000 different classes to classify. We can directly import this model from Keras.applications module.
We need to remove the last classification layer to get the (2048, ) dimensional feature vector from InceptionV3 model.
from keras.preprocessing.image import load_img, img_to_array
def preprocess_img(img_path):
img = load_img(img_path, target_size = (299, 299))
x = img_to_array(img)
x = np.expand_dims(x, axis = 0)
x = preprocess_input(x)
return x
def encode(image):
image = preprocess_img(image)
vec = model.predict(image)
vec = np.reshape(vec, (vec.shape[1]))
return vec
base_model = InceptionV3(weights = 'imagenet')
model = Model(base_model.input, base_model.layers[-2].output)
encoding_train = {}
for img in train_img:
encoding_train[img[len(images):]] = encode(img)
|
Step 7: Tokenizing the vocabulary
In this step, we need to tokenize all the words present in our vocabulary. Alternatively, we can use tokenizer in Keras to do this task.
all_train_captions = []
for key, val in train_descriptions.items():
for caption in val:
all_train_captions.append(caption)
vocabulary = vocab
threshold = 10
word_counts = {}
for cap in all_train_captions:
for word in cap.split(' '):
word_counts[word] = word_counts.get(word, 0) + 1
vocab = [word for word in word_counts if word_counts[word] >= threshold]
ixtoword = {}
wordtoix = {}
ix = 1
for word in vocab:
wordtoix[word] = ix
ixtoword[ix] = word
ix += 1
max_length = max(len(des.split()) for des in all_train_captions)
max_length
|
Step 8: Glove vector embeddings
GloVe stands for global vectors for word representation. It is an unsupervised learning algorithm developed by Stanford for generating word embeddings by aggregating global word-word co-occurrence matrix from a corpus. Also, we have 8000 images and each image has 5 captions associated with it. It means we have 30000 examples for training our model. As there are more examples you can also use data generator for feeding input in the form of batches to our model rather than giving all at one time. For simplicity, I’m not using this here.
Also, we are going to use an embedding matrix to store the relations between words in our vocabulary. An embedding matrix is a linear mapping of the original space to a real-valued space where entities will have meaningful relationships.
X1, X2, y = list(), list(), list()
for key, des_list in train_descriptions.items():
pic = train_features[key + '.jpg']
for cap in des_list:
seq = [wordtoix[word] for word in cap.split(' ') if word in wordtoix]
for i in range(1, len(seq)):
in_seq, out_seq = seq[:i], seq[i]
in_seq = pad_sequences([in_seq], maxlen = max_length)[0]
out_seq = to_categorical([out_seq], num_classes = vocab_size)[0]
X1.append(pic)
X2.append(in_seq)
y.append(out_seq)
X2 = np.array(X2)
X1 = np.array(X1)
y = np.array(y)
embeddings_index = {}
golve_path ='/kaggle / input / glove-global-vectors-for-word-representation / glove.6B.200d.txt'
glove = open(golve_path, 'r', encoding = 'utf-8').read()
for line in glove.split("\n"):
values = line.split(" ")
word = values[0]
indices = np.asarray(values[1: ], dtype = 'float32')
embeddings_index[word] = indices
emb_dim = 200
emb_matrix = np.zeros((vocab_size, emb_dim))
for word, i in wordtoix.items():
emb_vec = embeddings_index.get(word)
if emb_vec is not None:
emb_matrix[i] = emb_vec
emb_matrix.shape
|
Step 9: Define the model
For defining the structure of our model, we will be using the Keras Model from Functional API. It has three major steps:
- Processing the sequence from the text
- Extracting the feature vector from the image
- Decoding the output by concatenating the above two layers
ip1 = Input(shape = (2048, ))
fe1 = Dropout(0.2)(ip1)
fe2 = Dense(256, activation = 'relu')(fe1)
ip2 = Input(shape = (max_length, ))
se1 = Embedding(vocab_size, emb_dim, mask_zero = True)(ip2)
se2 = Dropout(0.2)(se1)
se3 = LSTM(256)(se2)
decoder1 = add([fe2, se3])
decoder2 = Dense(256, activation = 'relu')(decoder1)
outputs = Dense(vocab_size, activation = 'softmax')(decoder2)
model = Model(inputs = [ip1, ip2], outputs = outputs)
|
Output:
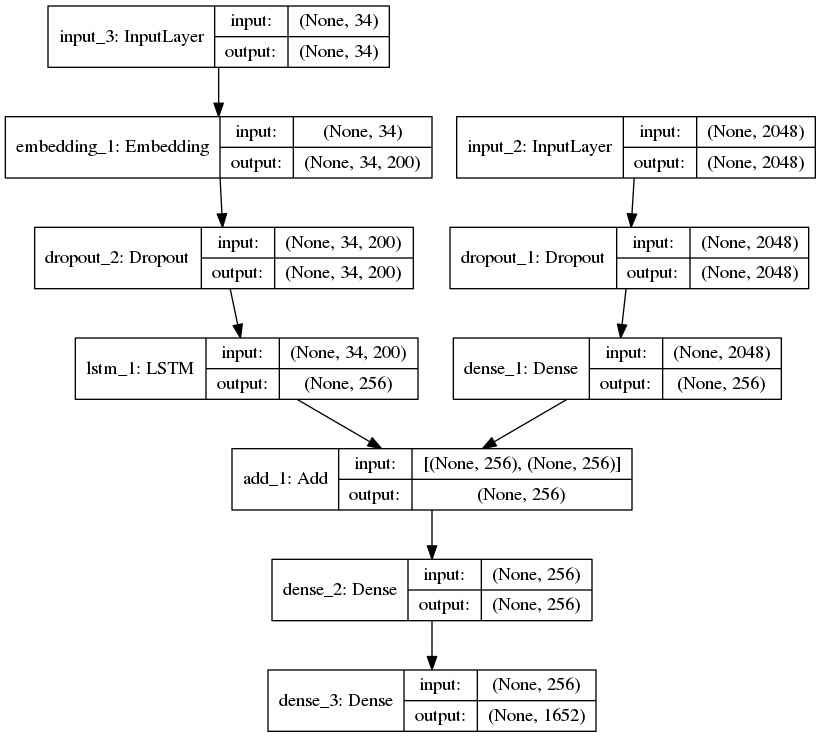
Caption Generator deep learning model
Step 10: Training the model
For training our model I’m using Adam’s optimizer and loss function as categorical cross-entropy. I’m training the model for 50 epochs which will be enough for predicting the output. In case you have more computational power (no. of GPU’s) you can train it by decreasing batch size and increasing number of epochs.
model.layers[2].set_weights([emb_matrix])
model.layers[2].trainable = False
model.compile(loss = 'categorical_crossentropy', optimizer = 'adam')
model.fit([X1, X2], y, epochs = 50, batch_size = 256)
|
Output:
Epoch 1/1

292328/292328 [==============================] - 55s 189us/step - loss: 3.8895

Epoch 1/1

292328/292328 [==============================] - 55s 187us/step - loss: 3.1549

Epoch 1/1

292328/292328 [==============================] - 54s 186us/step - loss: 2.9185

Epoch 1/1

292328/292328 [==============================] - 54s 186us/step - loss: 2.7652

Epoch 1/1

292328/292328 [=================>.........] - ETA: 15s - loss: 2.6496
Step 11: Predicting the output
def greedy_search(pic):
start = 'startseq'
for i in range(max_length):
seq = [wordtoix[word] for word in start.split() if word in wordtoix]
seq = pad_sequences([seq], maxlen = max_length)
yhat = model.predict([pic, seq])
yhat = np.argmax(yhat)
word = ixtoword[yhat]
start += ' ' + word
if word == 'endseq':
break
final = start.split()
final = final[1:-1]
final = ' '.join(final)
return final
|
OUTPUT:
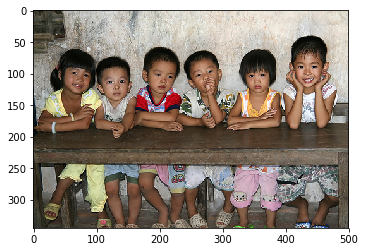
Predicted Output: four girls are sitting on wooden floor
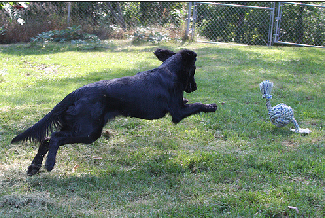
Predicted Output: black dog is running through the grass

Predicted Output: man is skateboarding on ramp
Share your thoughts in the comments
Please Login to comment...