Behold, Marvel Fans. Avengers are out there to save the Multiverse, so are we, ready to do whatever it takes to support them.
In this article, we will use Deep Learning and computer vision for the caption generation of Avengers Endgame characters. We will start will the basics, explaining concepts and use a pre-trained model to implement the project.
An Overview:
Image Caption generation is a challenging problem in AI that connects computer vision and NLP where a textual description must be generated for a given photograph. In General Sense for a given image as input, our model describes the exact description of an Image. It requires both image understanding from the domain of computer vision which Convolution Neural Network and a language model from the field of Natural language processing.
It is important to assume and test multiple ways to frame a given predictive modeling problem and there are indeed many ways to frame the problem of generating captions for photographs. we stick to one which we’ll Explain at the end of this article so hold for some time. can you hold Thor Hammer !!! NO !! but you could hold here, joke apart.
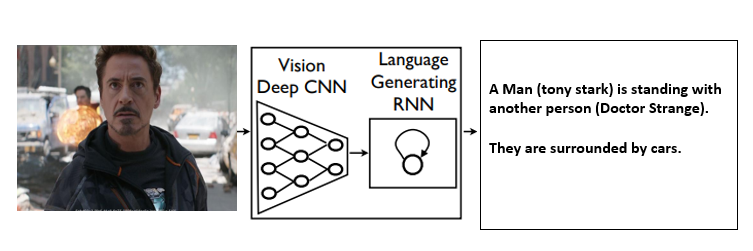
So Basically what our model does is when we pass an image to our CNN and RNN combined architecture then it will generate the natural description of the image using NLP.
We show a generative model based on a deep Recurrent neural architecture that combines with machine translation and which can be used to generate natural sentences which describe an image. The model is trained to maximize the likelihood of the target descriptions sentence given the training images. Experiments on various datasets show the accuracy of the model and the fluency of the language which it learns solely from image descriptions.
Example:
Before going deeper let’s understand the basic terminology which is required to understand this algorithm.
They are basically two types:
Image based model : Which extracts the features from the image.
Language based model: Which translates the features and objects given by our image-based model to a natural sentence.
The condensed feature vector is formed from a convolutional neural network . In general terms, this feature vector is called embedding, and the CNN model is referred to as an encoder which encode the given set of word and generate the sequence which passes to a decoder network. In the next step, we will be using these embeddings from the CNN layer as input to the LSTM network, a decoder which decodes the input sequence and generates the output.
For Example: Language translation like French to English.
In a sentence language model, LSTM is predicting the next word in a sentence. Given the initial embedding of the image, the LSTM is trained to predict the most probable next value of the sequence. It’s just like showing a person to a bunch of images and asking them to remember the details of the images and then later show them a new image which has similar content to the previous images and asks them to recall the content. This “recall” and “remember” job is done by our LSTM network which is much more useful here. later when I come to Implementation part will show you how does it actually function.
In this article, we will be using a pre-trained convolution neural network that is trained on the ImageNet dataset. The images are transformed into a standard resolution of 224 X 224 X 3 (nh x hw x nc) which will make the input constant for the model for any given image.
Technically, we also insert Start and Stop to signal the end of the caption.
Example:
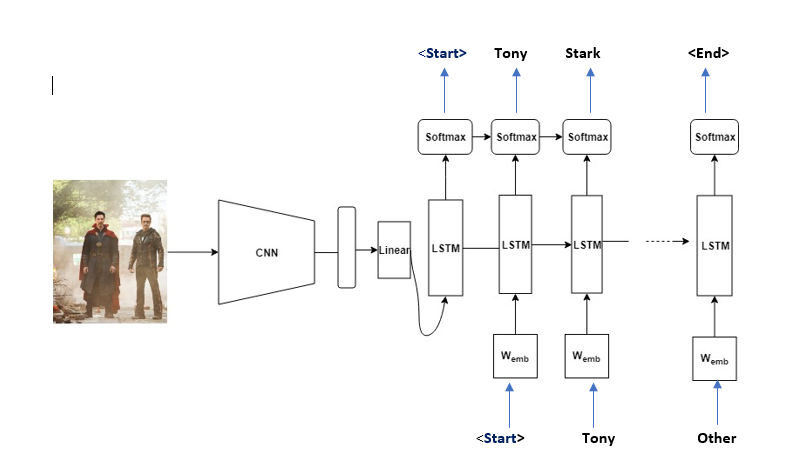
If the image description is “Tony Stark is standing with Doctor Strange “, the source sequence is a list containing [‘(Start), ‘Tony’, ‘Stark’, ‘is’, ‘standing’, ‘with’, ‘Doctor’, ‘Strange’] and the target sequence is a list containing [‘Tony’, ‘Stark’, ‘is’, ‘standing’, ‘with’, ‘Doctor’, ‘Strange’, ‘(End)‘] . Using these Source and Target sequences and the feature vector, the LSTM decoder is trained as a language model conditioned on the feature vector.
Below image explains better –
Test phase:
In the test phase, the encoder part is almost the same as the training phase. The only difference is that batchnorm layer uses variance and average rather than mini-batch statistics. This can be easily implemented using encoder.eval() function. For the decoder part, there is a vital difference between the training phase and the test phase. In the test phase, the LSTM decoder can’t observe the image description. To handle this situation, the LSTM decoder feeds back the previously generated word to the next input. This can be implemented using a for-loop.
There are basically Two caption generation models:
Model 1:
Generate the Whole Sequence : The first approach involves generating the entire textual description for the object given an Image.
 Input: Photograph
 Output: Complete textual description.
This is a one-to-many sequence prediction model that generates the entire output in a one-shot manner.
- This model puts a heavy load on the language model to generate the right words in the right order.
- The Images passes through a feature extraction model such as a model pre-trained on the ImageNet dataset.
- One hot encoding is used for the output sequence which allows the model to predict the probability distribution of each word in the sequence over the entire vocabulary.
- All sequences are padded to the same length which means that the model is forced to generate multiple “no word” time steps in the output sequence.
- Testing this method, We found that a very large language model is required and even then it is hard to get past the model generating the NLP equivalent of persistence, example: generating the same word repeated for the entire sequence length as the output.
Model 2:
Generate Word from Word: This is a different kind of approach where the LSTM generates a prediction of one word given an Image and one word as input.
 Input 1: Image
 Input 2: Previously generated word or start of sequence token.
 Output:  Next word in sequence.
This is a one-to-one sequence prediction model that generates the textual description by recursive calls to the model.
- The one word input is either a token which indicates the start of the sequence in the case of the first time the model is being called or is the word which generated from the previous time the model was called.
- The Image passes through a feature extraction model like a model which is pre-trained on the ImageNet dataset and input word is integer encoded which passes through a word embedding.
- The output word is one hot encoded which allow the model to predict the probabilities of words over the whole vocabulary.
- The recursive word generation process is kept on repeating until an end of sequence token is generated.
- By Testing this method, We found that the model does generate some good n-gram sequences, but gets caught in a loop repeating the same sequences of words for long descriptions which is an overhead because of that there is problem of insufficient memory in the model to remember what has been generated previously.
Let’s get the deeper intuition through the example of an image captioning.
In order to develop an image captioning model which we break down into three parts :
1)Extracting image features to use in the model.
2)Training the model on those features what we extracted from the Image.
3)Using the trained model to generate caption text when we pass the input image’s features to the network.
We have two different kinds of techniques to do this –
1. Visual Geometry Group Neural Network (VGG) for the feature extraction from Image.
2. A Recurrent Neural Network (RNN) to train and generate caption text through Model.
Step #1:
Using the pre-trained VGG model, the image is read in and resized to 224*224*3 which is having three color channels, and then fed into the VGG neural network where the features are extracted as a Numpy array. Since VGG network is used here to do an image classification, instead of getting the output from the last layer, we get the output from the fully-connected (FC-2) layer which contains the feature data of an image.
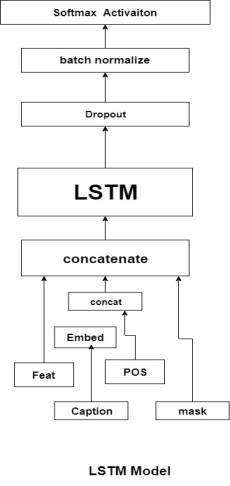
Step #2:
For captioning Image, using Keras, create a single LSTM (long term short term memory ) cell with 256 neurons. For this cell, we have four inputs: Image features, captions, a mask, and a current position First the caption input and position input are concatenated (merged) and then it goes through a word embedding layer then the image features and embedded words are also merged (using concatenate) with the mask input. Together, they all pass through the LSTM cell and the output of the LSTM cell then goes through Dropout and Batch Normalization layer to prevent the model from overfitting. Finally, the Softmax non-linearity is applied and we get the expected result.
The result what we get is a vector having each entry representing the possibility of every word in the dictionary. The word with the highest probability would be our current “best word”. Along with pre-built dictionary, this vector is used to “interpret” the next generated word which can be considered a type of ground truth for training in the true caption. The mask plays an important role in all of this, “recording” the previous words used in captions so that the model knows the words before the current word and input the model with the current position of the sentence so that it will not fall into a loop.
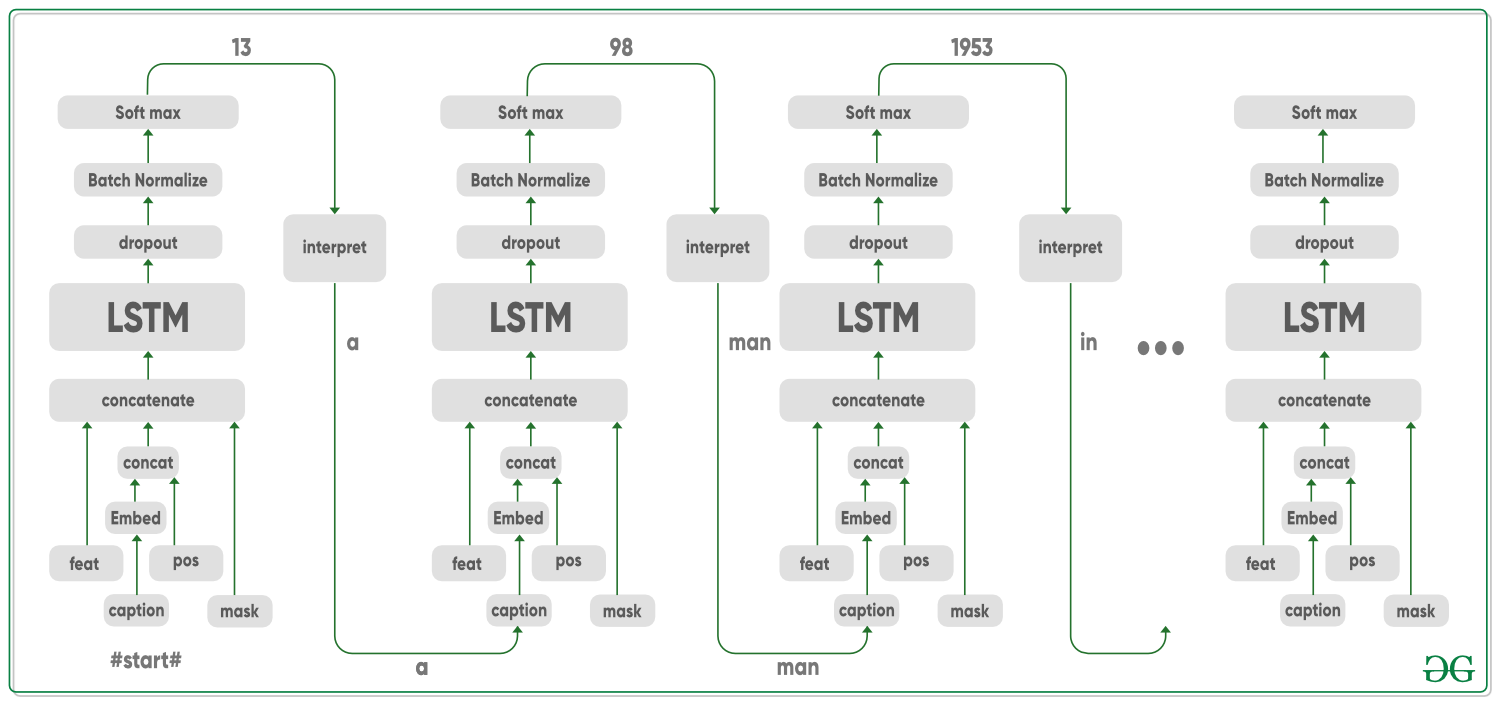
Similar to training, we also need to get the features for each image to be predicted. So, the images go through the VGG-16 network architecture first, to generate the features. For captioning, we used the same LSTM model. The first-word input for this model is the ‘#start#’ tag and the following input are the prediction result from the previous iteration.
Model Architecture:
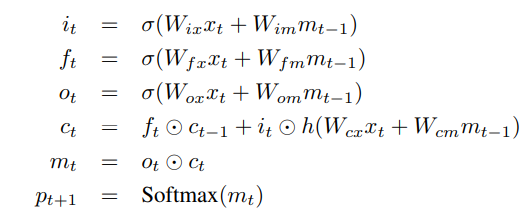
We encourage you to have a look at this research paper to get clear Intuition about what is exactly happening.
The memory block contains a cell ‘C’ which is controlled by three gates. In blue we show the recurrent connections the output ‘m’ at time ‘t-1’ is fed back to the memory at time ‘t’ via the three gates, the cell value is fed back via the forget gate and the predicted word at time ‘t-1’ is fed back in addition to the memory output ‘m’ at time ‘t’ into the Softmax function for word prediction. Read its input gate ‘i’ and whether to output the new cell value (output gate o).
- Encoder-Decoder architecture: Typically, a model that generates sequences will use an Encoder to encode the input into a fixed form and a Decoder to decode it, word by word, into a sequence.
- Attention: The use of Attention networks is widespread in deep learning, and with good reason. This is a way for a model to choose only those parts of the encoding that it thinks is relevant to the task at hand. The same mechanism you see employed here can be used in any model where the Encoder’s output has multiple points in space or time. We consider some pixels more important than others in image captioning. In sequence to sequence tasks like machine translation, you consider some words more important than others.
- Transfer Learning: is when you borrow from an existing model by using parts of it in a new model which is almost always better than training a new model from scratch (i.e., knowing nothing) as will see, we can always fine-tune this second-hand knowledge to the specific task at hand and using pre-trained word embeddings is a null but valid example. We will use a pretrained Encoder and then fine-tune it as needed.
- Beam Search: is where we don’t let your Decoder be lazy and simply choose the words with the best score at each decode-step and Beam Search is useful for any language modeling problem because it finds the most optimal sequence.
Let’s understand through the code:
Prerequisites-
Anaconda
Pytorch
MSCOCO Dataset
To replicate the results of this article, please make sure that you install the pre-requisites. Now let’s train a model from scratch, follow the below steps.
Dataset
git clone https://github.com/pdollar/coco.git
cd coco/PythonAPI/
make
python setup.py build
python setup.py install
cd ../../
git clone https://github.com/yunjey/pytorch-tutorial.git
cd pytorch-tutorial/tutorials/03-advanced/image_captioning/
pip install -r requirements.txt
Note: We suggest you to use google Colab
Pretrained model –
Let’s download the pretrained model and the vocabulary file from here, then we should extract pretrained_model.zip to ./models/ and vocab.pkl to ./data/ using the unzip command.
Now the model is ready which can predict the captions using:
$ python sample.py --image='/example.png'
Let’s begin the show !
Import all the libraries and make sure the notebook is in the root folder of the repository:
import torch
import matplotlib.pyplot as plt
import numpy as np
import argparse
import pickle
import os
from torchvision import transforms
from PIL import Image
from build_vocab import Vocabulary
from model import EncoderCNN, DecoderRNN
|
hardCoded Model can’t be altered:
ENCODER_PATH = 'content/encoder-5-3000.pkl'
DECODER_PATH = 'content/decoder-5-3000.pkl'
VOCAB_PATH = 'content/vocab.pkl'
EMBED_SIZE = 256
HIDDEN_SIZE = 512
NUM_LAYERS = 1
|
To load_image Add this configuration code:
device = torch.cuda.device(0)
def load_image(image_path, transform=None):
image = Image.open(image_path)
image = image.resize([224, 224], Image.LANCZOS)
if transform is not None:
image = transform(image).unsqueeze(0)
return image
|
Now, let’s code a PyTorch function which uses pretrained data files to predict the output:
def PretrainedResNet(image_path, encoder_path=ENCODER_PATH,
decoder_path=DECODER_PATH,
vocab_path=VOCAB_PATH,
embed_size=EMBED_SIZE,
hidden_size=HIDDEN_SIZE,
num_layers=NUM_LAYERS):
transform = transforms.Compose([
transforms.ToTensor(),
transforms.Normalize((0.485, 0.456, 0.406),
(0.229, 0.224, 0.225))])
with open(vocab_path, 'rb') as f:
vocab = pickle.load(f)
encoder = EncoderCNN(embed_size).eval()
decoder = DecoderRNN(embed_size, hidden_size,
len(vocab), num_layers)
encoder = encoder.to(device)
decoder = decoder.to(device)
encoder.load_state_dict(torch.load(encoder_path))
decoder.load_state_dict(torch.load(decoder_path))
image = load_image(image_path, transform)
image_tensor = image.to(device)
feature = encoder(image_tensor)
sampled_ids = decoder.sample(feature)
sampled_ids = sampled_ids[0].cpu().numpy()
sampled_caption = []
for word_id in sampled_ids:
word = vocab.idx2word[word_id]
sampled_caption.append(word)
if word == '<end>':
break
sentence = ' '.join(sampled_caption)[8:-5].title()
image = Image.open(image_path)
return sentence, image
|
Let’s get started with producing captions on some scenes from Avenger’s EndGame, and see how well it generalizes, don’t forget to enjoy.
To predict the labels use following code :
plt.figure(figsize=(24,24))
predicted_label, image = PretrainedResNet(image_path='IMAGE_PATH')
plt.imshow(image)
print(predicted_label)
|
We had Hulk, Now we have DeepLearning. 😀
Test Image: Thor- Mark I
Let’s take a look that this image
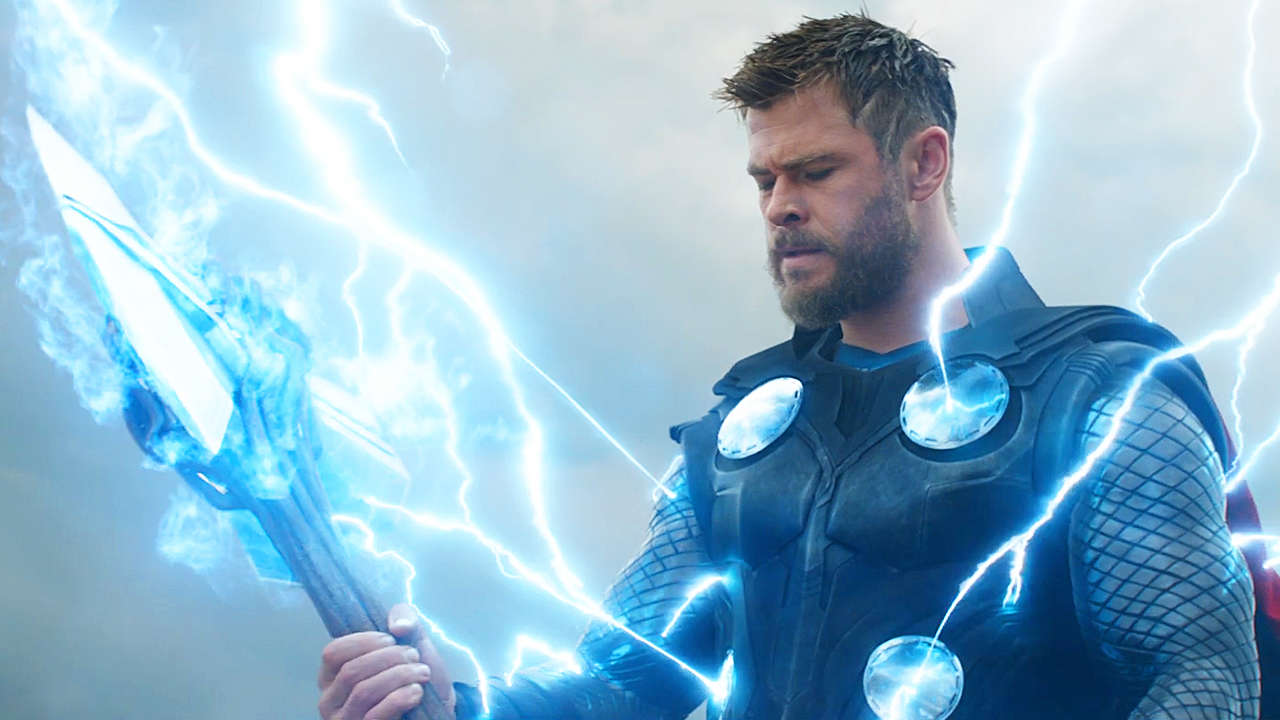
Now What do you think about this image? Hold a caption in your mind without scrolling down.
plt.figure(figsize=(17,19))
predicted_label, img = PretrainedResNet(image_path='./image/AVENGERENDGAME1.png')
plt.imshow(img)
print(predicted_label)
|
Output:

Thor
Test Image: Tony- Mark II
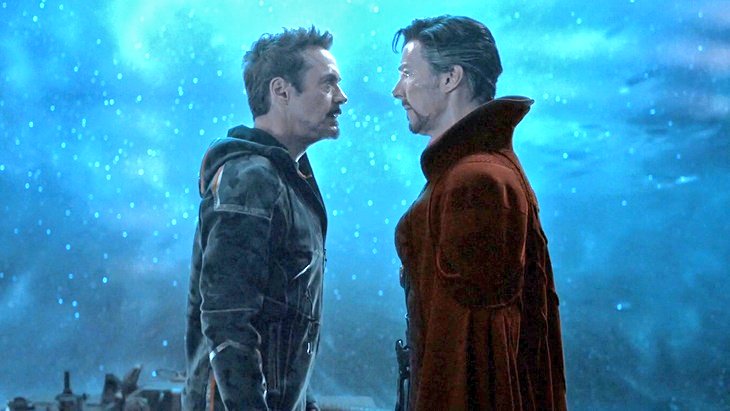
Now What do you think about this image? Hold a caption in your mind without scrolling down.
plt.figure(figsize=(22,22))
predicted_label, img = PretrainedResNet(image_path='./image/AVENGERENDGAME2.png')
plt.imshow(img)
print(predicted_label)
|
Output:

(tony and doctor strange)
Test Image: Hulk- Mark III
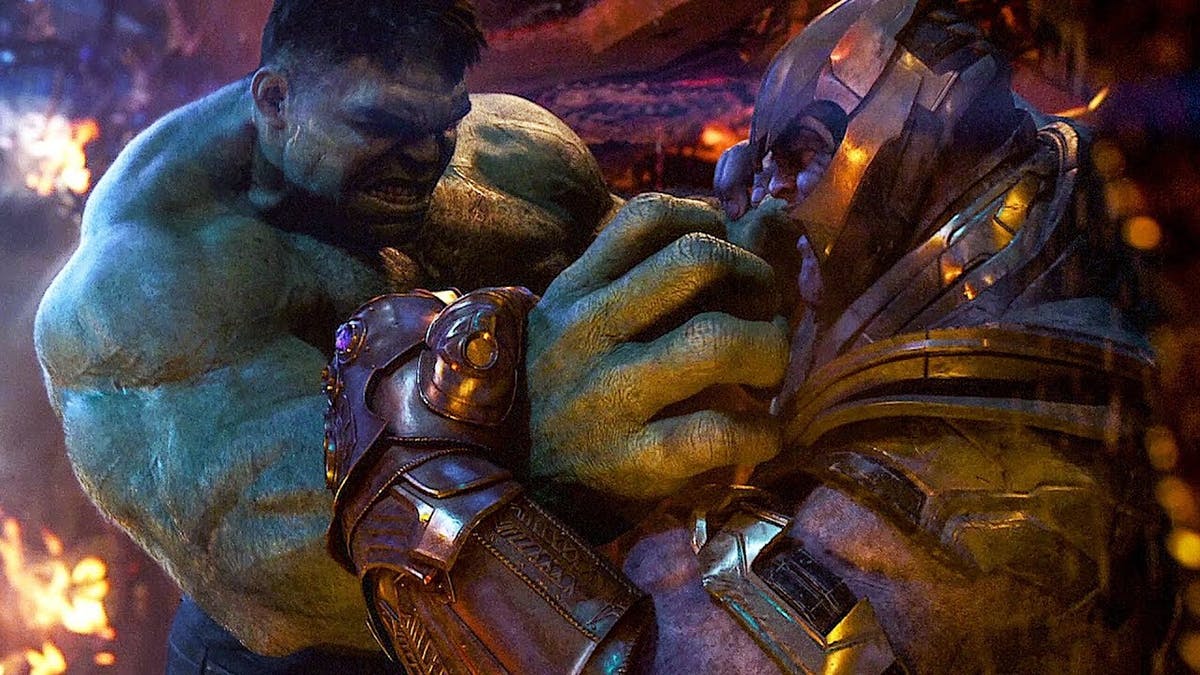
Now What do you think about this image? Hold a caption in your mind without scrolling down.
plt.figure(figsize=(42,49))
predicted_label, img = PretrainedResNet(image_path='./image/AVENGERENDGAME3.png')
plt.imshow(img)
print(predicted_label)
|
Output:

(thanos and Hulk)
Note: We are using image name here AVENGERENDGAME*.png where * varies from 1,2,3 … so on, but you can put your own images and keep in mind that one might get different caption and another might get a different one.