How to Configure IPv6 on CISCO Router?
Last Updated :
03 May, 2024
An IPv6 is the sixth version of any IP address on the IP protocol. It consists of eight groups of four hexadecimal digits. IP v6 is a 128-bits address having an address space of 2^128.
For more details about IPv6 refer to the articles: What is IPv6? and Internet Protocol version 6 (IPv6).
Steps to Configure IPv6 on Cisco Packets Tracer:
Step 1: First open the Cisco packet tracer desktop and create a network topology something like the image and an IPv6 addressing table given below.
| S.NO |
Device Name |
Model-Name |
Link-Local-Address |
Default-Gateway |
| 1. |
PC |
PC |
FE80::207:ECFF:FEA3:EB56 |
FE80::1 |
| 2. |
Switch |
PT-switch |
FE80::207:ECFF:FEB9:862A |
FE80::1 |
| 3. |
Router |
2911 |
FE80::250:FFF:FE6C:B21 |
FE80::1 |
| 4. |
cable |
Automatic connecting cable |
nil |
nil |
IP Addressing Table:
| S.NO |
Interface |
IPv6 Address |
| 1. |
Gig0/0 |
2001:DB:AAAA:A::1/64 |
| 2. |
Gig0/1 |
2001:DB:AAAA:B::1/64 |
Step 2: Configuring the GigabitEthernet Interfaces.
- First, we will configure the GigabitEthernet0/0 using CLI.
- Click on router0 and go to CLI and type the commands are given below:
Router>en
Router#conf t
Enter configuration commands, one per line.  End with CNTL/Z.
Router(config)#ipv6 unicast-routing
Router(config)#int Gig0/0
Router(config-if)#ipv6 address FE80::1 link
Router(config-if)#ipv6 address FE80::1 link-local
Router(config-if)#no shut
- Now we will configure the GigabitEthernet0/1 Interface.
- Click on router0 and go to CLI and type the commands are given below:
Router(config-if)#int Gig0/1
Router(config-if)#ipv6 address FE80::1 link-local
Router(config-if)#no shut
- Then, both the interfaces will be active now:
Step 3: Configuring Ipv6 address in both Interfaces using CLI:
- CLI commands to configure IPv6 address in GigabitEthernet0/0 and GigabitEthernet0/1 ports are given below:
Router#en
Router#conf t
Enter configuration commands, one per line.  End with CNTL/Z.
Router(config)#int Gig0/0
Router(config-if)#ipv6 address 2001:DB8:AAAA:A::1/64
Router(config-if)#no shut
Router(config-if)#int Gig0/1
Router(config-if)#ipv6 address 2001:DB8:AAAA:B::1/64
Router(config-if)#no shut
Router(config-if)#
Router(config-if)#
Step 4: We have configured the router now change the settings of hosts in IPv6 configuration:
- First, click on PC0 and go to desktop then IP configuration.
- Now find the IPv6 configuration.
- Change the settings from static to automatic and then after a few seconds, the IPv6 address and default gateway are displayed.
- Similarly, repeat this procedure with PC1 and PC2
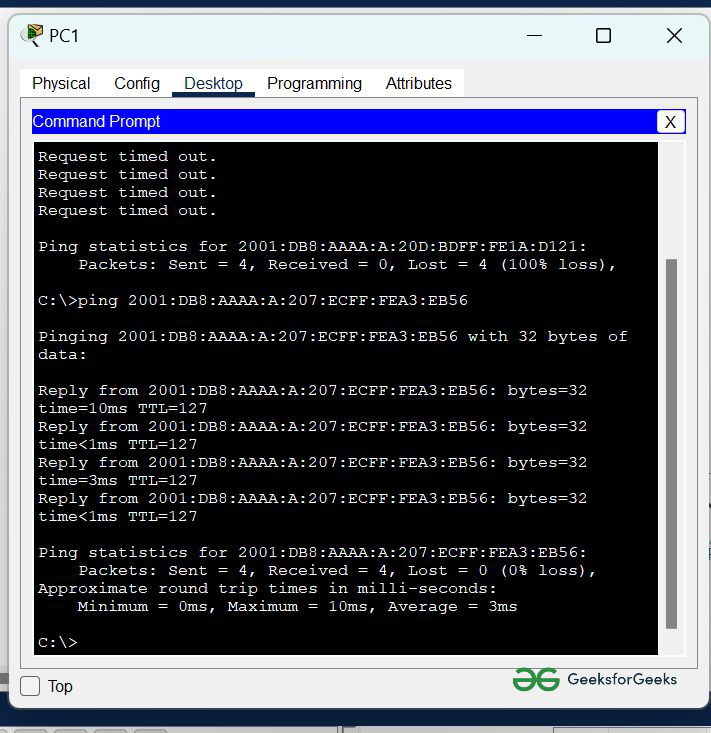
Step 5: Now we have to verify the connection by pinging the IPv6 address of PC0 in PC1.
- First, click on PC1 and go to the command prompt, and type ping <ipv6 address>
command: ping 2001:DB8:AAAA:A:20D:BDFF:FE1A:D121
- As we can see in the below image, getting replies from PC0 means the connection is established successfully.
Simulation Result:
Share your thoughts in the comments
Please Login to comment...