Prerequisite: Basic knowledge of hibernate framework, Knowledge about databases, Java
Hibernate is a framework that provides some abstraction layer, meaning that the programmer does not have to worry about the implementations, Hibernate does the implementations for you internally like Establishing a connection with the database, writing queries to perform CRUD operations, etc. It is a java framework that is used to develop persistence logic. Persistence logic means storing and processing the data for long use. More precisely Hibernate is an open-source, non-invasive, lightweight java ORM(Object-relational mapping) framework to develop objects which are independent of the database software and make independent persistence logic in all JAVA, JEE.
What is one-to-one mapping?
One to one represents that a single entity is associated with a single instance of the other entity. An instance of a source entity can be at most mapped to one instance of the target entity. We have a lot of examples around us that demonstrate this one-to-one mapping.
- One person has one passport, a passport is associated with a single person.
- Leopards have unique spots, a pattern of spots is associated with a single leopard.
- We have one college ID, a college ID is uniquely associated with a person.
You can find more day-to-day life examples if you observe. In database management systems one-to-one mapping is of two types-
- One-to-one unidirectional
- One-to-one bidirectional
One-to-one unidirectional
In this type of mapping one entity has a property or a column that references to a property or a column in the target entity. Let us see this with the help of an example-
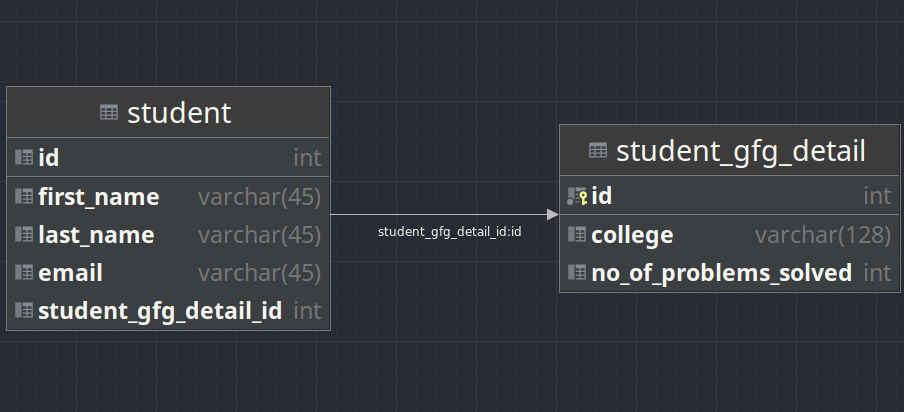
ER Diagram
In this example student table to associated with the student_gfg_detail with the help of a foreign key student_gfg_detail_id which references student_gfg_detail.id. The target entity (student_gfg_detail) does not have a way to associate with the student table but the student table can access the student_gfg_table with the help of a foreign key. The above relationship can be generated with the help of the following SQL script.
DROP SCHEMA IF EXISTS `hb-one-to-one-mapping`;

CREATE SCHEMA `hb-one-to-one-mapping`;

use `hb-one-to-one-mapping`;

SET FOREIGN_KEY_CHECKS = 0;

DROP TABLE IF EXISTS `student_gfg_detail`;

-- -----------------------------------------------------
-- Table `hb-one-to-one-mapping`.`student_gfg_detail`
-- -----------------------------------------------------
CREATE TABLE `student_gfg_detail` (
  `id` INT NOT NULL AUTO_INCREMENT,
  `college` varchar(128) DEFAULT NULL,
  `no_of_problems_solved` INT DEFAULT 0,
  PRIMARY KEY (`id`)
) ENGINE=InnoDB AUTO_INCREMENT=1 DEFAULT CHARSET=latin1;


DROP TABLE IF EXISTS `instructor`;

-- -----------------------------------------------------
-- Table `hb-one-to-one-mapping`.`student`
-- -----------------------------------------------------
CREATE TABLE `hb-one-to-one-mapping`.`student` (
  `id` INT NOT NULL AUTO_INCREMENT,
  `first_name` VARCHAR(45) NULL DEFAULT NULL,
  `last_name` VARCHAR(45) NULL DEFAULT NULL,
  `email` VARCHAR(45) NULL DEFAULT NULL,
  `student_gfg_detail_id` INT UNIQUE,
  PRIMARY KEY (`id`),
  FOREIGN KEY (`student_gfg_detail_id`)
  REFERENCES `hb-one-to-one-mapping`.`student_gfg_detail` (`id`)
  ON DELETE NO ACTION
  ON UPDATE NO ACTION)
ENGINE = InnoDB
DEFAULT CHARACTER SET = latin1;

SET FOREIGN_KEY_CHECKS = 1;
While creating the student table we reference the primary key in the student_gfg_detail table i.e. student_gfg_detail.id. We have set ON DELETE NO ACTION and ON DELETE NO ACTION deliberately as we will set these values inside Hibernate. Now let’s add entries to the database with the help of Hibernate. First, let’s define our hibernate configuration file.
XML
<!DOCTYPE hibernate-configuration PUBLIC
"-//Hibernate/Hibernate Configuration DTD 3.0//EN"
<hibernate-configuration>
<session-factory>
<property name="connection.driver_class">com.mysql.cj.jdbc.Driver</property>
<property name="connection.url">
</property>
<property name="connection.username">your_username</property>
<property name="connection.password">your_password</property>
<property name="connection.pool_size">1</property>
<property name="dialect">org.hibernate.dialect.MySQLDialect</property>
<property name="show_sql">true</property>
<property name="current_session_context_class">thread</property>
</session-factory>
</hibernate-configuration>
|
We will be using MySQL as the JDBC driver. You can use any other vendor implementation also. In the configuration file, we set up the session factory with the database connection settings, connection pool settings, SQL dialect, etc. One important property here to note is current_session_context_class. Most applications using Hibernate need some form of “contextual” session, where a given session is in effect throughout the scope of a given context. Here this property specifies that the current session is in the context of only one thread. Also do not forget to change your_username with your database username and your_password with your database password.
Now we need to add hibernate JAR file and MySQL database connector to our external libraries. I will be using maven to add those JAR files but you can also download them from the official sources and add them manually to your external libraries. Let’s define our pom.xml file
XML
<?xml version="1.0" encoding="UTF-8"?>
<modelVersion>4.0.0</modelVersion>
<groupId>com.geeksforgeeks</groupId>
<artifactId>Hibernate-One-to-One-Mapping</artifactId>
<version>1.0</version>
<properties>
<maven.compiler.source>11</maven.compiler.source>
<maven.compiler.target>11</maven.compiler.target>
</properties>
<dependencies>
<dependency>
<groupId>org.hibernate</groupId>
<artifactId>hibernate-vibur</artifactId>
<version>5.6.5.Final</version>
</dependency>
<dependency>
<groupId>mysql</groupId>
<artifactId>mysql-connector-java</artifactId>
<version>8.0.28</version>
</dependency>
</dependencies>
</project>
|
Now that we have added the related dependencies let’s add start with defining our entities.
Java
package com.geeksforgeeks.entity;
import javax.persistence.CascadeType;
import javax.persistence.Column;
import javax.persistence.Entity;
import javax.persistence.GeneratedValue;
import javax.persistence.GenerationType;
import javax.persistence.Id;
import javax.persistence.JoinColumn;
import javax.persistence.OneToOne;
import javax.persistence.Table;
@Entity
@Table(name = "student")
public class Student {
@Id
@GeneratedValue(strategy = GenerationType.IDENTITY)
@Column(name = "id")
private int id;
@Column(name = "first_name") private String firstName;
@Column(name = "last_name") private String lastName;
@Column(name = "email") private String email;
@OneToOne(cascade = CascadeType.ALL)
@JoinColumn(name = "student_gfg_detail_id")
private StudentGfgDetail studentGfgDetail;
public Student() {}
public Student(String firstName, String lastName,
String email)
{
this.firstName = firstName;
this.lastName = lastName;
this.email = email;
}
public int getId() { return id; }
public void setId(int id) { this.id = id; }
public String getFirstName() { return firstName; }
public void setFirstName(String firstName)
{
this.firstName = firstName;
}
public String getLastName() { return lastName; }
public void setLastName(String lastName)
{
this.lastName = lastName;
}
public String getEmail() { return email; }
public void setEmail(String email)
{
this.email = email;
}
public StudentGfgDetail getStudentGfgDetail()
{
return studentGfgDetail;
}
public void
setStudentGfgDetail(StudentGfgDetail studentGfgDetail)
{
this.studentGfgDetail = studentGfgDetail;
}
@Override public String toString()
{
return "Student{"
+ "id=" + id + ", firstName='" + firstName
+ '\'' + ", lastName='" + lastName + '\''
+ ", email='" + email + '\''
+ ", studentGfgDetail=" + studentGfgDetail
+ '}';
}
}
|
Java
package com.geeksforgeeks.entity;
import javax.persistence.Column;
import javax.persistence.Entity;
import javax.persistence.GeneratedValue;
import javax.persistence.GenerationType;
import javax.persistence.Id;
import javax.persistence.Table;
@Entity
@Table(name = "student_gfg_detail")
public class StudentGfgDetail {
@Id
@GeneratedValue(strategy = GenerationType.IDENTITY)
@Column(name = "id")
private int id;
@Column(name = "college") private String college;
@Column(name = "no_of_problems_solved")
private int noOfProblemsSolved;
public StudentGfgDetail() {}
public StudentGfgDetail(String college,
int noOfProblemsSolved)
{
this.college = college;
this.noOfProblemsSolved = noOfProblemsSolved;
}
public int getId() { return id; }
public void setId(int id) { this.id = id; }
public String getCollege() { return college; }
public void setCollege(String college)
{
this.college = college;
}
public int getNoOfProblemsSolved()
{
return noOfProblemsSolved;
}
public void
setNoOfProblemsSolved(int noOfProblemsSolved)
{
this.noOfProblemsSolved = noOfProblemsSolved;
}
@Override public String toString()
{
return "StudentGfgDetail{"
+ "id=" + id + ", college='" + college + '\''
+ ", noOfProblemsSolved=" + noOfProblemsSolved
+ '}';
}
}
|
All the latest frameworks these days heavily rely on annotations as it makes code shorter and easier to understand, let’s understand what is happening step by step. As we store the Student object and StudentGfgDetail objects in our database, we annotate them with @Entity. The @Table annotation specifies the primary table associated with the entity, we pass the name of the table inside the annotation.
- @Id – Specifies that the given field is the primary key of the entity.
- @GeneratedValue – This defines the strategy to generate the primary key, here we use GenerationType.IDENTITY which is auto increments the value of Id, if we don’t want to use this we would have to specify the primary key explicitly every time we create an object.
- @Column – This simply maps a given field to a column inside the database.
The key thing here to note is the following part-
@OneToOne(cascade = CascadeType.ALL)
@JoinColumn(name = "student_gfg_detail_id")
private StudentGfgDetail studentGfgDetail;
We add a single object of StudentGfgDetail inside the Student class which is annotated with @OneToOne annotation which specifies the one-to-one mapping. This annotation contains an element called cascade which specifies the cascading strategy. Cascading is a feature that is used to manage the state of the target entity whenever the state of the parent entity changes. Basic Hibernate cascade types are-
- CascadeType.ALL – Propagates all operations from parent to target entity.
- CascadeType.PERSIST – Propagates persist from parent to target entity.
- CascadeType.MERGE – Propagates merge from parent to target entity.
- CascadeType.REMOVE – Propagates remove from parent to target entity.
- CascadeType.REFRESH – Propagates refresh from parent to target entity.
- CascadeType.DETACH – Propagates detach from parent to target entity.
For example if cascade = CascadeType.REMOVE then if the parent entity is deleted from the database then the target entity will also be deleted from the database i.e. if a Student entity is deleted from the database then the related StudentGfgDetail will get automatically deleted in the same operation. The @JoinColumn annotation specifies the column for joining the target entity. Here it is specified that StudentGfgDetail should be joined to the column student_gfg_detail_id which is correct as student_gfg_detail_id is acting as our foreign key.
This sets up a one-to-one unidirectional relationship as Student can access the StudentGfgDetail entity but it is not true vice-versa. Now after we are done defining our entities let’s get into real action, let’s modify our database with the help of hibernate. Let’s add an entry to our database-
Java
package com.geeksforgeeks.application;
import com.geeksforgeeks.entity.Student;
import com.geeksforgeeks.entity.StudentGfgDetail;
import org.hibernate.Session;
import org.hibernate.SessionFactory;
import org.hibernate.cfg.Configuration;
public class AddingEntryDemo {
public static void main(String[] args)
{
SessionFactory factory
= new Configuration()
.configure("hibernate.cfg.xml")
.addAnnotatedClass(Student.class)
.addAnnotatedClass(StudentGfgDetail.class)
.buildSessionFactory();
try (factory; Session session
= factory.getCurrentSession()) {
Student student = new Student("Vyom", "Yadav",
"vyom@gmail.com");
StudentGfgDetail studentGfgDetail
= new StudentGfgDetail("GFG College", 20);
student.setStudentGfgDetail(studentGfgDetail);
session.beginTransaction();
session.save(student);
session.getTransaction().commit();
System.out.println(
"Transaction Successfully Completed!");
}
catch (Exception e) {
e.printStackTrace();
}
}
}
|
Now let’s discuss this step by step-
- We create the Session factory with the help of the configuration file as we had set up the details in the configuration file. Then we add annotated classes, basically classes we annotated in the previous steps, and then just build the session factory.
- Get the current session from the session factory.
- Create relevant objects and call setter methods.
- Begin the transaction.
- Save the Student object, this also saves the associated StudentGfgDetail as we used CascadeType.ALL in the previous steps.
- Get the transaction and commit the changes.
- Close the current session.
- Close the session factory as we don’t want to create more sessions.
If we run the code above with proper configuration we should see similar output-
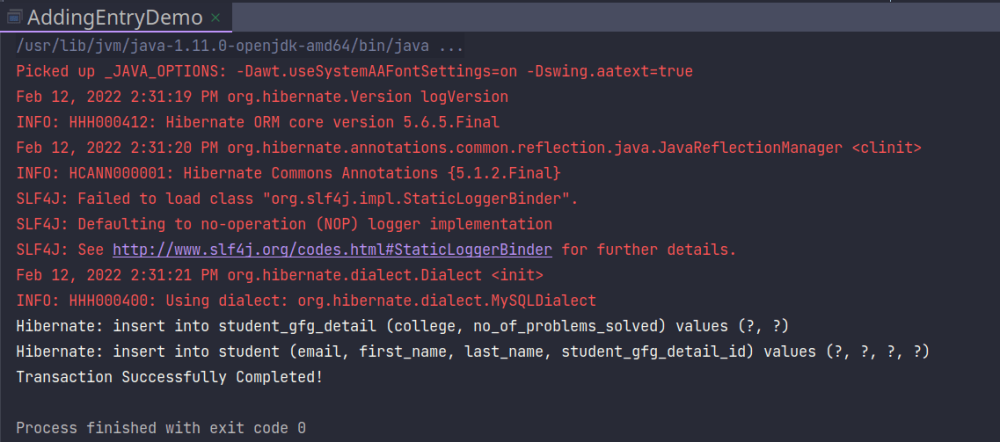
Output
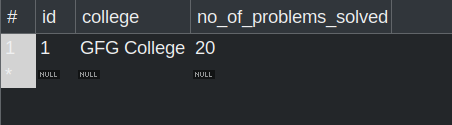
The output may not be 100% the same as it depends on the version of hibernate you are using but it should be very close to the output above. Let’s double-check whether those values were inserted into the database or not.

student Table
student_gfg_detail Table
Now that we have verified that we were able to add an entry to the database and our operations were working let’s try to update these entries.
Java
package com.geeksforgeeks.application;
import com.geeksforgeeks.entity.Student;
import com.geeksforgeeks.entity.StudentGfgDetail;
import org.hibernate.Session;
import org.hibernate.SessionFactory;
import org.hibernate.cfg.Configuration;
public class UpdateEntryDemo {
public static void main(String[] args)
{
SessionFactory factory
= new Configuration()
.configure("hibernate.cfg.xml")
.addAnnotatedClass(Student.class)
.addAnnotatedClass(StudentGfgDetail.class)
.buildSessionFactory();
try (factory; Session session
= factory.getCurrentSession()) {
session.beginTransaction();
int id = 1;
Student student
= session.get(Student.class, id);
StudentGfgDetail studentGfgDetail
= student.getStudentGfgDetail();
student.setEmail("vyom@geeksforgeeks.com");
studentGfgDetail.setNoOfProblemsSolved(40);
session.update(student);
session.getTransaction().commit();
System.out.println(
"Transaction Successfully Completed!");
}
catch (Exception e) {
e.printStackTrace();
}
}
}
|
The only piece of code we need to understand is-
// Get object with id = 1
int id = 1;
Student student = session.get(Student.class, id);
StudentGfgDetail studentGfgDetail = student.getStudentGfgDetail();

// modify the student and its details
student.setEmail("vyom@geeksforgeeks.com");
studentGfgDetail.setNoOfProblemsSolved(40);

// Update the student object.
// This will also update the StudentGfgDetail object as we have used CascadeType.ALL
session.update(student);
- We get the student with id = 1.
- Modify the details.
- Update the value.
One thing here to note here is that we should be inside to use the get(Student.class, id) method, that’s why this piece of code comes after we begin the transaction. The output if we run the code with proper configuration-
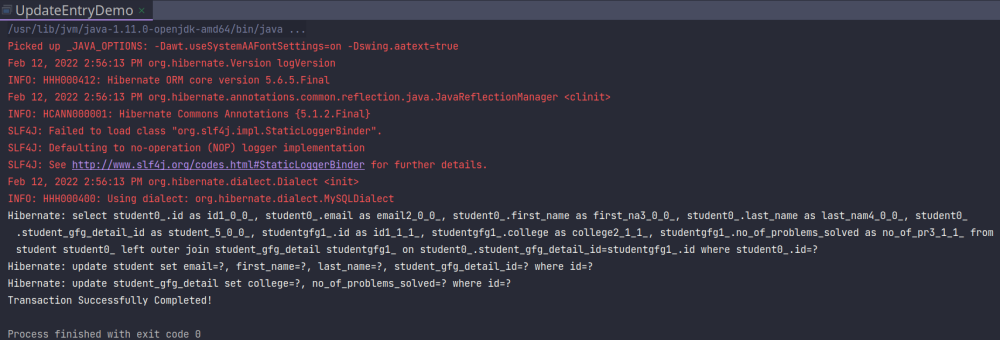
Output
Again the output depends on hibernate version but it should be similar. We can also verify these changes inside the database-

Note that email changed
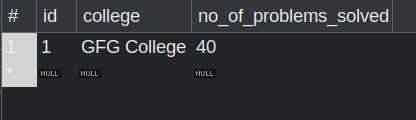
Note that the no_of_problems_solved changed
Reading a value from a database can also be done very easily, just modify the section under begin transaction as-
// Get object with id = 1
int id = 1;
Student student = session.get(Student.class, id);
StudentGfgDetail studentGfgDetail = student.getStudentGfgDetail();

System.out.println(student);
System.out.println(studentGfgDetail);

// Commit the transaction
session.getTransaction().commit();

// close the session
session.close();
We could print the data to the standard output stream or a file, according to our needs. Note that there is no need to save as we aren’t modifying the data, we are simply reading it. Deletion can also be done similarly-
// Get object with id = 1
int id = 1;
Student student = session.get(Student.class, id);

// Delete the student, this will also delete the associated entity
// as we use CascadeType.ALL
session.delete(student);

// Commit the transaction
session.getTransaction().commit();

// close the session
session.close();
Note that the associated StudentGfgDetail entity will also be deleted as we are using CascadeType.ALL
One-to-one bidirectional
Until now the relationship was unidirectional i.e. we could access StudentGfgDetail from the Student entity but not vice-versa, but why would we want to have a bidirectional relationship, and what is the problem with a unidirectional relationship?
Problem:
If we somehow just delete the StudentGfgDetail entity and leave the Student entity as it is then the Student entity will have a foreign key that refers to a non-existing object which introduces the problem of dangling foreign key which is, of course, a bad practice. The option to delete the Student entity when the StudentGfgDetail entity is deleted depends on the design of the database, we might want to keep the Student entity as a record of users who left the community or just delete it. Luckily we can achieve both of the things mentioned above without modifying our database and just with the help of Hibernate, just modify StudentGfgDetail.java-
Java
package com.geeksforgeeks.entity;
import javax.persistence.CascadeType;
import javax.persistence.Column;
import javax.persistence.Entity;
import javax.persistence.GeneratedValue;
import javax.persistence.GenerationType;
import javax.persistence.Id;
import javax.persistence.OneToOne;
import javax.persistence.Table;
@Entity
@Table(name = "student_gfg_detail")
public class StudentGfgDetail {
@Id
@GeneratedValue(strategy = GenerationType.IDENTITY)
@Column(name = "id")
private int id;
@Column(name = "college") private String college;
@Column(name = "no_of_problems_solved")
private int noOfProblemsSolved;
@OneToOne(mappedBy = "studentGfgDetail",
          cascade = CascadeType.ALL)
private Student student;
public StudentGfgDetail() {}
public StudentGfgDetail(String college,
int noOfProblemsSolved)
{
this.college = college;
this.noOfProblemsSolved = noOfProblemsSolved;
}
public int getId() { return id; }
public void setId(int id) { this.id = id; }
public String getCollege() { return college; }
public void setCollege(String college)
{
this.college = college;
}
public int getNoOfProblemsSolved()
{
return noOfProblemsSolved;
}
public void
setNoOfProblemsSolved(int noOfProblemsSolved)
{
this.noOfProblemsSolved = noOfProblemsSolved;
}
public Student getStudent() { return student; }
public void setStudent(Student student)
{
this.student = student;
}
@Override public String toString()
{
return "StudentGfgDetail{"
+ "id=" + id + ", college='" + college + '\''
+ ", noOfProblemsSolved=" + noOfProblemsSolved
+ ", student=" + student + '}';
}
}
|
The only thing we need to cover here is-
@OneToOne(mappedBy = "studentGfgDetail",
cascade = CascadeType.ALL)
private Student student;
Now we don’t have a column referencing to student table in our student_gfg_detail table so what is this piece of code?
This is where Hibernate comes into helping us, mappedBy = “studentGfgDetail” tells Hibernate to look for a field named studentGfgDetail in the Student class and link that particular instance to the current student object. Now that we have understood the linkage let’s try to add an entry into the database, but this time we will save the StudentGfgDetail object explicitly which will implicitly also save the related Student object because of CascadeType.ALL.
Java
package com.geeksforgeeks.application;
import com.geeksforgeeks.entity.Student;
import com.geeksforgeeks.entity.StudentGfgDetail;
import org.hibernate.Session;
import org.hibernate.SessionFactory;
import org.hibernate.cfg.Configuration;
public class AddEntryBidirectionalDemo {
public static void main(String[] args)
{
SessionFactory factory
= new Configuration()
.configure("hibernate.cfg.xml")
.addAnnotatedClass(Student.class)
.addAnnotatedClass(StudentGfgDetail.class)
.buildSessionFactory();
try (factory; Session session
= factory.getCurrentSession()) {
Student student = new Student("JJ", "Olatunji",
"jj@gmail.com");
StudentGfgDetail studentGfgDetail
= new StudentGfgDetail("GFG College", 0);
student.setStudentGfgDetail(studentGfgDetail);
studentGfgDetail.setStudent(student);
session.beginTransaction();
session.save(studentGfgDetail);
session.getTransaction().commit();
System.out.println(
"Transaction Successfully Completed!");
}
catch (Exception e) {
e.printStackTrace();
}
}
}
|
Note that we don’t have any key referencing to the student in the student_gfg_detail table still, we can save it through the StudentGfgDetail object.
Output:
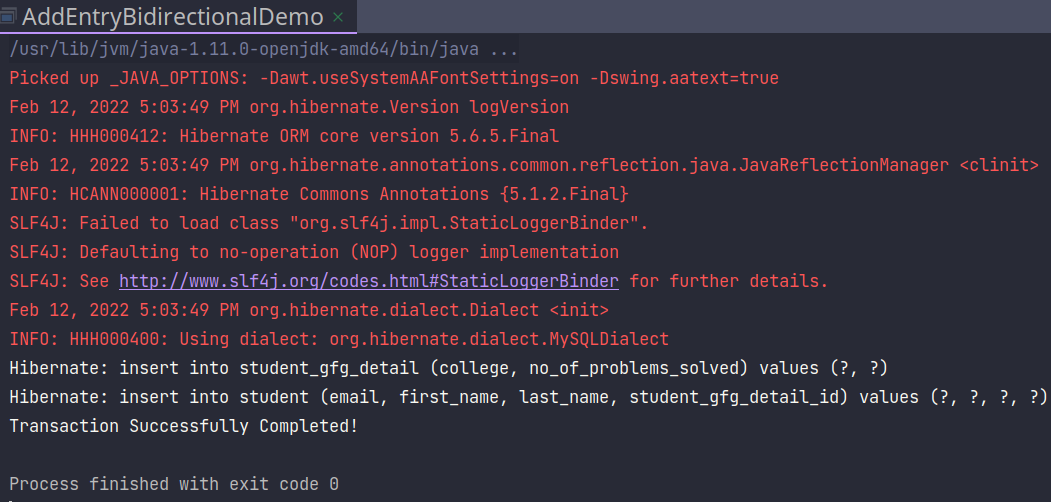
Output
We can see that hibernate did two insertions so we know that both the values have been successfully inserted, now let’s try to read these values by just retrieving the StudentGfgDetail object.
Java
package com.geeksforgeeks.application;
import com.geeksforgeeks.entity.Student;
import com.geeksforgeeks.entity.StudentGfgDetail;
import org.hibernate.Session;
import org.hibernate.SessionFactory;
import org.hibernate.cfg.Configuration;
public class ReadEntryBidirectionalDemo {
public static void main(String[] args)
{
SessionFactory factory
= new Configuration()
.configure("hibernate.cfg.xml")
.addAnnotatedClass(Student.class)
.addAnnotatedClass(StudentGfgDetail.class)
.buildSessionFactory();
try (factory; Session session
= factory.getCurrentSession()) {
session.beginTransaction();
int theId = 5;
StudentGfgDetail studentGfgDetail = session.get(
StudentGfgDetail.class, theId);
System.out.println(
studentGfgDetail.getStudent());
System.out.println(studentGfgDetail);
session.getTransaction().commit();
System.out.println(
"Transaction Successfully Completed!");
}
catch (Exception e) {
e.printStackTrace();
}
}
}
|
As we can see, we just retrieved the StudentGfgDetail object, and that object in turn implicitly retrieved the Student object.
Output:
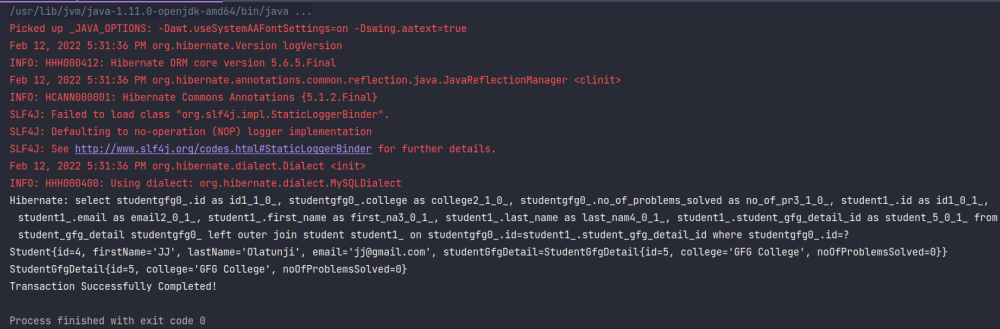
Output
Note: Before retrieving any item from the database, double-check the ID of the Student or StudentGfgDetail as it can vary in different systems due to the number of runs.
We can update and delete the items, in the same manner, we did in unidirectional but beware now updating or deleting any entity will also delete the associated entity!
Share your thoughts in the comments
Please Login to comment...