Spring Security – security none, filters none, access permitAll
Last Updated :
05 Mar, 2024
In Spring Boot, Spring Security is the most powerful authentication and access control framework for Java applications. Spring Security provides strong security features to protect our web applications from various security threats such as authentication, authorization, session management, and web vulnerabilities. It is highly flexible and easy to implement with Spring applications.
Key Terminologies
- Authentication: This is a process of verifying the user’s identity. It collects the credentials of the users and validates them.
- security=”none”: It is used to disable the Spring Security for specific endpoints. When security=”none” is set, it means that no Spring Security measures can be applied to specified resources, and it can effectively allow unrestricted access.
- filters=”none”: It is similar to the security=”none”, but it specifically disables any filters configured by Spring Security for the specified endpoint or resource. Filters in Spring Security are responsible for various security-related tasks such as authentication, authorization, CSRF protection, etc. Setting filters=”none” bypasses all such security filters for the specified resource.
- access=”permitAll”: This attribute is used to explicitly allow access to a specific endpoint or resource for all users, regardless of their authentication or authorization status. It essentially grants unauthenticated (anonymous) users’ permission to access the specified resource.
Project to implement Spring Security permitAll Access
We can develop the simple login management Spring application with the Custom Authentication failure handler mechanism.
Step 1: We can create the spring project including the below dependencies into the project.
Dependencies:
- Spring Web
- Spring Security
- Spring data for MongoDB
- Spring Dev Tools
- Lombok
Once create the spring project with the above dependencies into the project then file structure looks like the below image.

Step 2: Open the application.properties file and put the below code for the database configuration.
server.port=8081
spring.data.mongodb.uri=mongodb://localhost:27017/user-Data
Step 3: Create the new package named as the model and create the java class named as the User.
Go to src > com.gfg.securitynone> model > User and put the below code.
Java
import lombok.AllArgsConstructor;
import lombok.Data;
import lombok.NoArgsConstructor;
import org.springframework.data.annotation.Id;
import org.springframework.data.mongodb.core.mapping.Document;
@Data
@AllArgsConstructor
@NoArgsConstructor
@Document(collection = "users")
public class User {
@Id
private String id;
private String username;
private String password;
}
|
Step 4: Create the new package named as the repository and create the java interface named as the UserRepository.
Go to src > com.gfg.securitynone> repository > UserRepository and put the below code.
Java
import org.springframework.data.mongodb.repository.MongoRepository;
import org.springframework.stereotype.Repository;
@Repository
public interface UserRepository extends MongoRepository<User, String> {
User findByUsername(String username);
}
|
Step 5: Create the new package named as the service and create the java interface named as the UserService.
Go to src > com.gfg.securitynone> service > UserService and put the below code.
Java
import org.springframework.beans.factory.annotation.Autowired;
import org.springframework.stereotype.Service;
@Service
public class UserService {
@Autowired
private UserRepository userRepository;
public User findByUsername(String username) {
return userRepository.findByUsername(username);
}
}
|
Step 6: Create the new package named as the request and create the java class named as the SignRequest.
Go to src > com.gfg.customauthenticationfailure > request > SignRequest and put the below code.
Java
import lombok.AllArgsConstructor;
import lombok.Data;
import lombok.NoArgsConstructor;
@Data
@AllArgsConstructor
@NoArgsConstructor
public class SigninRequest {
String username;
String password;
}
|
Step 7: Create the new package named as the securityconfig and create the java interface named as the SecurityConfig.
Go to src > com.gfg.customauthenticationfailure > securityconfig > SecurityConfig and put the below code.
Java
import org.springframework.context.annotation.Bean;
import org.springframework.context.annotation.Configuration;
import org.springframework.security.config.annotation.web.builders.HttpSecurity;
import org.springframework.security.config.annotation.web.configuration.EnableWebSecurity;
import org.springframework.security.config.http.SessionCreationPolicy;
import org.springframework.security.crypto.bcrypt.BCryptPasswordEncoder;
import org.springframework.security.crypto.password.PasswordEncoder;
import org.springframework.security.web.SecurityFilterChain;
@Configuration
@EnableWebSecurity
public class SecurityConfig {
@Bean
SecurityFilterChain filterChain(HttpSecurity http) throws Exception {
http.sessionManagement(management -> management.sessionCreationPolicy(SessionCreationPolicy.STATELESS))
.authorizeRequests(
authorize -> authorize.requestMatchers("/api/public")
.permitAll().anyRequest().authenticated())
.csrf(csrf -> csrf.disable());
return http.build();
}
@Bean
PasswordEncoder passwordEncoder() {
return new BCryptPasswordEncoder();
}
}
|
Step 8: create the java class named as the UserController.
Go to src > com.gfg.customauthenticationfailure > UserController and put the below code.
Java
import org.springframework.beans.factory.annotation.Autowired;
import org.springframework.http.HttpStatus;
import org.springframework.http.ResponseEntity;
import org.springframework.security.authentication.UsernamePasswordAuthenticationToken;
import org.springframework.security.core.Authentication;
import org.springframework.security.core.context.SecurityContextHolder;
import org.springframework.security.crypto.password.PasswordEncoder;
import org.springframework.web.bind.annotation.*;
@RestController
@RequestMapping("/api")
public class UserController {
@Autowired
private UserRepository userRepository;
@Autowired
private PasswordEncoder passwordEncoder;
@GetMapping("/public")
public String publicEndpoint() {
return "This is a public endpoint accessible to all.";
}
@GetMapping("/restricted")
public String restrictedEndpoint() {
return "This is a restricted endpoint accessible only to authenticated users.";
}
@PostMapping("/signup")
public ResponseEntity<String> signUp(@RequestBody User user) {
try {
user.setPassword(passwordEncoder.encode(user.getPassword()));
userRepository.save(user);
return ResponseEntity.status(HttpStatus.CREATED).body("User registered successfully!");
} catch (Exception e) {
return ResponseEntity.status(HttpStatus.INTERNAL_SERVER_ERROR).body("Failed to register user: " + e.getMessage());
}
}
@Autowired
private UserService userService;
@PostMapping("/signing")
public ResponseEntity<String> signIn(@RequestBody SigninRequest signInRequest) {
try {
User user = userService.findByUsername(signInRequest.getUsername());
if (user != null && user.getPassword().equals(signInRequest.getPassword())) {
Authentication authentication = new UsernamePasswordAuthenticationToken(user.getUsername(), user.getPassword());
SecurityContextHolder.getContext().setAuthentication(authentication);
return ResponseEntity.ok("User authenticated successfully!");
} else {
return ResponseEntity.status(HttpStatus.UNAUTHORIZED).body("Invalid username or password");
}
} catch (Exception e) {
return ResponseEntity.status(HttpStatus.INTERNAL_SERVER_ERROR).body("Error occurred during authentication: " + e.getMessage());
}
}
}
|
Step 9: Open the main class and put the below code.
Java
import org.springframework.boot.SpringApplication;
import org.springframework.boot.autoconfigure.SpringBootApplication;
@SpringBootApplication
public class SecurityNoneApplication {
public static void main(String[] args) {
SpringApplication.run(SecurityNoneApplication.class, args);
}
}
|
pom.xml
XML
<?xml version="1.0" encoding="UTF-8"?>
<modelVersion>4.0.0</modelVersion>
<parent>
<groupId>org.springframework.boot</groupId>
<artifactId>spring-boot-starter-parent</artifactId>
<version>3.2.3</version>
<relativePath/>
</parent>
<groupId>com.gfg</groupId>
<artifactId>SecurityNone</artifactId>
<version>0.0.1-SNAPSHOT</version>
<name>SecurityNone</name>
<description>SecurityNone</description>
<properties>
<java.version>17</java.version>
</properties>
<dependencies>
<dependency>
<groupId>org.springframework.boot</groupId>
<artifactId>spring-boot-starter-data-mongodb</artifactId>
</dependency>
<dependency>
<groupId>org.springframework.boot</groupId>
<artifactId>spring-boot-starter-security</artifactId>
</dependency>
<dependency>
<groupId>org.springframework.boot</groupId>
<artifactId>spring-boot-starter-web</artifactId>
</dependency>
<dependency>
<groupId>org.springframework.boot</groupId>
<artifactId>spring-boot-devtools</artifactId>
<scope>runtime</scope>
<optional>true</optional>
</dependency>
<dependency>
<groupId>org.projectlombok</groupId>
<artifactId>lombok</artifactId>
<optional>true</optional>
</dependency>
<dependency>
<groupId>org.springframework.boot</groupId>
<artifactId>spring-boot-starter-test</artifactId>
<scope>test</scope>
</dependency>
<dependency>
<groupId>org.springframework.security</groupId>
<artifactId>spring-security-test</artifactId>
<scope>test</scope>
</dependency>
</dependencies>
<build>
<plugins>
<plugin>
<groupId>org.springframework.boot</groupId>
<artifactId>spring-boot-maven-plugin</artifactId>
<configuration>
<excludes>
<exclude>
<groupId>org.projectlombok</groupId>
<artifactId>lombok</artifactId>
</exclude>
</excludes>
</configuration>
</plugin>
</plugins>
</build>
</project>
|
Step 10: Once completed the spring project and its run as the spring application then the application runs the port 8081.
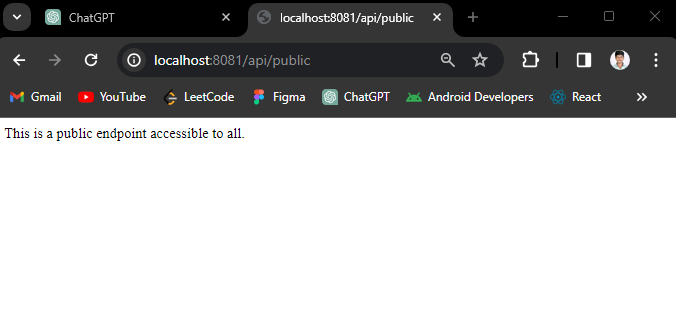
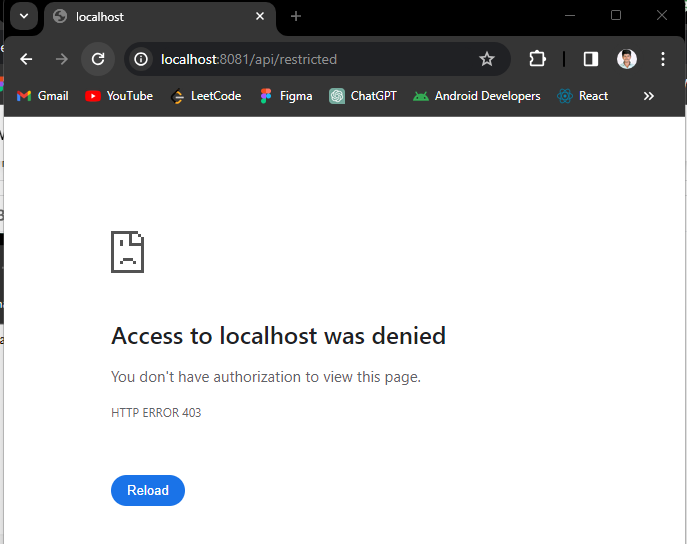
 Output:
GET api/public:
This endpoint is the public access point no need authentication and no filter can be apply of this endpoint.
GET api/restricted endpoint:
Note: This endpoint need authentication to access this endpoint. We have added this api for optional to better understanding of the concept.
If we follow the above the steps, then we can successfully build the public endpoints unrestricted access and filter of the spring security project.
Share your thoughts in the comments
Please Login to comment...