Spring Security – permitAll() Expression with Example
Last Updated :
01 Aug, 2023
In Spring Security, the permitAll() method is used to configure access rules for specific endpoints or resources, allowing unrestricted access to them without requiring authentication or authorization. It is typically used to define public endpoints that should be accessible to all users, including those who are not authenticated. A sample code is given below on how to use this expression.
@Override
protected void configure(HttpSecurity http) throws Exception {
        http
        .authorizeHttpRequests()
        .anyRequest()
        .permitAll()
        .and()
        .httpBasic();
}
The permitAll() method can be used in conjunction with the antMatchers() method to specify the URL patterns or paths to which the rule applies. Here’s an example of how it can be used in a Spring Security configuration:
@Override
protected void configure(HttpSecurity http) throws Exception {
        http.authorizeRequests()
            .antMatchers("/gfg/**").permitAll()
            .anyRequest().authenticated()
            .and()
            .httpBasic();
}
In the example above, the permitAll() method is used with the antMatchers() method to allow unrestricted access to the /gfg endpoint. This means that any user, whether authenticated or not, will be able to access this endpoint without any further authentication or authorization checks. Let’s understand the whole concept by developing a simple Spring MVC application.
Example Project
Step 1: Create Your Project and Configure Apache Tomcat Server
Note: We are going to use Spring Tool Suite 4 IDE for this project. Please refer to this article to install STS in your local machine How to Download and Install Spring Tool Suite (Spring Tools 4 for Eclipse) IDE.
Step 2: Folder Structure
Before moving to the project let’s have a look at the complete project structure for our Spring MVC application.
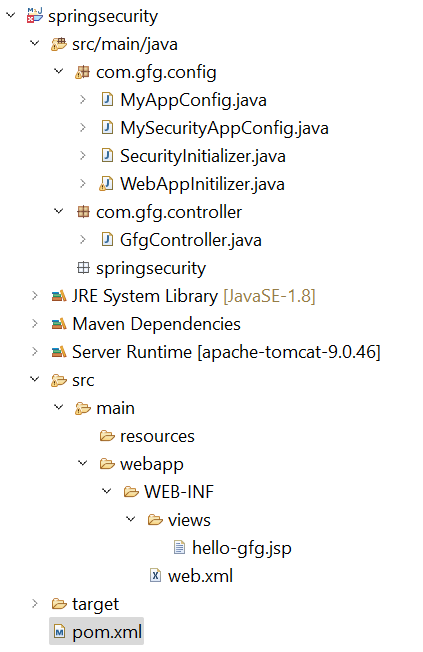
Folder Structure
Step 3: Add Dependencies to pom.xml File
Add the following dependencies to your pom.xml file
- Spring Web MVC
- Java Servlet API
- Spring Security Config
- Spring Security Web
XML
<dependencies>
<dependency>
<groupId>org.springframework</groupId>
<artifactId>spring-webmvc</artifactId>
<version>5.3.24</version>
</dependency>
<dependency>
<groupId>javax.servlet</groupId>
<artifactId>javax.servlet-api</artifactId>
<version>4.0.1</version>
<scope>provided</scope>
</dependency>
<dependency>
<groupId>org.springframework.security</groupId>
<artifactId>spring-security-config</artifactId>
<version>5.7.3</version>
</dependency>
<dependency>
<groupId>org.springframework.security</groupId>
<artifactId>spring-security-web</artifactId>
<version>5.7.3</version>
</dependency>
</dependencies>
|
Below is the complete pom.xml file. Please cross-verify if you have missed some dependencies.
XML
<?xml version="1.0" encoding="UTF-8"?>
<modelVersion>4.0.0</modelVersion>
<groupId>com.gfg.springsecurity</groupId>
<artifactId>springsecurity</artifactId>
<version>0.0.1-SNAPSHOT</version>
<packaging>war</packaging>
<name>springsecurity Maven Webapp</name>
<properties>
<project.build.sourceEncoding>UTF-8</project.build.sourceEncoding>
<maven.compiler.source>1.7</maven.compiler.source>
<maven.compiler.target>1.7</maven.compiler.target>
</properties>
<dependencies>
<dependency>
<groupId>org.springframework</groupId>
<artifactId>spring-webmvc</artifactId>
<version>5.3.24</version>
</dependency>
<dependency>
<groupId>javax.servlet</groupId>
<artifactId>javax.servlet-api</artifactId>
<version>4.0.1</version>
<scope>provided</scope>
</dependency>
<dependency>
<groupId>org.springframework.security</groupId>
<artifactId>spring-security-config</artifactId>
<version>5.7.3</version>
</dependency>
<dependency>
<groupId>org.springframework.security</groupId>
<artifactId>spring-security-web</artifactId>
<version>5.7.3</version>
</dependency>
</dependencies>
<build>
<finalName>springsecurity</finalName>
<pluginManagement>
<plugins>
<plugin>
<artifactId>maven-clean-plugin</artifactId>
<version>3.1.0</version>
</plugin>
<plugin>
<artifactId>maven-resources-plugin</artifactId>
<version>3.0.2</version>
</plugin>
<plugin>
<artifactId>maven-compiler-plugin</artifactId>
<version>3.8.0</version>
</plugin>
<plugin>
<artifactId>maven-surefire-plugin</artifactId>
<version>2.22.1</version>
</plugin>
<plugin>
<artifactId>maven-war-plugin</artifactId>
<version>3.2.2</version>
</plugin>
<plugin>
<artifactId>maven-install-plugin</artifactId>
<version>2.5.2</version>
</plugin>
<plugin>
<artifactId>maven-deploy-plugin</artifactId>
<version>2.8.2</version>
</plugin>
</plugins>
</pluginManagement>
</build>
</project>
|
Step 4: Configuring Dispatcher Servlet
Please refer to this article What is Dispatcher Servlet in Spring? and read more about Dispatcher Servlet which is a very very important concept to understand. Now we are going to configure Dispatcher Servlet with our Spring MVC application.
Go to the src > main > java and create a class WebAppInitilizer. Below is the code for the WebAppInitilizer.java file.
File: WebAppInitilizer.java
Java
package com.gfg.config;
import org.springframework.web.servlet.support.AbstractAnnotationConfigDispatcherServletInitializer;
public class WebAppInitilizer extends
AbstractAnnotationConfigDispatcherServletInitializer {
@Override
protected Class<?>[] getRootConfigClasses() {
return null;
}
@Override
protected Class<?>[] getServletConfigClasses() {
Class[] configFiles = {MyAppConfig.class};
return configFiles;
}
@Override
protected String[] getServletMappings() {
String[] mappings = {"/"};
return mappings;
}
}
|
Create another class in the same location (src > main > java) and name it MyAppConfig. Below is the code for the MyAppConfig.java file.
File: MyAppConfig.java
Java
package com.gfg.config;
import org.springframework.context.annotation.Bean;
import org.springframework.context.annotation.ComponentScan;
import org.springframework.context.annotation.Configuration;
import org.springframework.web.servlet.config.annotation.EnableWebMvc;
import org.springframework.web.servlet.view.InternalResourceViewResolver;
@Configuration
@EnableWebMvc
@ComponentScan("com")
public class MyAppConfig {
}
|
Reference article: Spring – Configure Dispatcher Servlet in Three Different Ways
Step 5: Create Your Spring MVC Controller
Go to the src > main > java and create a class GfgController. Below is the code for the GfgController.java file.
File: GfgController.java
Java
package com.gfg.controller;
import org.springframework.stereotype.Controller;
import org.springframework.web.bind.annotation.GetMapping;
@Controller
public class GfgController {
@GetMapping("/gfg")
public String helloGfg() {
return "hello-gfg";
}
}
|
Reference article: Create and Run Your First Spring MVC Controller in Eclipse/Spring Tool Suite
Step 6: Create Your Spring MVC View
Go to the src > main > webapp > WEB-INF > right-click > New > Folder and name the folder as views. Then views > right-click > New > JSP File and name your first view. Here we have named it as hello-gfg.jsp file. Below is the code for the hello-gfg.jsp file. We have created a simple web page inside that file.
File: hello-gfg.jsp
HTML
<!DOCTYPE html>
<html>
<body bgcolor="green">
<h1>Hello GeeksforGeeks!</h1>
</body>
</html>
|
Reference article: How to Create Your First View in Spring MVC?
Step 7: Setting Up ViewResolver in Spring MVC
Go to the src > main > java > MyAppConfig and set your ViewResolver like this
File: MyAppConfig.java
Java
package com.gfg.config;
import org.springframework.context.annotation.Bean;
import org.springframework.context.annotation.ComponentScan;
import org.springframework.context.annotation.Configuration;
import org.springframework.web.servlet.config.annotation.EnableWebMvc;
import org.springframework.web.servlet.view.InternalResourceViewResolver;
@Configuration
@EnableWebMvc
@ComponentScan("com")
public class MyAppConfig {
@Bean
InternalResourceViewResolver viewResolver() {
InternalResourceViewResolver viewResolver = new InternalResourceViewResolver();
viewResolver.setPrefix("/WEB-INF/views/");
viewResolver.setSuffix(".jsp");
return viewResolver;
}
}
|
Reference article: ViewResolver in Spring MVC
Step 8: Setting Up Spring Security Filter Chain
Go to the src > main > java and create a class MySecurityAppConfig and annotate the class with @EnableWebSecurity annotation. This class will help to create the spring security filter chain. Below is the code for the MySecurityAppConfig.java file.
File: MySecurityAppConfig.java
Java
package com.gfg.config;
import org.springframework.security.config.annotation.web.configuration.EnableWebSecurity;
@EnableWebSecurity
public class MySecurityAppConfig extends WebSecurityConfigurerAdapter {
}
|
Step 9: Create Spring Security Initilizer
Go to the src > main > java and create a class SecurityInitializer. This class will help to register the spring security filter chain with our application. Below is the code for the SecurityInitializer.java file.
File: SecurityInitializer.java
Java
package com.gfg.config;
import org.springframework.security.web.context.AbstractSecurityWebApplicationInitializer;
public class SecurityInitializer extends AbstractSecurityWebApplicationInitializer {
}
|
Now we are done with setting up our Spring Security Filter Chain.
Step 10: Create Users and Password Encoder
Modify the MyAppConfig file. Here we are going to create the PasswordEncoder Bean.
File: MyAppConfig.java
Java
package com.gfg.config;
import org.springframework.context.annotation.Bean;
import org.springframework.context.annotation.ComponentScan;
import org.springframework.context.annotation.Configuration;
import org.springframework.security.crypto.bcrypt.BCryptPasswordEncoder;
import org.springframework.security.crypto.password.PasswordEncoder;
import org.springframework.web.servlet.config.annotation.EnableWebMvc;
import org.springframework.web.servlet.view.InternalResourceViewResolver;
@Configuration
@EnableWebMvc
@ComponentScan("com")
public class MyAppConfig {
@Bean
InternalResourceViewResolver viewResolver() {
InternalResourceViewResolver viewResolver = new InternalResourceViewResolver();
viewResolver.setPrefix("/WEB-INF/views/");
viewResolver.setSuffix(".jsp");
return viewResolver;
}
@Bean
PasswordEncoder getPasswordEncoder() {
return new BCryptPasswordEncoder();
}
}
|
Modify the MySecurityAppConfig file. Here we are going to create the User, and we are going to provide the password in Bcrypt format. And we are also going to provide the roles to the user.
Note: We are going to use Spring Security In-Memory Authentication. Please refer to this article for more detail.
File: MySecurityAppConfig.java
Java
package com.gfg.config;
import org.springframework.beans.factory.annotation.Autowired;
import org.springframework.security.config.annotation.authentication.builders.AuthenticationManagerBuilder;
import org.springframework.security.config.annotation.web.configuration.EnableWebSecurity;
import org.springframework.security.config.annotation.web.configuration.WebSecurityConfigurerAdapter;
import org.springframework.security.crypto.password.PasswordEncoder;
@SuppressWarnings("deprecation")
@EnableWebSecurity
public class MySecurityAppConfig extends WebSecurityConfigurerAdapter {
@Autowired
private PasswordEncoder passwordEncoder;
@Override
protected void configure(AuthenticationManagerBuilder auth) throws Exception {
auth.inMemoryAuthentication()
.withUser("gfg")
.password(passwordEncoder.encode("gfg123"))
.roles("admin");
}
}
|
Step 11: Configuring Basic Authentication and Implement permitAll() Expression
Modify the MySecurityAppConfig file. Here we are going to configure basic authentication by overriding the configure() method.
File: MySecurityAppConfig.java
Java
package com.gfg.config;
import org.springframework.beans.factory.annotation.Autowired;
import org.springframework.security.config.annotation.authentication.builders.AuthenticationManagerBuilder;
import org.springframework.security.config.annotation.web.builders.HttpSecurity;
import org.springframework.security.config.annotation.web.configuration.EnableWebSecurity;
import org.springframework.security.config.annotation.web.configuration.WebSecurityConfigurerAdapter;
import org.springframework.security.crypto.password.PasswordEncoder;
@SuppressWarnings("deprecation")
@EnableWebSecurity
public class MySecurityAppConfig extends WebSecurityConfigurerAdapter {
@Autowired
private PasswordEncoder passwordEncoder;
@Override
protected void configure(AuthenticationManagerBuilder auth) throws Exception {
auth.inMemoryAuthentication()
.withUser("gfg")
.password(passwordEncoder.encode("gfg123"))
.roles("admin");
}
@Override
protected void configure(HttpSecurity http) throws Exception {
http
.authorizeHttpRequests()
.anyRequest()
.permitAll()
.and()
.httpBasic();
}
}
|
Now, let’s run the application and test it out.
Step 12: Run Your Spring MVC Application
To run our Spring MVC Application right-click on your project > Run As > Run on Server. After that use the following URL to run your controller.
http://localhost:8080/springsecurity/gfg
And you will get an output like this without any authentication page.

Share your thoughts in the comments
Please Login to comment...