Authentication and Authorization in Spring Boot 3.0 with Spring Security
Last Updated :
28 Mar, 2024
In Spring Security 5.7.0, the spring team deprecated the WebSecurityConfigurerAdapter, as they encourage users to move towards a component-based security configuration. Spring Boot 3.0 has come with many changes in Spring Security. So in this article, we will understand how to perform spring security authentication and authorization using spring boot 3.0.
Demo Project
Step 1: Create a New Spring Boot Project in Spring Initializr
To create a new Spring Boot project, please refer to How to Create a Spring Boot Project in Spring Initializr and Run it in IntelliJ IDEA. For this project choose the following things
- Project: Maven
- Language: Java
- Packaging: Jar
- Java: 17
Please choose the following dependencies while creating the project.
- Spring Web
- Spring Security
Below is the complete pom.xml file. Please cross-verify if you have missed some dependencies
XML
<?xml version="1.0" encoding="UTF-8"?>
<modelVersion>4.0.0</modelVersion>
<parent>
<groupId>org.springframework.boot</groupId>
<artifactId>spring-boot-starter-parent</artifactId>
<version>3.1.2</version>
<relativePath/>
</parent>
<groupId>com.example</groupId>
<artifactId>demo</artifactId>
<version>0.0.1-SNAPSHOT</version>
<name>demo</name>
<description>Demo project for Spring Boot</description>
<properties>
<java.version>17</java.version>
</properties>
<dependencies>
<dependency>
<groupId>org.springframework.boot</groupId>
<artifactId>spring-boot-starter-security</artifactId>
</dependency>
<dependency>
<groupId>org.springframework.boot</groupId>
<artifactId>spring-boot-starter-web</artifactId>
</dependency>
<dependency>
<groupId>org.springframework.boot</groupId>
<artifactId>spring-boot-starter-test</artifactId>
<scope>test</scope>
</dependency>
<dependency>
<groupId>org.springframework.security</groupId>
<artifactId>spring-security-test</artifactId>
<scope>test</scope>
</dependency>
</dependencies>
<build>
<plugins>
<plugin>
<groupId>org.springframework.boot</groupId>
<artifactId>spring-boot-maven-plugin</artifactId>
</plugin>
</plugins>
</build>
</project>
|
Step 2: Create a UserController
Go to the src > main > java > controller and create a class UserController and put the below code. In this, we have created a simple REST API in our controller class.
Java
import org.springframework.security.access.prepost.PreAuthorize;
import org.springframework.web.bind.annotation.GetMapping;
import org.springframework.web.bind.annotation.RequestMapping;
import org.springframework.web.bind.annotation.RestController;
@RestController
@RequestMapping("/auth")
public class UserController {
@GetMapping("/welcome")
public String welcome() {
return "Welcome this endpoint is not secure";
}
@GetMapping("/user/userProfile")
@PreAuthorize("hasAuthority('ROLE_USER')")
public String userProfile() {
return "Welcome to User Profile";
}
@GetMapping("/admin/adminProfile")
@PreAuthorize("hasAuthority('ROLE_ADMIN')")
public String adminProfile() {
return "Welcome to Admin Profile";
}
}
|
Step 3: Create a SecurityConfig Class
Go to the src > main > java > config and create a class SecurityConfig and put the below code. This is the new changes brought in Spring Boot 3.0.
Java
import org.springframework.context.annotation.Bean;
import org.springframework.context.annotation.Configuration;
import org.springframework.security.config.annotation.method.configuration.EnableMethodSecurity;
import org.springframework.security.config.annotation.web.builders.HttpSecurity;
import org.springframework.security.config.annotation.web.configuration.EnableWebSecurity;
import org.springframework.security.core.userdetails.User;
import org.springframework.security.core.userdetails.UserDetails;
import org.springframework.security.core.userdetails.UserDetailsService;
import org.springframework.security.crypto.bcrypt.BCryptPasswordEncoder;
import org.springframework.security.crypto.password.PasswordEncoder;
import org.springframework.security.provisioning.InMemoryUserDetailsManager;
import org.springframework.security.web.SecurityFilterChain;
@Configuration
@EnableWebSecurity
@EnableMethodSecurity
public class SecurityConfig {
@Bean
public UserDetailsService userDetailsService(PasswordEncoder encoder) {
UserDetails admin = User.withUsername("Amiya")
.password(encoder.encode("123"))
.roles("ADMIN", "USER")
.build();
UserDetails user = User.withUsername("Ejaz")
.password(encoder.encode("123"))
.roles("USER")
.build();
return new InMemoryUserDetailsManager(admin, user);
}
@Bean
public SecurityFilterChain securityFilterChain(HttpSecurity http) throws Exception {
return http.csrf().disable()
.authorizeHttpRequests()
.requestMatchers("/auth/welcome").permitAll()
.and()
.authorizeHttpRequests().requestMatchers("/auth/user/**").authenticated()
.and()
.authorizeHttpRequests().requestMatchers("/auth/admin/**").authenticated()
.and().formLogin()
.and().build();
}
@Bean
public PasswordEncoder passwordEncoder() {
return new BCryptPasswordEncoder();
}
}
|
Test the Application
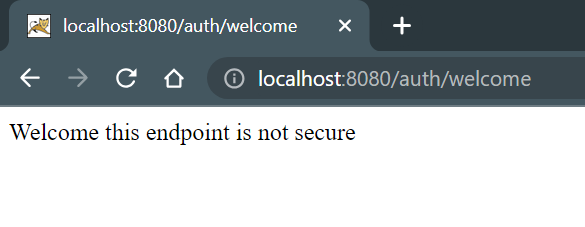
Now run your application and test it out. Hit the following URL
http://localhost:8080/auth/welcome
You can access this endpoint without any authentication as it is not secured.
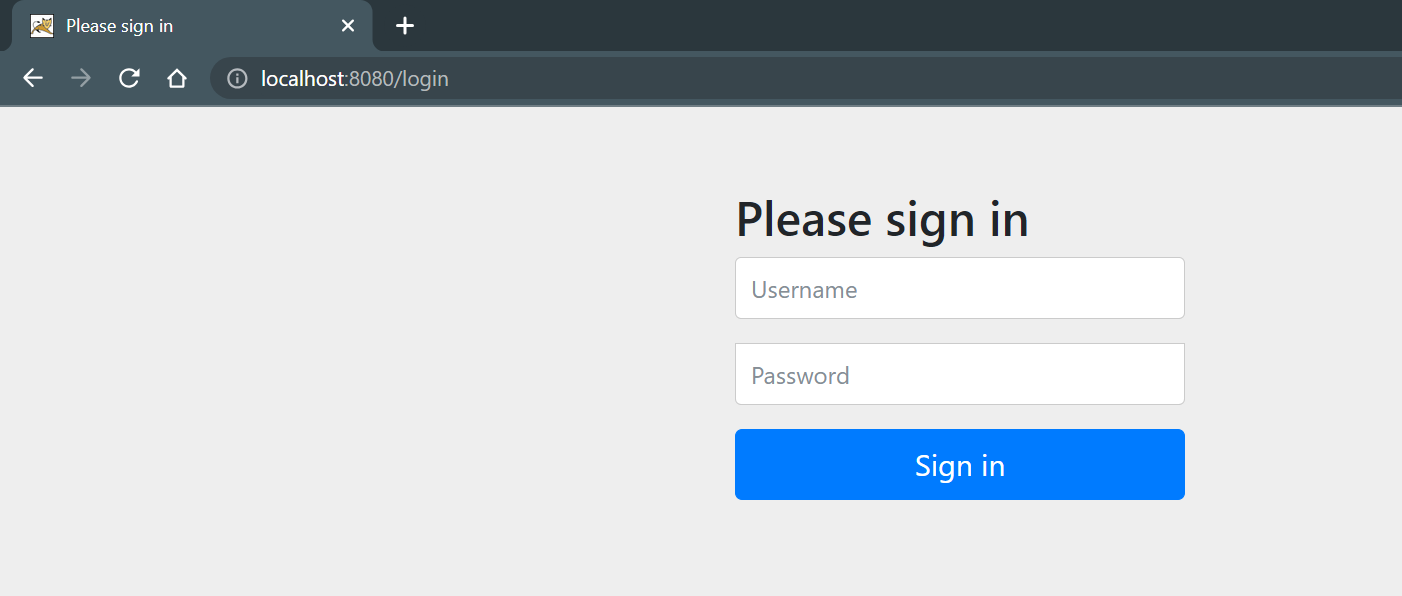
Now, hit the following URL
http://localhost:8080/auth/user/userProfile
And you will be redirected to this URL
http://localhost:8080/login
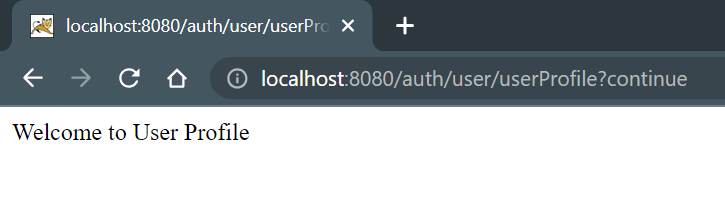
After putting the correct Username and Password you can access your endpoint. Put this Username and Password
- Username: Ejaz
- Password: 123
And you will get the output screen like this
Similarly, you can hit and try other Users and play with it.
Share your thoughts in the comments
Please Login to comment...