Python Falcon – Websocket
Last Updated :
19 Mar, 2024
Websockets provide a powerful mechanism for establishing bidirectional communication between a client and a server over a single, long-lived connection. Python Falcon, a lightweight and fast web framework, offers support for implementing websockets, enabling real-time communication between clients and servers.
What is a Websocket?
WebSocket is a protocol that provides full-duplex communication channels over a single TCP connection. It’s commonly used for real-time web applications such as chat applications, online gaming, and live updates. Falcon is a high-performance Python web framework for building RESTful APIs. While Falcon itself doesn’t have built-in WebSocket support, you can integrate WebSocket functionality into a Falcon application using libraries such as websocket-server or websockets.
Python Falcon – Websocket
Below is the step-by-step procedure to understand about websocket in Python Falcon:
Step 1: Installation
Here, we will install the following libraries and modules before starting:
- Install Python Falcon
- Install Python
Step 2: Setting Up the Environment
Before diving into the implementation, make sure you have the necessary dependencies installed. You’ll need falcon, falcon-asgi, jinja2, and uvicorn. You can install them via pip:
pip install falcon falcon-asgi jinja2 uvicorn
Step 3: Implementing WebSocket Chat in Falcon
In this example, we define an HTML template for the chat interface with the title “GeeksforGeeks Chat” and a light green background color. The chat container is centered on the page using flexbox CSS. We implement a Falcon resource called ChatResource. The on_get method serves the HTML template, while the on_websocket method handles WebSocket connections. The WebSocket handler accepts incoming connections and echoes any received messages back to the client.
Python3
import uvicorn
import falcon
import falcon.asgi
import jinja2

html = """
<!DOCTYPE html>
<html>
   <head>
      <title>GeeksforGeeks Chat</title>
      <style>
         body {
            background-color: #f0f8ea;
            display: flex;
            justify-content: center;
            align-items: center;
            height: 100vh;
            margin: 0;
         }
         #chat-container {
            width: 400px;
            padding: 20px;
            background-color: #ffffff;
            border-radius: 10px;
            box-shadow: 0 0 10px rgba(0, 0, 0, 0.1);
         }
      </style>
   </head>
   <body>
      <div id="chat-container">
         <h1>GeeksforGeeks Chat</h1>
         <ul id='messages'></ul>
         <form action="" onsubmit="sendMessage(event)">
            <input type="text" id="messageText" autocomplete="off"/>
            <button>Send</button>
         </form>
      </div>
      <script>
         var ws = new WebSocket("ws://localhost:8000/chat");
         ws.onmessage = function(event) {
            var messages = document.getElementById('messages');
            var message = document.createElement('li');
            var content = document.createTextNode(event.data);
            message.appendChild(content);
            messages.appendChild(message);
         };
         function sendMessage(event) {
            var input = document.getElementById("messageText");
            ws.send(input.value);
            input.value = '';
            event.preventDefault();
         }
      </script>
   </body>
</html>
"""


class ChatResource:
    async def on_get(self, req, resp):
        """Handles GET requests"""
        resp.status = falcon.HTTP_200
        resp.content_type = 'text/html'
        template = jinja2.Template(html)
        resp.body = template.render()

    async def on_websocket(self, req, websocket):
        await websocket.accept()
        while True:
            data = await websocket.receive_text()
            await websocket.send_text(f"Message: {data}")


app = falcon.asgi.App()
chat = ChatResource()
app.add_route('/chat', chat)


if __name__ == "__main__":
    uvicorn.run("app:app", host="0.0.0.0", port=8000, reload=True)
Step 4: Running the Application
To run the Falcon application with WebSocket chat support, execute the script:
python app.py
This will start the Falcon application using the Uvicorn server, which supports ASGI and WebSocket protocols. You can then access the WebSocket chat interface by navigating to http://localhost:8000/chat in your web browser.
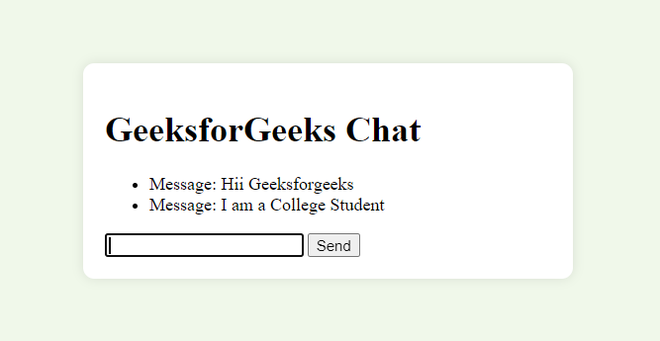
Output:
Share your thoughts in the comments
Please Login to comment...