Python Falcon – Environment Setup
Last Updated :
08 Dec, 2023
Falcon is a Python library renowned for its proficiency in crafting indispensable REST APIs and microservices. Capable of accommodating both the WSGI (Web Server Gateway Interface) and ASGI (Asynchronous Server Gateway Interface) standards, Falcon has gained widespread recognition since its inception. Originally conceived by Kurt Griffiths in January 2013, the framework has consistently evolved to meet the demands of the modern development landscape. As of March 2022, Falcon’s most recent version, 3.1.0, stands as a testament to its commitment to innovation and improvement.
What sets Falcon apart is its inherent lightweight design, allowing developers to embrace a highly flexible and customizable approach. By providing a minimalist foundation, Falcon empowers developers to make judicious decisions regarding their preferred strategies and the integration of third-party packages.
Python Falcon – Environment Setup
We use a module named virtualenv which is a tool to create isolated Python virtual environments. virtualenv creates a folder that contains all the necessary executables to use the packages that a Python project would need.
Step 1: Install Falcon
The latest version of Falcon requires at least Python 3.5. To install Falcon, we recommend using the PIP installer. You can do this by executing the following command:
pip3 install falcon
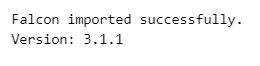
After installation, you can verify it as follows:
Python3
import falcon
print("Falcon imported successfully.\nVersion:", falcon.__version__)
|
Output:
Since its early versions, Falcon has adhered to the WSGI (Web Server Gateway Interface) standard for running web applications in Python. A Falcon application can be launched using the built-in WSGI server included in Python’s standard library module, wsgiref. However, it’s important to note that this server may not be suitable for production environments where more robust and performant options like Gunicorn, Waitress, or uWSGI are recommended.
Step 2: For basic Testing and Learning
When you’re initially exploring Falcon, you can make use of the built-in server that comes bundled with Python (wsgiref). It’s user-friendly for learning purposes, although it’s not recommended for heavy-duty, real-world applications.
Step 3: For windows users
If you’re using Windows and require a server suitable for both learning and practical use, you can install a server called “Waitress.” To acquire Waitress, execute the following command
pip3 install waitress
Output:

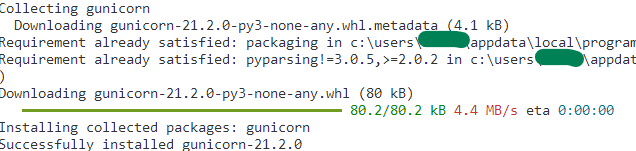
Step 3.1 : For Linux, WSL, or Docker
For users on Linux, Windows Subsystem for Linux (WSL), or Docker environments, a popular choice is “Gunicorn.” While it’s not directly installable on Windows, you can use it in these environments. To install Gunicorn, use the following command:
pip3 install gunicorn
Output:
Step 4: For Asynchronous Applications
If you’re developing a Falcon application with asynchronous capabilities (allowing it to handle multiple tasks simultaneously), you’ll require a different kind of server. “Uvicorn” is an excellent choice, compatible with both Windows and Linux. To install Uvicorn, use the command:
pip3 install uvicorn
Output

So, your choice of server depends on your operating system and whether your Falcon application is synchronous or asynchronous, ensuring it runs smoothly and efficiently.
Share your thoughts in the comments
Please Login to comment...