How To Use WebSocket With FastAPI
Last Updated :
04 Nov, 2023
In this article, we will see what a WebSocket is, why we need Websocket, and how Websocket can be used to make real-time applications. We will see HTTP requests getting upgraded to web socket and how it will allow the server to send data to the client without the client having to send multiple HTTP requests again and again.
What is Websocket?
Websocket is a full duplex communication protocol, which means both the client and server can send data to each other. Previously when the user has to receive a web page he make an HTTP request to the server and the server then responds with the given page. The HTTP is a request response-based method where the client sends a request to the servers and the server then responds back. In this architecture, the client has to continuously send requests to the server to get the latest information. For application that needs real-time, bidirectional communication between the client and the server Websocket is used. It allows the server to send data without needing the client to send requests.
How Do Websocket Work?
To establish a Websocket connection a handshake needs to be done between the client and server. The client first sends an HTTP 1.1 request to the server with an additional header of upgrade with value of “websocket” asking the server to upgrade the current http connection to a Websocket connection. If the server is configured to handle Websocket request it will response back with status line “HTTP/1.1 101 Switching protocols” meaning the server is switching to Websocket protocol. It also respond with header Upgrade whose value is set to Websocket.
After the handshake is done now both the client and server can send data to each other at the same time. The connection can be closed either by the client or the server and the resources used for the connection will be released.
Setting Up FastAPI for WebSocket Communication
We are going to create a simple application which first opens the Websocket connection with the server and the server then sends message to the client every second. FastAPI provides WebSocket class which allows to work with the wesocket connections created in your application. It provides set of methods that can be used for sending and receiving messages from the client.
Installing Websocket
First you need to install WebSocket’s using the below command :
pip install websockets
For defining the Websocket endpoint in your fastAPI application you can use the below code :
@app.websocket(“/ws”)
async def websocket_endpoint(websocket: WebSocket):
Above we defined a “/ws” Websocket endpoint in our application. The decorator function takes in an argument of type WebSocket which can be used to handle Websocket connections.
Example
Create a folder named gfg_websockets and copy paste the below code :
In this code we used jinja templates for sending the HTML response to the client. We defined the “/” endpoint which will return the index.html file. We then defined the “/ws” endpoint which will open the Websocket connection between the client and the server. The decorator function for the endpoint takes the WebSocket instance. We then accepted connections to the server using the accept() method.
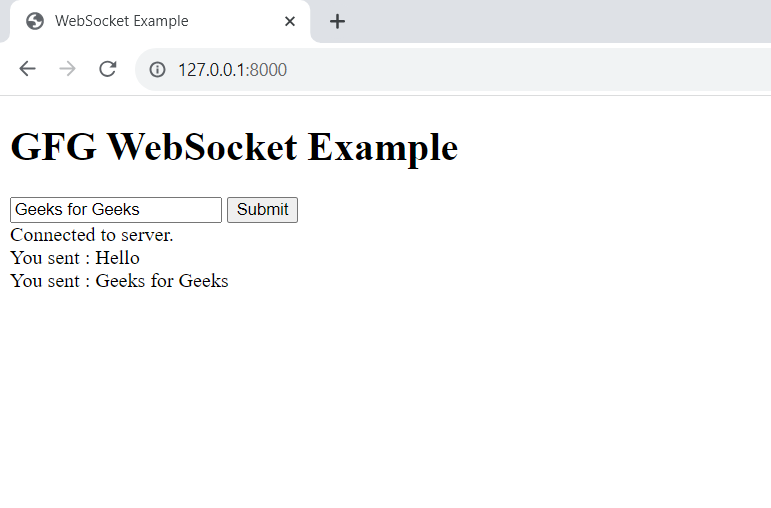
After accepting the connection request the server then waits for the client to send some data, the client can send data using the input box provided and then clicking on submit button. The server receives the data from the Websocket connection and then sends back the data to the client from the same connection.
Python3
import time
from fastapi.templating import Jinja2Templates
from fastapi.responses import HTMLResponse
from fastapi import FastAPI, WebSocket, Request
app = FastAPI()
templates = Jinja2Templates(directory="templates")
@app.get("/", response_class=HTMLResponse)
def read_index(request: Request):
return templates.TemplateResponse("index.html", {"request" : request})
@app.websocket("/ws")
async def websocket_endpoint(websocket: WebSocket):
await websocket.accept()
while True:
data = await websocket.receive_text()
await websocket.send_text(data)
|
index.html: This HTML page is used to view the messages send by the client to the server.
HTML
<!DOCTYPE html>
<html lang="en">
<head>
<meta charset="UTF-8">
<meta name="viewport" content="width=device-width, initial-scale=1.0">
<title>WebSocket Example</title>
</head>
<body>
<h1>GFG WebSocket Example</h1>
<input type="text" id="inputText" placeholder="Type something...">
<button id="submitButton">Submit</button>
<div id="container"></div>
<script>
// Create a WebSocket connection to the server
// Function to display messages on the web page
function showMessage(message) {
const messageContainer = document.getElementById('container');
const messageElement = document.createElement('div');
messageElement.textContent = message;
messageContainer.appendChild(messageElement);
}
// Event handler for when the connection is established
socket.addEventListener('open', (event) => {
showMessage('Connected to server.');
});
// Event handler for receiving messages from the server
socket.onmessage = (event) => {
showMessage("You sent : " + event.data)
}
// Event handler for when the connection is closed
socket.addEventListener('close', (event) => {
showMessage('Connection closed.');
});
const inputText = document.getElementById("inputText");
const submitButton = document.getElementById("submitButton");
submitButton.addEventListener("click", function() {
const inputValue = inputText.value;
socket.send(inputValue)
});
</script>
</body>
</html>
|
Deployment of the Project
When the server receives the index.html file it run the javascript code which first make a Websocket connection with the server.
const socket = new WebSocket('ws://127.0.0.1:8000/ws');
It then uses this socket to send and receive messages from the server. To run the fastAPI server using uvicorn copy the below command and paste it in terminal :
python -m uvicorn app:app --reload
After running the above command the server should be up and running at http://127/0.0.0.1:8000. At the end the directory structure should look like this :
Server :
.jpg)
Client :
Share your thoughts in the comments
Please Login to comment...