Who wouldn’t like to have cool wallpapers for their laptop to look cool? Windows Operating System has always provided its users with a generous amount of customization in every aspect. However, the wallpaper customization is limited in the Windows Operating System. Fortunately, there are a few third-party applications available on the internet that will help you customize the wallpapers to the fullest. Want to enhance your customization further? You can also download Rainmeter Skins for even more personalized desktop experiences.

In this article, we will be discussing one such application called “Rainmeter” which is most popular among the others. Whether you’re new to customization or an experienced user, rainmeter install can transform your desktop experience.
How to Install Rainmeter Skins in Windows
What is Rainmeter Skins?
Rainmeter is a free third-party application that allows Windows users to display customizable wallpapers/Skins on their desktops that can display various widgets on the screen like clock, network, weather, audio players, and process usage, and countless skins are also available for free. Individuals mostly use Rainmeter for aesthetics and quick access to information in the form of widgets.
How to Install Rainmeter Skins from the Internet?
After installing Rainmeter Skins and setting up the Rainmeter on your desktop, go to the browser and visit visualskins.com, deviantart.com, or the rainmeterhub.com sites to download different skins.
For example, let’s download a skin from deviantart.com.
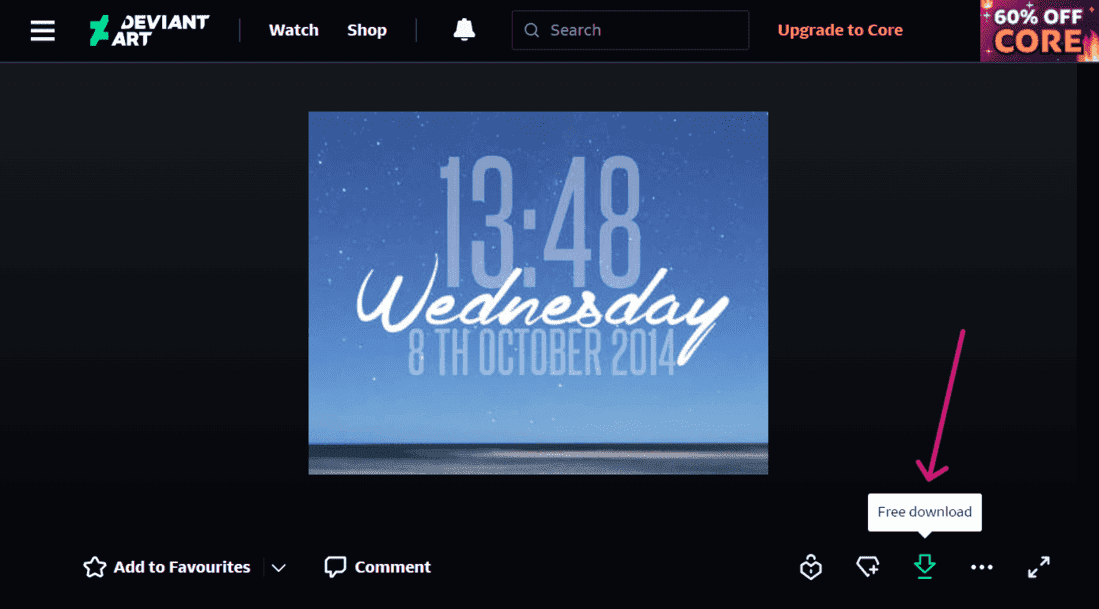
After choosing the desired skin, click on the download option and wait for it to download. Now go to the Downloads Section/Folder in My Computer or This PC to find the downloaded one. The Skin download process is the same for both methods discussed above. Additionally, you can explore various customization options by downloading Rainmeter Skins to personalize your desktop further.
Before installing Rainmeter skins, check if Rainmeter is already installed on your system. Visit the rainmeter.net site to install Rainmeter on your computer if you haven’t installed it yet. Now follow the instructions discussed below. Note that to update the Rainmeter, one doesn’t have to uninstall the existing copy on the Computer, as the rainmeter skins and plugins that were previously installed by the user will be preserved.
There are several methods to install a Rainmeter Skin. There are two standard general methods to install rainmeter skins on Windows, they are:
1. Automatic Installation of Skins
2. Manual Installation of Skins
Method 1: Automatic Installation of Skins
If the downloaded skin is a ‘.rmskin’ format, double-click that file to install the skin. The skins in this format can be installed with Rainmeter Skin Installer. A dialogue box would appear at the time of installation that lists all the components that will be installed as shown below:
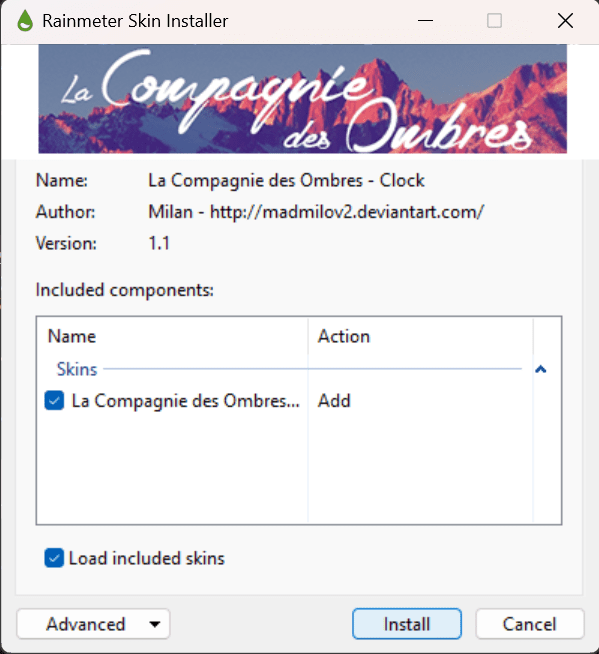
The dialogue box would contain the following components:
- Skins: Shows the information of the skin that will be installed.
- Layouts: If there is a layout added to the package by the author, it will be directly installed in the Layouts folder of Rainmeter.
- Plugins: If there are any custom plugins added to the package by the author, they will be directly installed in the Plugins folder of Rainmeter.
- Fonts: If there are font files added to the package by the author, they will be directly installed in the Fonts folder of Windows. This setting can be changed in the Advanced drop-down menu.
- Addons: If there are addon executable files added to the package by the author, they will be directly installed in the Addons folder of Rainmeter.
Note: These components will be visible only if the author adds them while creating a ‘.rmskin’ file. Also if the user tries installing the existing skins, then such skins will be directly sent to the Backup folder of Rainmeter. By clicking install, the installation will be completed.
Method 2: Manual Installation of Skins
The latest version of Rainmeter is 4.5, however, the rainmeter skins before version 1.3 were supposed to be extracted manually to the folders as they came in ZIP formats. Later on, as the new versions were released, this issue was resolved. However, if anyone wants to use the skins that come in a ZIP file, they can use the 7-Zip software as it can handle almost all archive types. There would be a “readme.txt”, which is a text file that contains all the necessary instructions that a user must know.
Adjusting the Skin Appearances
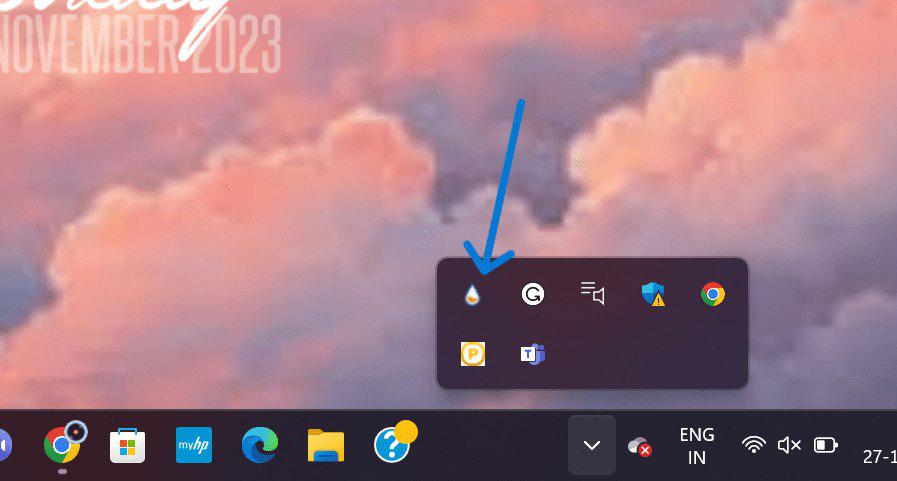
After the installation is completed, go to the taskbar, click on the upward arrow key icon, and click on the rainmeter icon, as shown in the image below:
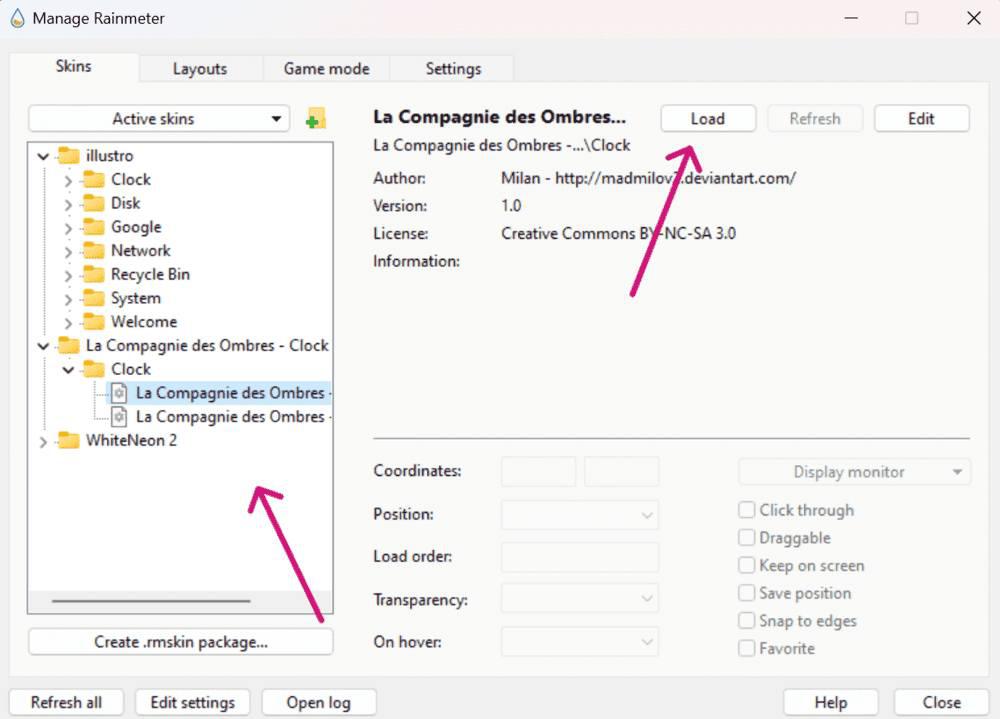
A manage rainmeter dialogue box would appear where one can customize the skin accordingly by loading or unloading the .ini files inside the folders found on the left side panel of the dialogue box as shown below:
After setting the desired appearance, select Refresh All. The changes will now be applied to the skins. The setup is complete now.
Fix Rainmeter Skins Installation Challanges
Using Rainmeter to set up various customizable skins is fun but what if there is trouble installing them? Here are some of the common challenges faced when installing Rainmeter skins that can be examined:
1. Rainmeter doesn’t start
There are cases where Rainmeter doesn’t start or open. In those situations, go to the official website rainmeter.net and download the latest version.
2. Random Crashes
Rainmeter could encounter random crashes and this might be due to the incompatibility of the device.
If the rainmeter keeps on crashing, try to turn off the skins in use for a while. To do this right-click on the skin, and select Manage Skin. In the Manage Rainmeter click on Unload for all the skins that are in use as shown below:
3. Rainmeter Freezes
If the software has bugs, hardware issues, or corrupted files, this can lead to the freezing of the Rainmeter. If your rainmeter freezes, follow the steps discussed below to resolve it.
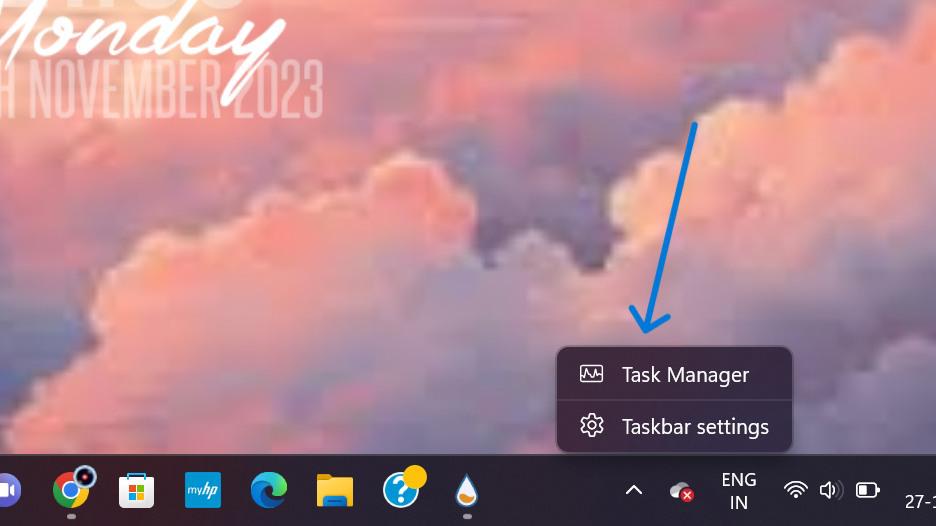
Step 1: Right-click on the taskbar to open Task Manager.
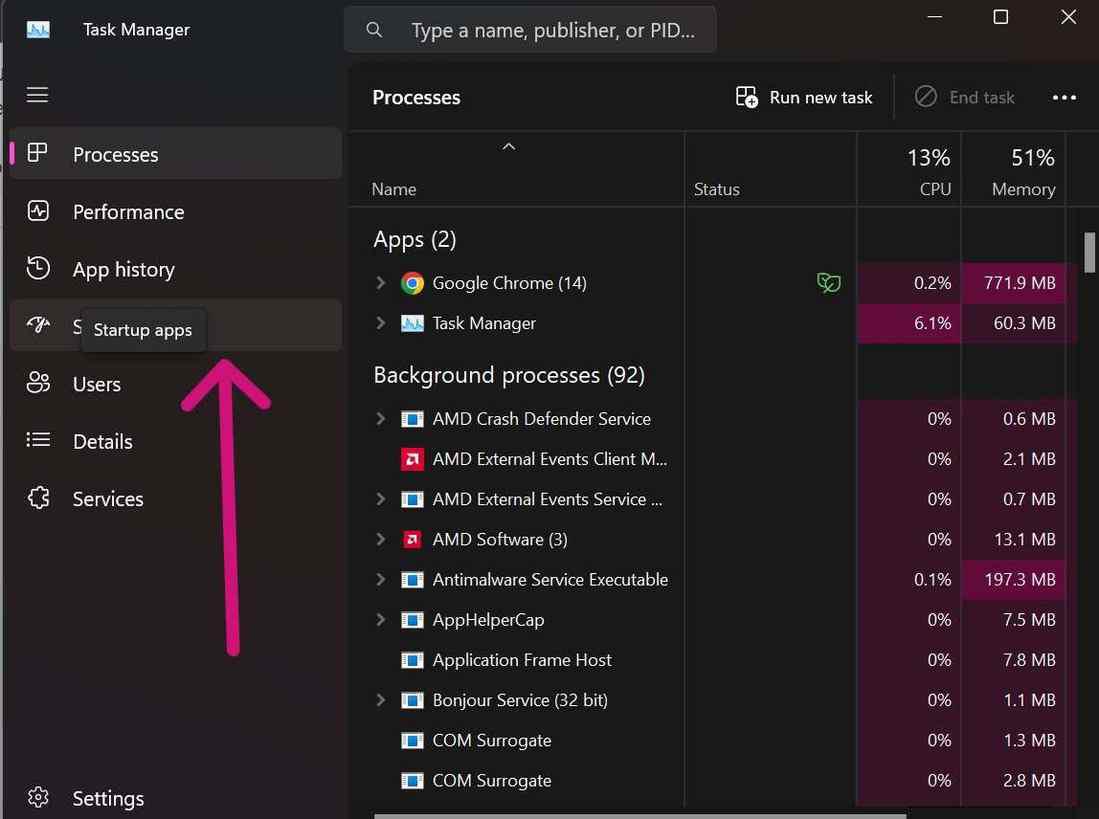
Step 2: Open Startup apps from the panel.
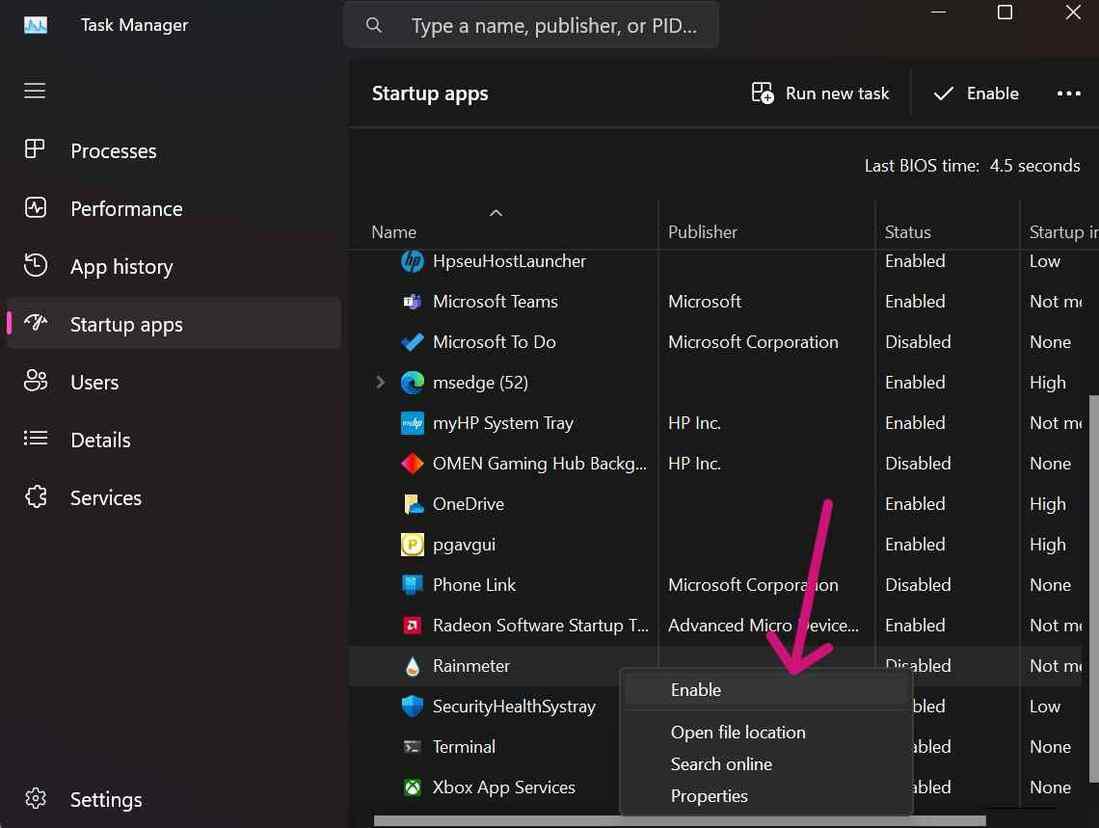
Step 3: Right-click on Rainmeter and Enable from the options.
Conclusion
In conclusion, Rainmeter is a cool application to use that provides good aesthetics to the user’s desktop. Its functional elements and visuals help in creating an exclusive desktop experience by providing personalization. Overall, it is a highly popular application compared to the other applications in its community. To further enhance your desktop customization, don’t forget to download rainmeter skins for a wide range of visual options.
How to Install Rainmeter Skins in Windows? – FAQs
Can we use Rainmeter on MacOS?
Nope, one can not use Rainmeter for MacOS as it is specifically designed for Windows Systems. However, Mac users can use alternatives like MacOS style widget pack, GeekTool, and Ubersicht.
What are the advantages of using Rainmeter?
There are several advantages of using rainmeter:
- Beautiful desktop gimmicks
- Desktop Personalization
- Lightweight on system
What are a few disadvantages of using Rainmeter?
Though there are numerous advantages of using Rainmeter, there are also cons, which are:
- Buggy skins may cause stability problems
- As a third-party application, there may be some security concerns
- Using feature-rich skins may eat up RAM
Do we need to know coding to use this tool?
Using Rainmeter doesn’t require coding. However, if you want to create skins then coding might become a requirement. If you are not a programmer, do not worry as there are countless skins already available on the internet.
Where are Rainmeter skins installed?
Rainmeter skins are usually in: C:\Users\YourUsername\Documents\Rainmeter\Skins
Share your thoughts in the comments
Please Login to comment...