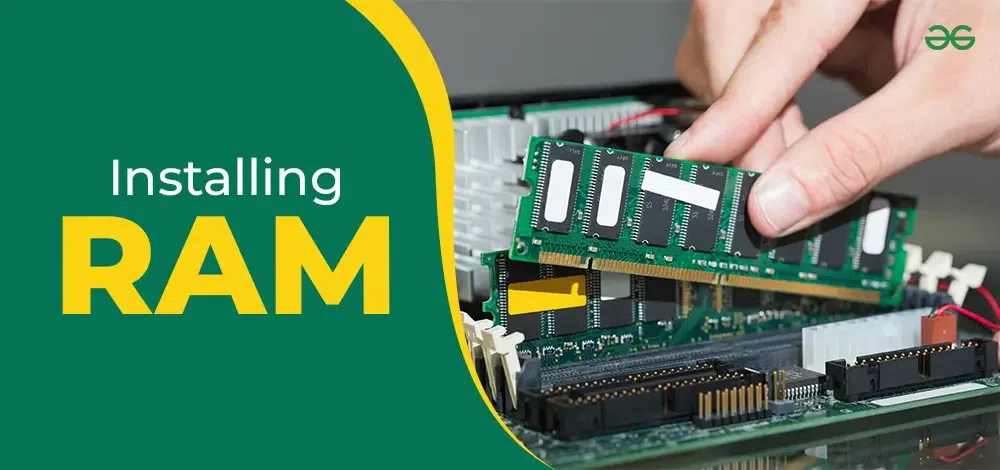
Sometimes, the device starts working slowly or a new software that is installed in the device is not working properly. So, there may be some problem present in the RAM. Installing RAM can be a solution for that. So, in this article, we will discuss how to upgrade the memory(RAM) of your PC or laptop.
Learn how to boost your computer’s speed by installing RAM in your PC or laptop with this guide. Upgrade your system for better performance
Random Access Memory (RAM) is the key element in computers or laptops that helps to increase computer speed when necessary. Multiple data lines like 8-bit, 16-bit, 32-bit, and 64-bit are present in RAM which helps to improve the speed of the device. lets first know Why should you UpGrade my RAM?
Why should you UpGrade my RAM?
- Improved Performance: Upgrading your RAM can boost system speed, allowing for faster multitasking, smoother application performance, and quicker data access.
- Software Compitiblity: Increasing RAM can help your computer handle newer software and OS updates, extending its usability.
- Cost-Effective: RAM upgrades are often more affordable than purchasing a new computer.
- Enhanced Productivity: Better RAM capacity enables efficient work and creativity.
- Gaming Experience: Upgraded RAM supports high-quality gaming with minimal lag.
How to upgrade RAM : Quick Overview
- Check Compatibility: Ensure the RAM module matches your computer’s specifications.
- Shut Down & Unplug: Turn off your computer and disconnect the power source.
- Ground Yourself: Prevent static discharge by touching a grounded object.
- Open the Case: Access your computer’s RAM slots.
- Remove Old RAM (if any): Carefully release the latches and pull out old modules.
- Insert New RAM: Align the notches, gently push it in until it clicks.
- Close the Case: Secure the computer’s case and plug it back in.
- Power On & Test: Start your computer and verify the new RAM is recognized.
Things To Remember Before RAM Installation
1. Choosing Right RAM:
- Check your motherboard’s manual or online for RAM compatibility.
- Find out the type and generation of RAM your motherboard supports (e.g., DDR3, DDR4).
- Consider how much RAM you need (8-16GB for basic tasks, more for gaming or heavy work).
- Make sure the RAM speed matches your motherboard.
2. Check The Device Capability:
- Not all devices can get more RAM, especially laptops.
- Some laptops use SSD cards instead of adding RAM.
- Check online to see if your device can get more RAM.
3. Be Cautions For RAM:
Inserting or removing RAM isn’t too hard, but you should be careful of:
- Hold the RAM on its two corners, avoid touching other parts.
- Don’t touch the golden part; fingerprints can cause issues.
- Keep RAM clean for it to work correctly. Be cautious.
4. Danger From Static Electricity:
Static electricity can be a big problem during installation, Mistakes can damage computer parts and give you a shock. After disconnecting power, static electricity stays, To avoid this, touch the metal cabinet or use an ESD wrist strap.
Installing RAM on Your Computer
After getting all the general information & disclaimer, we will move for the installation process. First, we will do the insertion in one computer & later in iMac & Laptop.
How To Install RAM On Desktop?
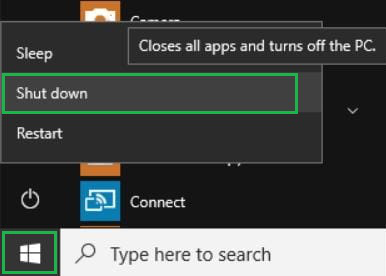
Step 1: At first, Shut Down the computer by moving to the Start Menu. And then, click on the Shut Down option to close all the programs.
Step 2: Switch Off the power connection & remove all the connections from the plug point. Now, press the Power Button to present there for at least 5 seconds. It will remove the remaining electricity from the device.

Step 3: Now, open the cabinet using a screwdriver & place it on the ground. It will also help to ground yourself. Touch any metal unpaired body, like the CPU Cabinet Body. The place is marked in the image below. And Try to locate the RAM slot.

Step 4: In the RAM slot, you will find some of the Clips. Pressing the clips will open the RAM from the motherboard. Now, you can easily insert or remove RAM from the slot. At last, again press the clip to close the slot.
.png)
Hence, we have successfully inserted RAM on the desktop.
How To Install RAM On iMac?
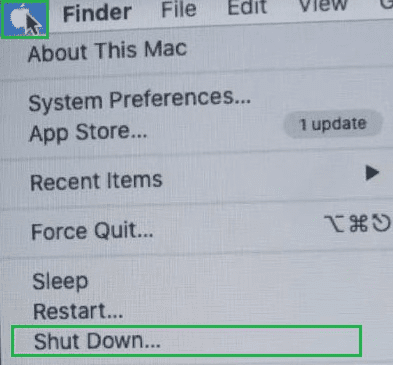
Step 1: In the home screen, click on the Apple Icon to get the option to Shut Down. Click on it to completely close all the applications. Now, wait for a minimum of 10 minutes to cool down the inner components present there.
Step 2: Remove the power cable from the device & you will find a Small Button present below it. Press the button with a finger or screwdriver to open the Memory Access Door.

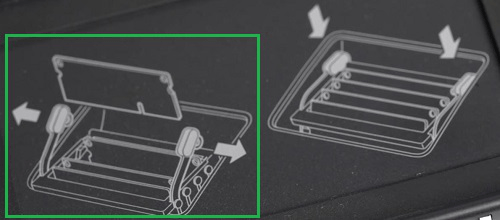
Step 3: After opening the Memory Access Door, you will find the instruction to open the RAM slot in the device. The instruction tells us to first pull the knobs in the opposite direction along with pulling towards the upper side means towards your side.
Step 4: After opening the RAM slot, it will be easy to remove or add any RAM there. There is no clip present that should be removed to add any RAM. After adding RAM, press the Memory Acess Door into the space & it will fix there.

Hence, we have successfully inserted RAM on the iMac.
How To Install RAM On Laptop?
Step 1: In this case also, the device Shut Down will be the first priority. Let all the applications completely close down. And wait for a few minutes to Cool Down the inner components, because in a laptop the space to reduce heat is very less.

Step 2: Remove all the power connections from the device along with the battery connection. Now, press the Power Button for a while to remove the additional electrical charge present there. it will reduce to get any electrical shock.
Step 3: Open the backside of the laptop & find out the RAM slot. There is also no such clip concept present in the RAM slot. In the RAM slot, first place the RAM in the tilted position & hold it in a soft hand. The RAM is now inserted.
.png)
Step 4: Now, press the RAM softly into the lower direction. There are some hands present on the sides of the RAM slot. While pressing, they will activate & hold the RAM in the RAM slot.
.png)
Hence, we have successfully inserted RAM on the laptop.
Check if your RAM upgrade or not
To check if your RAM upgrade upgrade or not:
- On Windows, open Task Manager (Ctrl + Shift + Esc) and see if total RAM has increased.
- On a Mac, go to “About This Mac” and check the “Memory” tab for the new RAM amount.
- Run challenging tasks to ensure improved performance, like gaming or multitasking.
If it’s smoother, its means your RAM is upgrade Successfully.
Above are some simple steps that are needed for inserting the RAM into the devices. The thing is to remember here about static electricity. Otherwise, the process is not that much of difficult. Now, insertion of the RAM can be done by yourself also without paying any single penny to any technician.
FAQs to install RAM in your PC or Laptop
1. How much RAM your PC need?
- For basic tasks like browsing and office work, 8-16GB RAM is enough.
- Gamers and creators need 16GB or more for smooth performance.
- Consider your budget and future needs.
- Check your motherboard’s compatibility for the right type and speed.
- Choose a reputable brand within your budget.
2. How can I check my current RAM?
To check your current RAM follow the Quick Steps:
- On Windows, press “Ctrl + Shift + Esc” to open Task Manager. Click “Performance” and find “Memory” to see your RAM size and usage.
- On a Mac, click the Apple logo, choose “About This Mac,” and check the “Memory” tab for RAM details.
- On Linux, open a terminal and use the “free” or “htop” command to view RAM information.
3. How much RAM your motherboard can handle?
To know how much RAM your motherboard can handle:
- Check the motherboard’s manual or website for specifications.
- Look for details on the maximum RAM capacity and supported RAM types (e.g., DDR3, DDR4).
- Motherboards typically support 8GB, 16GB, 32GB, or more, depending on the model.
- Ensure your RAM upgrade stays within these limits.
4. Should I also upgrade my laptop with an SSD?
Upgrading your laptop with an SSD can significantly improve its performance:
- Faster boot and application loading times.
- Smoother multitasking.
- Extended laptop lifespan.
- Lower power consumption.
Consider budget and existing specs to decide if an SSD upgrade is worth it for your needs
Share your thoughts in the comments
Please Login to comment...