How to Implement Radio Button In React Native ?
Last Updated :
08 Sep, 2023
In this article, we will learn to implement Radio Button in React Native. A radio button signifies a graphical user interface element enabling individuals to make an exclusive selection among multiple alternatives.
React Native is a popular platform for creating native mobile apps for iOS and Android using a single codebase. To use it, configure the development setup, install Node.js, and use Expo CLI. This versatile framework accelerates app development, allowing developers to create immersive, high-performing applications.
Prerequisites:
Steps to Create React Native Application:
Step 1: Create React Native Application With Expo CLI
Create a new React Native project for RadioButtonApp.
npx create-expo-app RadioButtonApp
Step 2: Change the directory to the project folder:
cd RadioButtonApp
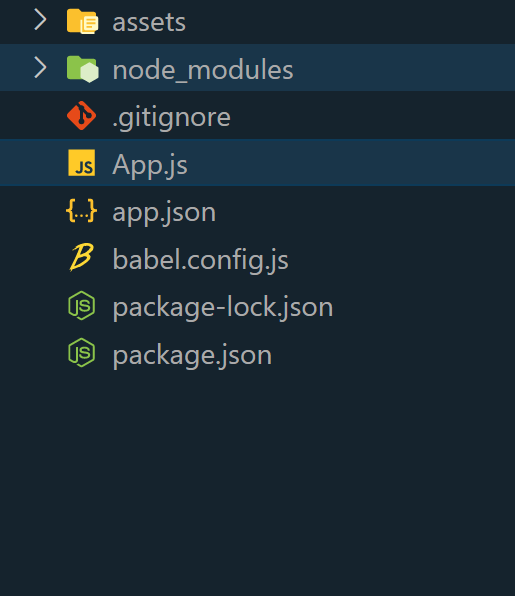
Project Structure:
Step 3: Install Required Packages:
Install necessary packages for radio button implementation.
npm install react-native-paper
Example 1: In this example, we are going to use the React Native Paper library to create the radio button in react native.
Javascript
import React, { useState } from 'react';
import { View, Text, StyleSheet } from 'react-native';
import { RadioButton } from 'react-native-paper';
const styles = StyleSheet.create({
container: {
flex: 1,
backgroundColor: '#F5F5F5',
justifyContent: 'center',
alignItems: 'center',
},
radioGroup: {
flexDirection: 'row',
alignItems: 'center',
justifyContent: 'space-around',
marginTop: 20,
borderRadius: 8,
backgroundColor: 'white',
padding: 16,
elevation: 4,
shadowColor: '#000',
shadowOffset: {
width: 0,
height: 2,
},
shadowOpacity: 0.25,
shadowRadius: 3.84,
},
radioButton: {
flexDirection: 'row',
alignItems: 'center',
},
radioLabel: {
marginLeft: 8,
fontSize: 16,
color: '#333',
},
});
const App = () => {
const [selectedValue, setSelectedValue] = useState('option1');
return (
<View style={styles.container}>
<View style={styles.radioGroup}>
<View style={styles.radioButton}>
<RadioButton.Android
value="option1"
status={selectedValue === 'option1' ?
'checked' : 'unchecked'}
onPress={() => setSelectedValue('option1')}
color="#007BFF"
/>
<Text style={styles.radioLabel}>
ReactJS
</Text>
</View>
<View style={styles.radioButton}>
<RadioButton.Android
value="option2"
status={selectedValue === 'option2' ?
'checked' : 'unchecked'}
onPress={() => setSelectedValue('option2')}
color="#007BFF"
/>
<Text style={styles.radioLabel}>
NextJs
</Text>
</View>
<View style={styles.radioButton}>
<RadioButton.Android
value="option3"
status={selectedValue === 'option3' ?
'checked' : 'unchecked'}
onPress={() => setSelectedValue('option3')}
color="#007BFF"
/>
<Text style={styles.radioLabel}>
React Native
</Text>
</View>
</View>
</View>
);
};
export default App;
|
Step 4: To run the React native application, open the command prompt or terminal and enter the command listed below.
npx expo start
To run on Android:
npx react-native run-android
To run on Ios:
npx react-native run-ios
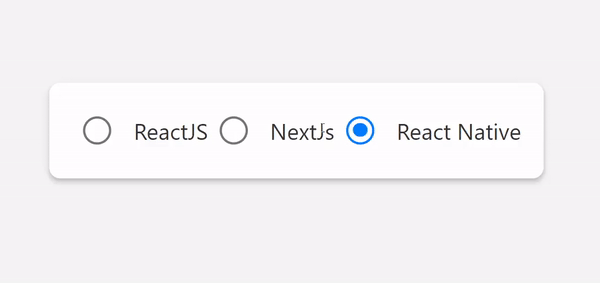
Output:
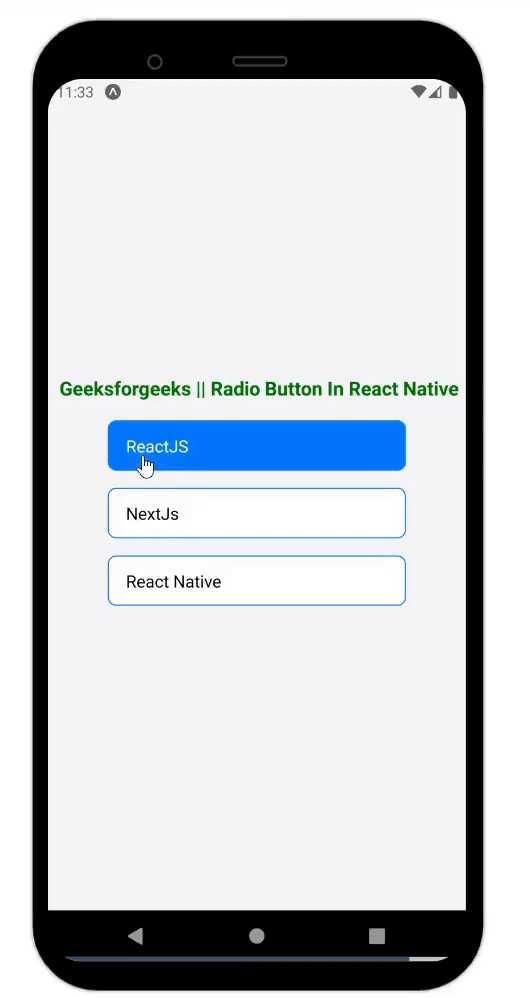
Example 2: Upon selection of an option, the background color changes to a vibrant blue while ensuring optimal text contrast for improved visibility.
Javascript
import React, { useState } from 'react';
import {
View, Text, TouchableOpacity,
StyleSheet
} from 'react-native';
const CustomRadioButton = ({ label, selected, onSelect }) => (
<TouchableOpacity
style={[styles.radioButton,
{ backgroundColor: selected ? '#007BFF' : '#FFF' }]}
onPress={onSelect}
>
<Text style={[styles.radioButtonText,
{ color: selected ? '#FFF' : '#000' }]}>
{label}
</Text>
</TouchableOpacity>
);
const styles = StyleSheet.create({
container: {
flex: 1,
justifyContent: 'center',
alignItems: 'center',
backgroundColor: '#F5F5F5',
},
radioButton: {
paddingVertical: 12,
paddingHorizontal: 16,
borderRadius: 8,
marginVertical: 8,
borderWidth: 1,
borderColor: '#007BFF',
flexDirection: 'row',
alignItems: 'center',
justifyContent: 'space-between',
width: 280,
},
radioButtonText: {
fontSize: 16,
},
});
const App = () => {
const [selectedValue, setSelectedValue] = useState(null);
return (
<View style={styles.container}>
<CustomRadioButton
label="ReactJS"
selected={selectedValue === 'option1'}
onSelect={() => setSelectedValue('option1')}
/>
<CustomRadioButton
label="NextJs"
selected={selectedValue === 'option2'}
onSelect={() => setSelectedValue('option2')}
/>
<CustomRadioButton
label="React Native"
selected={selectedValue === 'option3'}
onSelect={() => setSelectedValue('option3')}
/>
</View>
);
};
export default App;
|
Output:
Share your thoughts in the comments
Please Login to comment...