How To Clear DNS Cache on Android Device?
Last Updated :
24 Nov, 2023
In this digital era, everyone would have experienced error 404 webpages not found, or many other website glitches. All this happens because of a reason – Not Clearing the DNS Cache. So, flushing DNS Cache should be a daily maintenance task, as it is not only recommended but also a good practice that maintains the optimal performance of the device.
Now, before we can discuss on how to clear the DNS cache, let us understand the basics.
What is DNS?
Domain Name System (DNS), also called the “Phonebook of the Internet”, is a crucial element of the Internet as it can translate readable Domain names into IP addresses. In general, domain Names are mapped to their corresponding IP addresses in the Server hosted by the respective websites.
What is DNS Cache?
The DNS Cache is a temporary storage where the recent searches of the DNS are stored in the Operating System. Whenever we search for an address on the Internet, the browser’s OS stores that IP address temporarily in the DNS Cache as Resource Records(RR).
Importance of Clearing the DNS Cache?
There are some beneficial reasons to clear and erase the DNS Cache on Android devices regularly:
- Resolves Connection Problems: Cache is like a temporary storage where it stores the locations of websites. Sometimes these locations may be outdated. In this case, clearing the DNS Cache helps a lot.
- Keeps the DNS Information Updated: There are scenarios where the websites change their locations and these can be easily relocated by clearing the DNS Cache.
- Enhances Privacy and Security: Improves online privacy when the DNS Cache is regularly cleared which will prevent viewing the websites you visited recently.
- Helps in Troubleshooting Network Issues.
- Adaptable to New Changes: Using a new or different DNS Server can clear the DNS Cache and make use of new settings and this shows its adaptability to new changes.
How to Clear DNS Cache on Android Device?
There are 3 effective methods to clear and erase DNS cache on Android Devices, these methods work for almost all the android devices ranging from Samsung, One Plus, Redmi, Xiomi etc. You can choose the method that works effectively for your device. So lets get into each methods in detail.
Method 1: Clear DNS Cache using Chrome Browser
Step 1: To clear DNS cache using Chrome Browser, navigate to Chrome on your android device. Now, type the following in Chrome’s search bar as shown below:
chrome://net-internals/#DNS
.jpeg)
Step 2: This will open up a window with multiple options. Select the DNS option as shown below:
.jpeg)
Step 3: Now, click on the Clear Host Cache option on the right-hand panel to clear the DNS Cache.
.jpeg)
This would clear your DNS cache.
Method 2: Clear DNS Cache through Settings
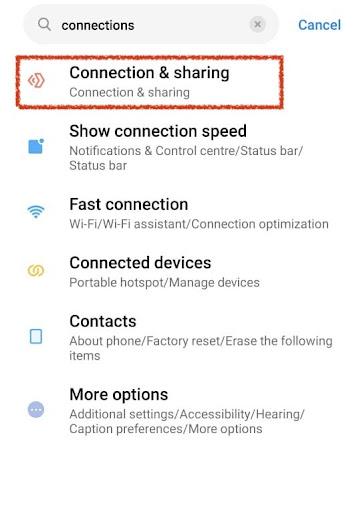
Step 1: To clear or erase the DNS Cache through settings, navigate to Android Settings App and search for Connections option and click on it as shown below:
Step 2: Now, a window with multiple options would be opened. Click on Private DNS option.
.jpeg)
Step 3: Select Private DNS Provider Hostname. If there is any domain name saved, clear the domain name and click on Save as shown in the image below:
.jpeg)
This would clear or erase the DNS cache.
Method 3: Change Wi-Fi Network to Static
Step 1: To clear the DNS Cache by changing the Wi-Fi Network to Static, navigate to device Settings and search for Connections option. Now, click on the Settings icon next to the Wi-Fi network to which the device is currently connected as shown below:
.jpeg)
Step 2: Wi-fi settings window would open up. Now, click on IP Settings as shown below:
.jpeg)
Step 3: Now, IP settings window would open up. Click on View More dropdown button. Now, change it to Static option as shown below:
.jpeg)
By doing this, DNS cache would be cleared.
Note: To carry out this method, it is necessary to be connected on a Wi-Fi network.
So, here comes your turn to clear DNS Cache from your Android Devices. You can also change your DNS server on Android for that you can check out Best DNS server for your Android.
Conclusion
In this digitalized world of the Internet, efficiency is one of the key factors that highly impact our online experiences. The higher the efficiency of the device, the better the online experience. Flushing DNS Cache should be a daily maintenance task, as it is not only recommended but also a good practice that maintains the optimal performance of the device.
Also Read
FAQs to Clear DNS Cache on Android Device
1. Why should I clear the DNS Cache on my Android?
Clearing the DNS cache is not just any technical action but a practice that ensures a good online experience. Always keep ur DNS cache clear to keep your device’s optimized performance and for a smooth internet experience. Clearing the DNS cache helps you resolve connectivity problems that you are facing while browsing the internet.
2. I cleared the DNS Cache but I am still facing internet connection issues. How do I resolve it?
Even after flushing the DNS Cache if you are facing the same internet connection issues, try to restart your device or try to verify your DNS Settings. If this doesn’t work then contact your Internet Service Provider.
3. Does clearing the DNS Cache have an affect on personal data or Settings?
No, clearing the DNS cache would have NO affect on personal data or device settings. It doesn’t have any impact on your personal data as it only clears your temporary DNS records or history related to your DNS Queries.
4. Can I erase the DNS cache without using third-party apps?
Yes, one can clear DNS cache without using third-party apps. Navigate to device settings and click on Private DNS. You can simply search for Private DNS on the search bar and erase the domain name in Private DNS Provider Hostname option if any. This would erase DNS cache.
Share your thoughts in the comments
Please Login to comment...