How to add nested object to existing JSON using Postman ?
Last Updated :
27 Mar, 2024
Postman has become a critical tool for developers around the world, particularly when dealing with JSON data. This article will guide you through the process of adding nested objects to an existing JSON using Postman, with a focus on the approaches and syntax involved.
Understanding JSON and Nested Objects:
JSON (JavaScript Object Notation) is a popular data exchange format, thanks to its simplicity and readability. It is often used when data is sent from a server to a web page. A nested object in JSON means an object within an object. It is an effective way to associate related data.
{
  "person": {
    "name": "John Doe",
    "age": 30,
    "address": {
      "street": "123 Main St",
      "city": "Anytown",
      "country": "USA"
    }
  }
}
In the above example, person is an object, and address is a nested object within person.
The Role of Postman:
Postman is a versatile tool used for API testing. It allows developers to send HTTP requests and view responses, making it an ideal tool for dealing with JSON data. Postman can handle both flat and nested JSON structures, although manipulating nested JSON objects requires a slightly different approach, which we will explore in this guide.
Approach 1: Using JSON.parse and JSON.stringify
- One of the simplest methods involves using JSON.parse to convert your JSON string into a JavaScript object. You can then modify the object as needed, and convert it back to a JSON string using JSON.stringify.
- This approach is straightforward but can become complex if you have deeply nested objects.
JavaScript
var jsonData = pm.response.json();
jsonData.newNestedObject = {"key1": "value1", "key2": "value2"};
pm.environment.set("updatedBody", JSON.stringify(jsonData));
Approach 2: Direct Assignment
- Another approach involves directly assigning new properties to an existing JSON object. This approach is more suitable for simple, shallowly nested objects.
- This approach is simple and easy to understand, but it can become verbose with more complex objects.
JavaScript
var jsonData = pm.response.json();
jsonData.newNestedObject = {};
jsonData.newNestedObject.key1 = "value1";
jsonData.newNestedObject.key2 = "value2";
Approach 3: Using a Pre-Request Script
- If you want to manipulate the JSON object before sending the request, you can use a pre-request script. This script will run before the request is sent, allowing you to modify the JSON object.
- This approach provides more control over the request, but it requires a good understanding of JavaScript and Postman scripting.
JavaScript
var requestBody = JSON.parse(pm.environment.get("body"));
if (requestBody.info.product !== null) {
    requestBody.info.product = null;
} else {
    var jsonObject = JSON.parse(requestBody);
    jsonObject.product.push({ productId: "123" });
    pm.environment.set("updatedBody", JSON.stringify(requestBody));
}
Creating an Application to Test JSON Manipulation
- To apply these approaches, let’s create a simple Node.js application. We will use this application to send HTTP requests and manipulate JSON data.
Step 1: Install Required Modules
Start by installing the required Node.js modules. You will need express for handling HTTP requests and body-parser for parsing JSON data. Install these modules using the following commands:
npm install express
npm install body-parser
Step 2: Update Dependencies in Package.json
After installing the necessary modules, make sure to update your package.json file to reflect these dependencies:
"dependencies": {
  "express": "^4.17.1",
  "body-parser": "^1.19.0"
}
Step 3: Create the Application
Next, create a new file named app.js and add the following code:
JavaScript
const express = require("express");
const bodyParser = require("body-parser");

const app = express();
app.use(bodyParser.json());

app.post("/test", function (req, res) {
    console.log(req.body);
    res.send("Received");
});

app.listen(3000, function () {
    console.log("Example app listening on port 3000!");
});
Step 4: Test the Application with Postman
Now that the application is ready, you can use Postman to send a POST request to http://localhost:3000/test. Include a JSON body with a nested object and see how the application logs the body of the request.
Steps to Convert Nested Objects to JSON in Postman:
Create a new Request in Postman:
- Open Postman.
- Click on the “New” button in the top left corner.
-660.png)
Enter the Requested URL:
- In the request field, enter the URL where you want to send the request. This URL should point to an endpoint that accepts JSON data.
-660.png)
Select Body:
- Below the request URL, select the “Body” tab.
-660.png)
Choose JSON Format:
- Within the “Body” tab, select the “raw” option from the available formats dropdown menu, and then choose “JSON”.
-660.png)
Enter JSON payload:
- In the text area provided, input the JSON payload data you want to include in the request body.
-660.png)
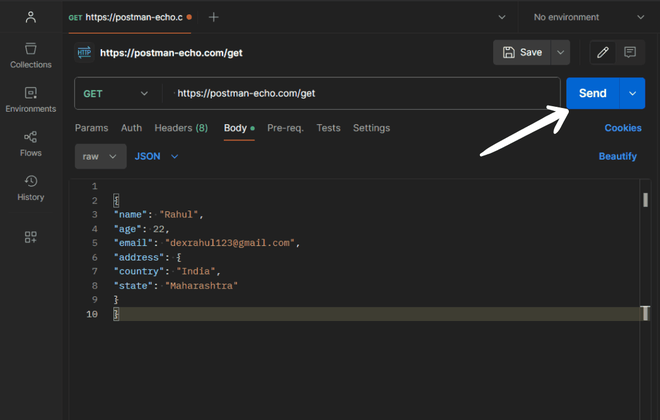
Send the Request:
- click on the “Send” button located at the top right corner of the window to send the request to the specified URL with the JSON payload data.
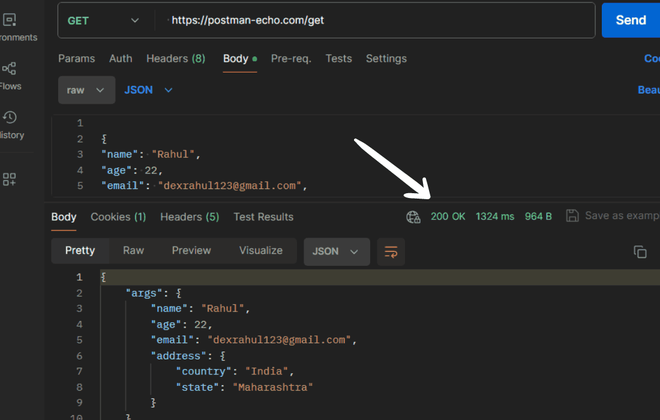
Verify the Request:
- After sending the request, examine the response received from the server. Check the status of the response to ensure it aligns with your expectations. Review the content of the response to confirm that it contains the data you were expecting.
Share your thoughts in the comments
Please Login to comment...