How to Handle file upload in Node with Multer and Postman
Last Updated :
26 Dec, 2023
In this article, we will discuss about file upload functionality using Node, Multer and Postman. File Uploading is a significant functionality of any web service to get the data from the users in the form of files.
To implement this feature we will use Node JS with Express and Multer library. Finally, we will use the Postman API platform to test the REST endpoint for file uploading.
Prerequisites
The following tools should be installed in your system to follow along with this article, incase you don’t have it already installed use the given links (node, postman) to download and install it in your system. Make sure you are using the same version of the tools mentioned.
Approach to handle file upload in Node
Let’s discuss our approach for implementing the file upload functionality in Node.js.
- Create a basic node application using the node package manager.
- Add the express.js and multer dependency to the project.
- Create a `/upload` endpoint in the api and use the post method to accept file inputs.
- Create a multer instance by importing the multer library and configure the storage location, file size limit, file type, etc.
- Pass the multer instance to the `upload` route as a middleware to parse every request before sending the response.
- Run the server and test the REST endpoint using the Postman API tool.
- Open your Postman tool and enter your localhost URL.
- To send the files set the body type as `form-data` and attach the file.
- Hit the send button to upload the file from postman to the node.js api and finally verify whether the files have been saved in the backend.
Project Structure:
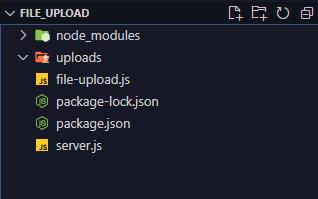
project structure
Handling File Upload in Node JS
Follow the step by step procedure to handle file upload in node, create a folder to store the project files and open that folder in VS Code or any of your preferred Text Editor. The entire workflow has been divided into three major process,
- Create a basic express application with Node.js
- Set up the file upload REST endpoint and configure the multer library to save the files to the disk.
- Test the file upload REST endpoint using the Postman API tool.
Steps to create Basic Express Application
Step 1: Create a basic node application with the below npm command.
npm init -y
`-y` flag is used to say yes to all of the details asked by npm, if you need to change any option, answer it manually by omitting the flag in the command.
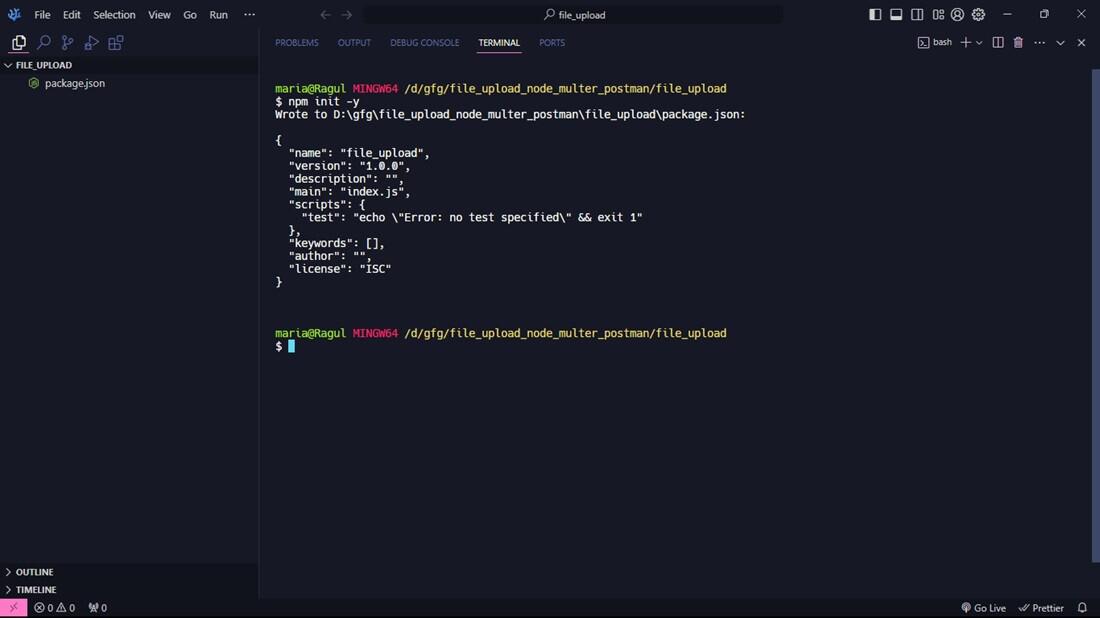
init node app
Step 2:
- Install the express.js and multer dependency using the npm install command.
- The dependencies will be installed under a folder called node_modules under the current directory.
npm install --save express multer
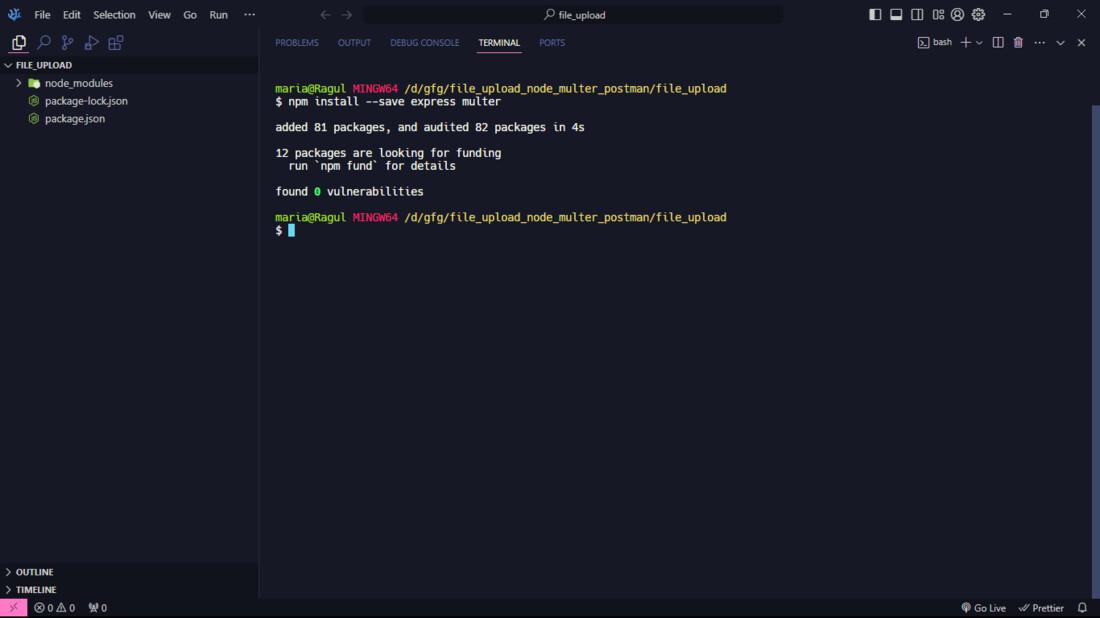
installing dependencies
- –save option is used to add these libraries in the package.json file as a dependency for running the application.
Step 3: Create a file named server.js under the same directory to host the express server. Add the below code to bootstrap the server for giving a hello message on hitting the “/” endpoint
Javascript
const express = require("express");
const app = express();
const PORT = 8080;
app.get("/", (req, res) => {
res.send("Hello from Express!");
});
app.listen(8080, () => {
console.log(`server is started and
listening at port: ${PORT}`);
});
|
A simple get method is added to the “/” path to check whether the app is starting fine and responding back to the request.
Step 4: Start the server and test the initial greeting message in Postman, to start the server use the below command.
npm start
Step 5:
- Once the server is started, open Postman and create a new HTTP request using the `New` button located after My Workspace in the screen.
- Enter your server url in the address bar of the request and select the HTTP method for the request, here => http://localhost:8080/ and GET method.
- Click the send button to send the request to the server.
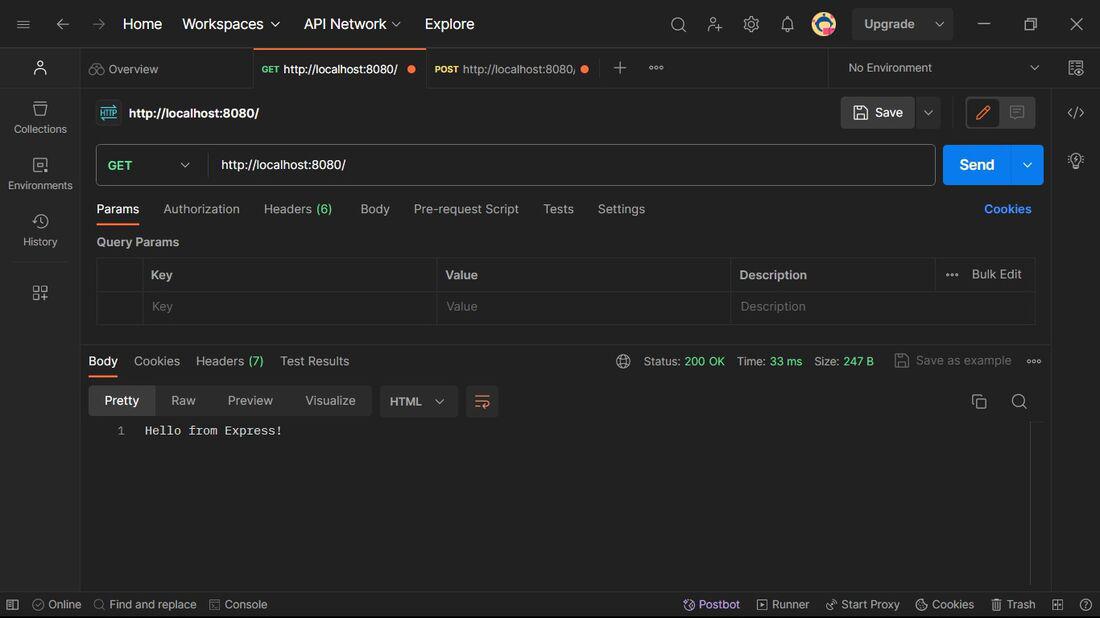
initial hello ouput
- Once the request has been sent, the server will respond with plain text saying “Hello from Express!”.
- You can find the response from the server in the below area of the request under the Body tab.
Adding File Upload functionality with Multer
Step 6: Create a file named file-upload.js in the current directory to store the file upload handling functions and Multer configuration.
Javascript
const multer = require("multer");
const path = require("node:path");
const storageConfig = multer.diskStorage({
destination: path.join(__dirname, "uploads"),
filename: (req, file, res) => {
res(null, Date.now() + "-" + file.originalname);
},
});
const fileFilterConfig = function(req, file, cb) {
if (file.mimetype === "image/jpeg"
|| file.mimetype === "image/png") {
cb(null, true);
} else {
cb(null, false);
}
};
const upload = multer({
storage: storageConfig,
limits: {
fileSize: 1024 * 1024 * 5
},
fileFilter: fileFilterConfig,
});
module.exports = upload;
|
Explanation of the above code:
- A multer object is created as “upload” and exported from the module, in the multer object storage, limits, fileFilter options are used to configure the multer object.
- Storage option is for configuring the process of storing the file, like the destination folder, file name to use for the uploaded files.
- destination: uploads, a folder is created inside the project directory to store the uploaded files.
- filename: Current time in milliseconds is fetched with Date.now() and prepended to avoid conflict of file names.
- FileFilter option is used to filter out files, call the cb() with true to pass the file, here we are filtering out files which are not images.
Step 7: Import the upload function in the server.js to use in the “/upload” REST endpoint.
Javascript
const express = require("express");
const app = express();
const PORT = 8080;
app.get("/", (req, res) => {
res.send("Hello from Express!");
});
app.post("/upload", upload.single("file"), (req, res) => {
if (!req.file) {
res.status(413).send(`File not uploaded!, Please
attach jpeg file under 5 MB`);
return;
}
res.status(201).send("Files uploaded successfully");
});
app.listen(8080, () => {
console.log(`server is started and
listening at port: ${PORT}`);
});
|
Explanation of the above code:
- Here we have created a post request and passed the upload object’s single function as a middleware to handle the file storing.
- upload.single(“file”) is used to accept a single file input and store it under the destination folder, where “file” is the name of the FORM-DATA attachment, this should match when we send the request.
- Once, multer has handled the request, the file will be stored under req.file. For simple error handling we will check the req.file, if it is undefined we will intimate the client about this client error with a error message.
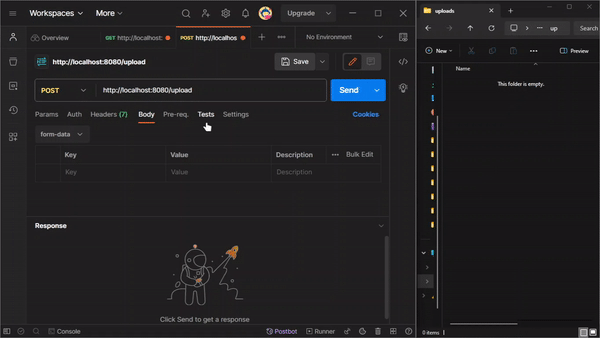
Testing File Upload with Postman
Step 8:
- Start the server and enter the “http://localhost:8080/upload” endpoint and use the POST method.
- Add the file under BODY tab, use the “FORM-DATA” encoding for the body and send the request.
Output:
final output
Share your thoughts in the comments
Please Login to comment...