FastAPI – Templates
Last Updated :
03 Apr, 2024
FastAPI is a modern web framework that is relatively fast and used for building APIs with Python 3.7+ based on standard Python type hints. In this article, we will delve deeper into learning how to integrate HTML templates and CSS style sheets with our FastAPI.
Integrate Templates with FastAPI
FastAPI, unlike Flask and Django doesn’t provide its own HTML rendering templates. However, we can integrate the templates engine very seamlessly and it’s very straightforward. The two most popular template rendering libraries are Jinja and Mako. We are going to use the Jinja template engine for our FastAPI as it’s a common choice.
Step 1: Installing Jinja library.
pip install Jinja2
Step 2: Create a ‘templates‘ and ‘static’ directory.
Create a directory named templates in your project. This is where your HTML templates will reside.
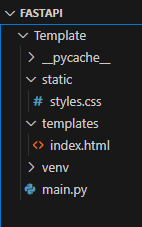
file structure
Step 3: Using Jinja2 template engine to create FastAPI.
We will create our FastAPI in .py file. We can use any name for the file here we are going with “main.py”.
This FastAPI code sets up a web application that serves static files, uses Jinja2 templates for rendering HTML pages, and responds to the root URL (“/”) with an HTML page that displays the message “Hello, World!”
Python3
from fastapi import FastAPI, Request
from fastapi.responses import HTMLResponse
from fastapi.staticfiles import StaticFiles
from fastapi.templating import Jinja2Templates

app = FastAPI()
app.mount("/static", StaticFiles(directory="static"), name="static")
templates = Jinja2Templates(directory="templates")
@app.get("/", response_class=HTMLResponse)
async def read_root(request: Request):
    return templates.TemplateResponse("index.html", {"request": request, "message": "Hello, World!"})
Step 4: Creating a HTML Template
We can write our HTML templates in templates/hello.html. Here we are creating the HTML template for FastAPI.
HTML
<!DOCTYPE html>
<html lang="en">
<head>
    <meta charset="UTF-8">
    <title>FastAPI Template</title>
</head>
<body>
      <h1>Gekks for Geeks</h1>
    <h1>{{ message }}</h1>
</body>
</html>
Step 5: Run the FastAPI Application.
uvicorn main:app --reload
Visit http://localhost:8000 in your browser, and you should see “Hello, World!” displayed on the page.

Output
FastAPI Templates with Static Files
We can now integrate Static files that is include CSS style sheets. For this we have to make little changes in HTML templates as shown below. We will use url_for() function for integrating static files.
HTML
<!DOCTYPE html>
<html lang="en">
<head>
    <meta charset="UTF-8">
    <title>FastAPI Template</title>
      <link href="{{ url_for('static', path='/styles.css') }}" rel="stylesheet">
</head>
<body>
      <h1>Geeks for Geeks </h1>
    <h1>{{ message }}</h1>
</body>
</html>
In this example, it would link to a CSS file at static/styles.css with:
CSS
Run the FastAPI Application.
uvicorn main:app --reload
Visit http://localhost:8000 in your browser, and you should see “Hello, World!” displayed on the page.
Output

Output
If-else Statements in FastAPI Templates
Integration of If-else condition with our Jinja template is very straight forward. To add an “if-else” statement to your main.py file, we can include it in our jinja template (index.html) and pass the necessary variables from our FastAPI route.
Step 1: Update main.py
Python3
from fastapi import FastAPI, Request
from fastapi.responses import HTMLResponse
from fastapi.staticfiles import StaticFiles
from fastapi.templating import Jinja2Templates

app = FastAPI()

app.mount("/static", StaticFiles(directory="static"), name="static")

templates = Jinja2Templates(directory="templates")

@app.get("/", response_class=HTMLResponse)
async def read_root(request: Request):
    message = "Hello"
    return templates.TemplateResponse("index.html", {"request": request,
                                                     "message": message})
In this code, we’ve added a message variable in the “read_root” route. Depending on its value, the if-else block in the Jinja template will render different content.
Step 2: Including if-else condition
HTML
<!DOCTYPE html>
<html lang="en">
<head>
    <meta charset="UTF-8">
    <meta name="viewport" content="width=device-width, initial-scale=1.0">
    <title>FastAPI Template Example</title>
    <link rel="stylesheet" href="/static/style.css"> <!-- Link to your CSS file -->
</head>
<body>

{% if message == "Hello" %}
    <p>Welcome to the FastAPI application!</p>
{% else %}
    <p>Message: {{ message }}</p>
{% endif %}

</body>
</html>
In this example, we’ve added an if-else block that checks if the message variable is equal to “Hello”. Depending on the condition, it will display different content.
Output:

Output from our template when message is “Hello”

Output from our template when message is “Hello World!!!”
Condition loop using Jinja Template in FastAPI
Integration of FOR condition in our jinja template is also a very seamlessness process
Step 1: Update main.py to send parameters that has to be iterated
Python3
from fastapi import FastAPI, Request
from fastapi.responses import HTMLResponse
from fastapi.staticfiles import StaticFiles
from fastapi.templating import Jinja2Templates

app = FastAPI()

app.mount("/static", StaticFiles(directory="static"), name="static")

templates = Jinja2Templates(directory="templates")

@app.get("/", response_class=HTMLResponse)
async def read_root(request: Request):
    message = "Hello World!!!!"
    return templates.TemplateResponse("index.html", {"request": request, "message": message})
Step 2: Add For statement in Jinja template
In this modified “index.html” file, we’ve added a for loop using “{% for i in range(5) %}” which will loop five times. In each iteration, it will print the value of the “message” variable.
HTML
<!DOCTYPE html>
<html lang="en">
<head>
    <meta charset="UTF-8">
    <meta name="viewport" content="width=device-width, initial-scale=1.0">
    <title>FastAPI Template Example</title>
    <link rel="stylesheet" href="/static/style.css"> <!-- Link to your CSS file -->
</head>
<body>

{% for i in range(5) %}
    <p>{{ message }}</p>
{% endfor %}

</body>
</html>
Output
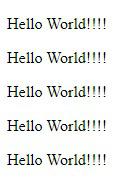
Output
Conclusion
In conclusion, this article provides a comprehensive guide on integrating HTML templates and CSS style sheets with FastAPI, a modern web framework for building APIs with Python. The tutorial covers the installation of the Jinja template engine, creating HTML templates, and incorporating static files such as CSS. Additionally, it demonstrates the straightforward integration of if-else statements and for loops in Jinja templates, enhancing the flexibility of FastAPI for dynamic content generation. The provided steps and examples make it accessible for developers to leverage these features seamlessly in their FastAPI applications, ultimately enhancing the overall web development experience.
Share your thoughts in the comments
Please Login to comment...