Explain AngularJS Scope Life-Cycle
Last Updated :
08 Feb, 2023
In AngularJS, The Scope acts as a merging parameter between the HTML and Javascript code, ie, it is the binding part between view and controller and it is a built-in object. It is available for both the view and the controller. It is used to define inside the controller, in order to define the member variables. It has variables that are the application data and methods.
Rootscope: It is a scope that is created on the HTML element which has the ng-app directive & is contained in all the applications. The availability of root scope is in the whole application.
The life cycle defines the journey of the application, which it goes through, right from creation to destruction. The lifecycle of AngularJs determines how the data interacts with AngularJS. Understanding the lifecycle enables the developer to more efficiently develop applications with greater code reusability and maintainability. During the lifecycle, all these components are monitored and governed by AngularJs itself. It allows the developers to maintain and update the components and code, while it goes through the creation to destruction phase.
In the flow of code in Javascript, the javascript callback will be executed for the corresponding event received by the browser. After that, when the callback gets completed, the DOM objects will be re-displayed by the browser. AngularJS remain unaware of the changes in the model if any javascript code, that is executed outside the context of AngularJS, by the browser. For this, AngularJS $apply API is used, in order to detect the model change.
Importance of Scope lifecycle:
- This lifecycle is used right from the creation to the destruction phase and thus makes it easier for the developer to create applications.
- Since it uses functions like $apply(), and $digest() it protects the application from any security mishap.
- Model mutation acts as a boon for developers in Angular as it monitors the code as well as updates and reflects the changes made.
- Whenever any child scope is not required, it is destroyed which lowers the load on the server as well as the chunk of memory allocated to the scope is made free.
- It is used to merge and combine view and controller.
AngularJS Scope Lifecycle: The lifecycle of scope in AngularJS is as follows:
- Creation: During this phase, the scope is initialized, and the $injector is used to create the rootscope (a scope that can be used inside and outside the controller). This root scope is created while the app module is being loaded. Here the digest loop (a loop responsible to update DOM elements ) is created to interact with the browser. This digest loop is responsible to detect any change in the code, the scope of the digest loop is limited to that specific controller itself. The main function of the digest loop is to merge/combine the changes made outside/inside the model. The digest loop makes sure that the front-end and javascript go hand in hand and that is being synchronized. When triggered it can run from 2-1 times in a loop process. During this phase, few directories can create new childscopes. While creating different $scopes for different controllers and applications, one thing to be noted is one controller cannot access another controller and thus nested controllers should be used.
Example 1: This example describes the creation of the Scope Lifecycle in AngularJS.
HTML
<!DOCTYPE html>
<html>
<head>
<script src=
</script>
</head>
<body ng-app="myApp">
<h1>GeeksForGeeks </h1>
<h3>Explain AngularJS scope lifecycle </h3>
<p>RootScope's name is:</p>
<h1>{{name}}</h1>
<div ng-controller="myCtrl">
<p>Scope's name is:</p>
<h1>{{name}}</h1>
</div>
<script>
var app = angular.module('myApp', []);
app.run(function ($rootScope) {
$rootScope.name = 'Alex';
});
app.controller('myCtrl', function ($scope) {
$scope.name = "Chris";
});
</script>
</body>
</html>
|
Output:
- Watcher Registration: In this phase, registers are used to watch the values of the scope in any code template. This model can make necessary changes in the DOM elements. You can register your own watch using the $watch() command. It compares the new value with the older one and then generates the output. The main function is to monitor the variable and update any changes made in the variable. This compares the old and new values and updates the changes. Generally, this function is created and initiated by the application internally. This function is implemented through the means of controllers.
Syntax of watch():
$scope.$watch('expression', function (newvalue, oldvalue) {
    // Your Code
});
Example 2: This example describes the Watcher Registration in AngularJS.
HTML
<!DOCTYPE html>
<html>
<head>
<script src=
</script>
</head>
<body>
<h1> GeeksForGeeks </h1>
<h3> Explain AngularJS scope lifecycle </h3>
<div ng-app="watchApp"
ng-controller="watchCtrl">
Enter the text:
<input type="text"
ng-model="txtval" />
<br /><br />
<span style="color:Red">
No. of Times $watch() Function Fired: {{count}}
</div>
<script type="text/javascript">
var app = angular.module('watchApp', []);
app.controller('watchCtrl', function ($scope) {
$scope.count = -1;
$scope.$watch('txtval', function (newval, oldval) {
$scope.count = $scope.count + 1;
});
});
</script>
</body>
</html>
|
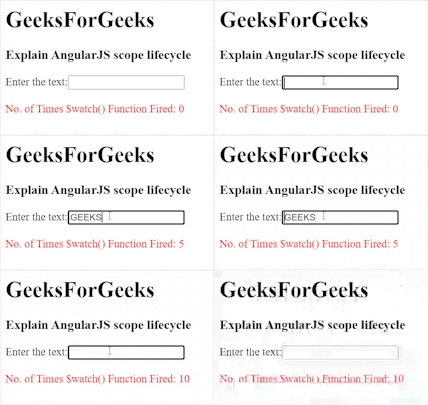
Output: From the output, we see no. of times changes are made in the text and thus how $watch monitors code and returns or generates the output.

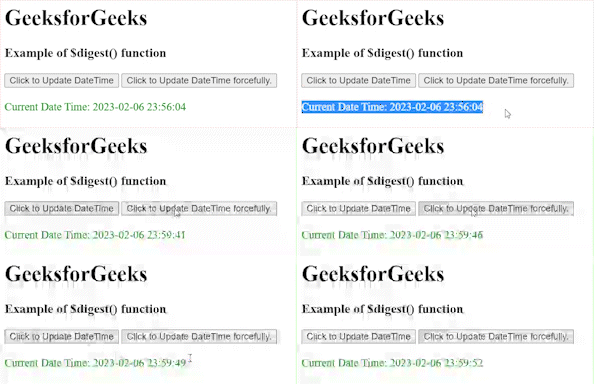
- Model Mutation: In this phase, the scope data changes, while these changes are being made $apply() scope function is used to modify the function and the $digest() function is used to update DOM elements and registered watches. The main function of the $digest() function in this phase is to observe the mutation in a proper manner. When the changes in the scope are done inside the code, for e.g. in services and controllers, angular internally calls the function $apply(), but when the changes in the scope are done outside the code, then the $apply() function is externally called to update DOM and model properly. The $apply function is used along with $digest in this phase. $apply is used to estimate the parameters and expressions which lie outside the scope. When any changes are made then the $apply updates all the variables and parameters. The main reason why $apply() is used & it can encounter an error while the code is still being executed.
Example 3: This example describes the Model Mutation in AngularJS.
HTML
<!DOCTYPE html>
<html>
<head>
<script src=
</script>
</head>
<body>
<div ng-app="digestApp"
ng-controller="digestCtrl">
<h1> GeeksforGeeks </h1>
<h3> Example of $digest() function </h3>
<input type="button"
value="Click to Update DateTime"
ng-click="updatedtime()" />
<input type="button"
value="Click to Update DateTime forcefully."
id="btndigest" />
<br /><br />
<span style="color : Green">
Current Date Time: {{currentDateTime | date:'yyyy-MM-dd HH:mm:ss'}}
</div>
<script type="text/javascript">
var app = angular.module('digestApp', []);
app.controller('digestCtrl', function ($scope) {
$scope.currentDateTime = new Date();
$scope.updatedtime = function () {
$scope.currentDateTime = new Date();
}
var event = document.getElementById("btndigest");
event.addEventListener('click', function () {
$scope.currentDateTime = new Date();
$scope.$digest();
});
});
</script>
</body>
</html>
|
Output:

- Mutation Observation: In this phase, the $digest function is executed to run all the watches for the change in the model. If there is a change in the code then the $digest() function calls the $watch listener function to update DOM elements. The $digest function is executed at the end of the $apply function. It is used to identify any changes made in the code and DOM elements. It is an in-built function within the framework. This phase plays the most important role while developing an application. For example, when you need to know that the user is shifting/jumping from one webpage to another. Also, it provides an advantage to the developer to undo any changes made while developing the code.
- Scope Destruction: In this phase, if the child scope is not required then it needs to be destroyed .$destroy() function is used to erase the scope from the browser. Destroying a child scope that is no longer in use releases the memory it has been utilizing, this is the responsibility of the childscope creator. Destroying unwanted child scope also lowers the chances of security theft and helps the application run faster and run more efficiently. The above procedure stops the functioning of $digest in child scope and thus the released memory can be claimed by the browser garbage collector.
Example 4: This example describes the Mutation Observation & Scope Destruction in AngularJS.
HTML
<!DOCTYPE html>
<html>
<head>
<script src=
</script>
</head>
<body ng-app="myApp">
<h1>GeeksForGeeks </h1>
<h3> AngularJS scope lifecycle </h3>
<div ng-controller='test'
ng-if="toggle">
<button ng-click='dispatch()'>
EVENT
</button>
</div>
<button ng-click='toggle = !toggle'>
Click to add / remove an event
</button>
<script>
var myApp = angular.module('myApp', []);
var startingDate = (new Date()).getTime();
myApp.controller('test', function ($scope) {
// Date controller was created
var controllerDate = (new Date()).getTime() - startingDate;
console.log('Controller created at ', controllerDate);
// Listener that logs controller date
$scope.$on('dispatched', function () {
console.log('listener created at:', controllerDate);
});
// Function to dispatch event
$scope.dispatch = function () {
$scope.$emit('dispatched');
};
$scope.$on('$destroy', function () {
console.log('Controller ', controllerDate, ' destroyed');
});
});
</script>
</body>
</html>
|
Output:
Share your thoughts in the comments
Please Login to comment...